Label Templates
Label templates let you design custom product labels that can be printed on your label printer. You control the label dimensions, which fields appear (name, price, SKU, barcode, THC/CBD, etc.), and how they are laid out. Once a template is created, you can print labels for individual products or in bulk.
Label printing is only available when Enable Label Printing is enabled in your store settings. Navigate to Settings > Edit Settings > Hardware & System tab and toggle on Enable Label Printing.
Accessing Label Templates
- Log in to the Admin Panel.
- Navigate to the Products page.
- Open the dropdown menu and click Label Templates.
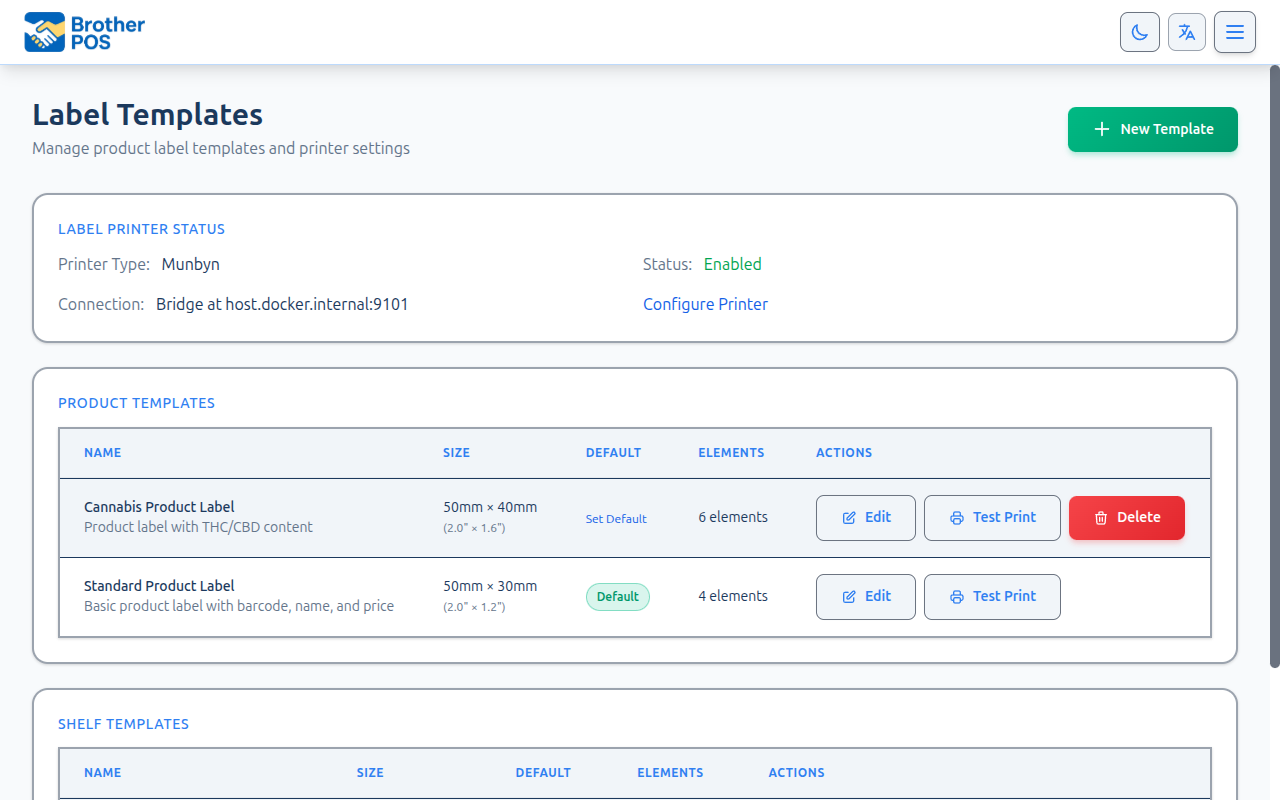
- The template list loads, showing all saved templates.
Understanding Label Templates
Each template defines:
- Physical dimensions -- Width and height of the label stock.
- Content fields -- Which data fields appear on the label.
- Layout -- How fields are positioned on the label.
- Barcode -- Type and placement of the barcode.
Creating a Label Template
- Click New Template.
- Fill in the template settings:
Template Name
A descriptive name for this template.
- Required: Yes
- Example: "Standard Shelf Label", "Cannabis Jar Label", "Price Tag"
Label Dimensions
Set the physical size of your label stock:
- Width -- In millimeters (e.g.,
50). - Height -- In millimeters (e.g.,
25).
Measure your actual label stock with a ruler. Even small discrepancies (1-2mm) can cause text to be cut off or misaligned. Common sizes include 50x25mm, 60x40mm, and 100x50mm.
Safe Margin
Each template has a Safe margin (mm) setting (default 1mm, range 0-10mm). The margin defines a keep-clear border around the label edge:
- Position clamping -- When labels are generated, every element's X/Y anchor is clamped so it can never land inside the margin zone. A template designed for a larger label still produces a usable print on smaller stock instead of pushing content off the edge.
- Text wrap width -- Long text auto-wraps inside a block that is, by default,
label_width - 2 * safe_margin_mmwide. You can override this per element with an optional Wrap width (see below).
Thermal printers cannot reliably print to the very edge of the label, and barcode scanners need a clear "quiet zone" around a barcode. A 1mm safe margin keeps content inside the printable area and gives barcodes room to scan.
Content Configuration
The template content defines which elements appear on the label and how they are arranged. For each element, you can configure:
- Element type -- Text or barcode.
- Data field -- Which product information to display (e.g., product name, SKU, price, THC/CBD, strain type, weight, category, or brand).
- Position -- Where the element appears on the label (horizontal and vertical placement).
- Font size -- Size of the text for this element. Each element can have its own font size, so you can make the price larger than the SKU, for example.
- Alignment -- Left, center, or right alignment. Choosing an alignment in the editor now snaps the element's X position to the matching edge (left snaps to the left safe margin, center to the label center, right flush against the right safe margin), then redraws the property card so the new X is visible.
- Bold -- Whether the text is displayed in bold.
- Wrap width (text elements) -- Optional. Overrides the default wrap width for this element so long text wraps within the width you set instead of the full label width. The on-screen canvas mirrors the printer's ZPL
^FBfield-block geometry, so the preview matches the physical print.
Behind the scenes, the renderer emits a ZPL ^FB (Field Block) command so long strings auto-wrap inside the label instead of overflowing the edge. The block width comes from the element's anchor, alignment, and optional Wrap width -- falling back to label_width - 2 * safe_margin_mm. This fixes long product names (for example, "1.5 g Rocket Pops Premium Indoor Hybrid Prerolls") that used to run off a 2"x1" label.
Barcode Settings
If you enabled the barcode field:
- Barcode Type -- Choose from Code 128 (recommended), EAN-13, or QR Code.
- Barcode Data -- Select what the barcode encodes: SKU (default) or a custom field.
- Barcode Position -- Top, bottom, left, or right of the label.
- Barcode Size -- Small, medium, or large relative to the label.
The editor now estimates Code 128 barcode width accurately, accounting for the ZPL module width (^BY2 = 2 dots per module) and the fact that Set C packs two digits per code position for all-numeric data. As a result the canvas preview and right-edge alignment match what the printer actually emits, instead of overshooting for alphanumeric SKUs or undershooting for purely numeric codes.
- Click Save Template.
Previewing a Template
After saving, you can preview how the label will look:
- Open the template.
- Click Preview.
- A sample label renders using data from a random product in your catalog.
- Verify that all fields fit within the label boundaries and text is legible.
The Print Preview now visually shows the label edge: a dark outline plus a checkered "off-label" background and width/height labels at the edges, so it is easy to see when an element runs past the physical label.
Always test print 1-2 labels on your actual printer before running a large batch. Screen previews may not perfectly match physical output due to printer DPI differences.
Editing a Template
- Click the template name in the list.
- Modify any settings.
- Click Save Template.
Editing a template does not reprint any previously printed labels. Only future print jobs use the updated template.
Editor Visual Aids
The drag-and-drop editor canvas includes guides that help you keep labels printable and scannable:
- Margin guide -- A faint dashed line marks the safe margin. Dragging an element snaps it to stay inside the margin.
- Scan-risk (quiet-zone) warning -- A red warning appears when any barcode's 2.5mm quiet zone overlaps the safe margin or runs off the label edge. An overlapping quiet zone is the single most common cause of unscannable thermal labels; move the barcode inward or reduce surrounding content to clear the warning.
If a template fails validation on save (for example, a duplicate template name), the form re-renders in place with a "Please fix the following errors" block at the top describing what went wrong. Previously the Save button could spin indefinitely with no feedback.
Deleting a Template
- Open the template.
- Click Delete Template.
- Confirm.
Default templates cannot be deleted. Non-default templates can be deleted regardless of count.
Auto-Generated Product Barcodes
When a product is created without a barcode, Brother POS auto-generates one as an 8-digit numeric code. Code 128 encodes pure numeric data two digits per code position (Set C), so an 8-digit barcode prints at roughly 14mm wide on a 203 DPI thermal printer -- narrow enough to fit a 2"x1" label with proper quiet zones. (The previous format was a longer alphanumeric POS... string that printed about 42mm wide.)
Only newly created products get the shorter 8-digit code. Products that already have a barcode keep it.
Customer Card (Loyalty Card) Templates
In addition to product, shelf, and custom labels, you can create customer card templates for printing loyalty cards. Customer card templates now appear alongside the other template types in the label templates index.
The editor applies smart, template-aware field defaults for customer card templates:
- Adding a text element seeds the field to customer name (not the product
namefield, which does not exist on customers). - Switching an element's type to barcode auto-selects customer code (the scan-lookup value) unless you have already chosen loyalty card number.
- Switching back to text restores a valid customer field.
Available customer fields include store name, customer name, customer code, and loyalty card number.
If no customer card template has been configured yet, Brother POS still prints a sensible default loyalty card so you can print cards before designing a template.
Setting a Default Template
- On the template list page, click the star icon next to the template you want as default.
- The default template is used when printing labels from the product list or POS register unless you explicitly select a different one.
Printing Labels
Single Product Label
- Navigate to Products and find the product.
- Click the actions menu (three-dot icon) on the product row.
- Click Print Label.
- Select the template (or use the default).
- Enter the number of copies.
- Click Print.
Bulk Label Printing
- Navigate to Products.
- Select multiple products using checkboxes.
- Click Bulk Actions > Print Labels.
- Select the template.
- Enter copies per product (or set individual quantities).
- Click Print.
From the POS Register
If label printing is enabled, budtenders can print labels directly:
- On the POS, find the product.
- Long-press (or right-click) the product tile.
- Select Print Label.
- The label prints using the default template.
Printer Configuration
Label templates work with multiple printer types: Zebra (ZPL), Munbyn (TSPL), Dymo, Brother, and Generic (ESC/POS). The printer type is set when you configure the label printer on the Printers page (see Label Printers).
Network Printer
- Navigate to Settings > Edit Settings > Hardware & System tab, then find the label printer settings.
- Enter the printer's IP address and port (default: 9100).
- Click Test Connection.
- Print a test label to verify.
USB Printer via Printer Bridge
If your label printer is connected via USB:
- Ensure the Printer Bridge is running.
- The bridge listens on port 9101 for label print jobs.
- Configure the label printer IP as your Printer Bridge host and port 9101.
Most stores use two printers: a receipt printer (port 9100) and a label printer (port 9101). The Printer Bridge handles both simultaneously.
Cannabis-Specific Labels
For cannabis products, labels often need to include regulatory information:
- THC/CBD percentages -- Required in many jurisdictions.
- Health warnings -- Use the Custom Text field to add mandatory warning text.
- Lot/batch number -- If tracked, include the SKU field which can be set to the lot number.
- Weight -- Required for products sold by weight.
Check your provincial and federal regulations for cannabis labeling requirements. Brother POS provides the tools to include required information, but compliance is your responsibility.
Best Practices
- Create templates for different use cases -- A small shelf label, a larger jar label, and a price tag template cover most needs.
- Include barcodes -- Barcodes enable fast scanning at the POS. Always include them if space allows.
- Test with your actual printer -- DPI, margin, and alignment vary by printer. Test before printing hundreds of labels.
- Keep a stock of label rolls -- Running out of labels during a busy relabeling session is frustrating. Keep spares on hand.
- Update labels after price changes -- When you change prices, reprint affected labels. Mismatched shelf labels and POS prices cause customer confusion.
- Use large font for price -- Customers look at price first. Make it the most prominent field on the label.
What's Next?
- Managing Products -- Access label printing from the product list.
- Menu Board -- Display products on a digital menu screen.
- Creating Products -- Set up products with proper SKUs for barcode labels.