User Management
The Users page in the admin panel is where you manage every person who accesses Brother POS -- from cashiers who ring up sales to managers who run the floor. You can create new accounts, edit existing ones, assign roles, set store access, and deactivate users who no longer need access.
Accessing User Management
- Log in to the Admin Panel with an Admin account.
- Navigate to Users (accessible from the Settings page).
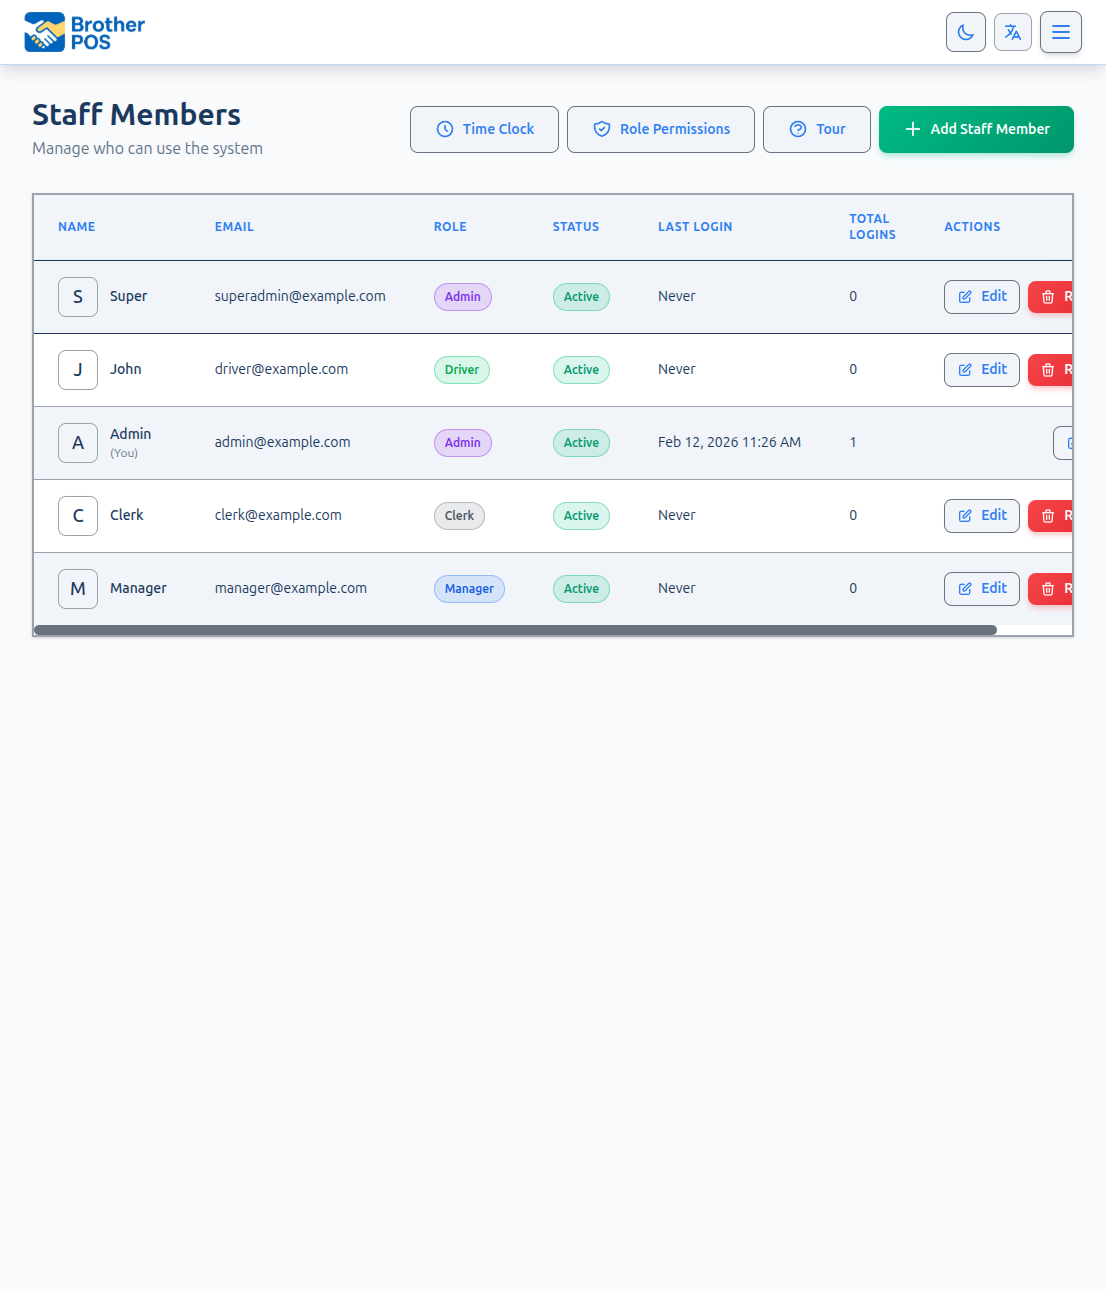
The user list displays all accounts in your store.
Only admins can access the Users page. Managers cannot view, create, edit, or manage user accounts. This protects against unauthorized access changes.
Understanding the Users Table
| Column | Description |
|---|---|
| Name | Full name of the user. Click to open the edit page. |
| Login email address for the admin panel. | |
| Role | The user's assigned role (Admin, Manager, Clerk, Driver). |
| Status | Active or Deactivated. |
| Last Login | Date and time of the user's most recent login. |
| Total Logins | Number of times the user has logged in. |
| Actions | Edit and Remove buttons for managing the user. |
Creating a New User
Step-by-Step
- Click the New User button at the top of the users list.
- Fill in the required fields:
| Field | Required | Description |
|---|---|---|
| First Name | Yes | User's first name. |
| Last Name | Yes | User's last name. |
| Yes | Must be unique. Used for admin panel login. | |
| Password | Yes | Minimum 8 characters. The user can change this after first login. |
| Role | Yes | Select from Admin, Manager, or Clerk. (Driver is not in this dropdown — see Adding Drivers below.) |
| Phone | No | User's phone number. |
| PIN | No | 4-digit PIN for POS register login. Can be set now or later. |
| Hourly Rate | No | The user's hourly pay rate (used for time tracking if enabled). |
- Click Create User.
After Creation
- The user account is immediately active.
- If you set a PIN, the user can log in to the POS register right away.
- Share the email, password, and PIN with the new user securely. Do not send credentials via unencrypted channels.
Create the account with a simple temporary password and tell the user to change it on their first login. Brother POS does not currently send automatic welcome emails.
Editing a User
- Click the user's name in the users table.
- The edit page opens with all current information.
- Update any fields as needed:
- Name -- Correct a misspelling or legal name change.
- Email -- Change the login email. The user must use the new email on their next login.
- Role -- Change the user's role. Permissions update immediately.
- PIN -- Set a new PIN or clear the existing one.
- Click Save Changes.
When you change a user's role, their permissions update immediately across both the admin panel and the POS register. If they are currently logged in, they will see the updated permissions on their next action or page load.
Changing a User's Password
To change a user's password, edit their account and enter a new password in the Password field. Leave the password field blank to keep the current password unchanged. Communicate the new password to the user securely.
The user should change this password after logging in. Navigate to their profile by clicking their name in the top-right corner of the admin panel.
Deactivating a User
When an employee leaves or no longer needs access, there are two ways to deactivate them:
- From the edit form: Open the user's edit page, uncheck the Active checkbox, and click Save Changes.
- From the user list: Click the Remove button next to the user on the users list. This sets the user's active status to false (it does not delete the user).
What Happens When You Deactivate
- The user can no longer log in to the admin panel or the POS register.
- Their PIN is disabled and will not work at the POS.
- All their historical data (sales, sessions, audit trail entries) is preserved.
- The user's name still appears in reports and order history for accountability.
Brother POS does not support user deletion. Deactivation is the correct way to remove access. This preserves the audit trail and ensures historical records remain accurate. Deactivated users do not count against any license limits.
Reactivating a User
If a deactivated user needs access again:
- Open the user's edit page.
- Check the Active checkbox.
- Click Save Changes.
- The user can log in again immediately with their existing credentials.
Role Assignment
Each user must have exactly one role. The role determines what the user can access:
| Role | Admin Panel | POS Register | Primary Use |
|---|---|---|---|
| Admin | Full access | Yes | System configuration, user management, all features |
| Manager | Most features | Yes | Day-to-day operations, reports, inventory, cash management |
| Clerk | No access | Yes | Sales processing at the register |
| Driver | No access | Driver PWA | Delivery management on mobile |
For a detailed breakdown of what each role can do, see Roles & Permissions.
Choosing the Right Role
- New cashier? Assign the Clerk role. They only need POS access.
- Shift supervisor? Assign the Manager role. They need to open/close drawers, handle returns, and view reports.
- Store owner or IT admin? Assign the Admin role. They need full system access.
- Delivery staff? Add them as a Driver from the Drivers section, not the standard user form. They only need the mobile delivery app.
Keep the number of Admin accounts to a minimum. Every admin has full access to user management, system settings, and sensitive data. Most daily operations can be handled with Manager accounts.
Adding Drivers
The Driver role is no longer offered in the standard user create/edit dropdown. This prevents accidental driver assignments in stores that do not use delivery. Drivers are managed in their own section and onboarded through the Driver PWA.
- From the Users page, click Drivers (or go to the Drivers section in the admin panel).
- The Drivers page lists existing drivers and provides their setup actions.
- Use Show QR to display a setup QR code / code that the driver scans with the Driver PWA to activate their device. Use Reset Access to revoke and reissue access.
Users who already have the Driver role keep it. Only the ability to newly assign the Driver role from the standard user form was removed.
User List Display
The users page displays all active users sorted by last name. There are no search or filter controls.
Common Workflows
Onboarding a new cashier
- Click New User.
- Enter the cashier's name and email.
- Set a temporary password.
- Set the role to Clerk.
- Set a 4-digit PIN for POS login.
- Click Create User.
- Share the PIN with the cashier. They will use it to log in at the register.
Promoting a cashier to manager
- Open the cashier's user profile.
- Change the Role from Clerk to Manager.
- Click Save Changes.
- The user now has access to the admin panel and can open/close drawers, process returns, and view reports.
Offboarding an employee
- Open the employee's user profile.
- Uncheck the Active checkbox (or click Remove from the user list).
- Save changes.
- The employee immediately loses access to all Brother POS interfaces.
Troubleshooting
| Problem | Solution |
|---|---|
| User cannot log in to the admin panel | Verify their email and password are correct. Check that they are not deactivated. Clerks and Drivers do not have admin panel access. |
| User cannot log in to the POS | Check that their PIN is set and correct. Verify the user is active. |
| "Email already taken" error | Each email must be unique across all users. If a previous user had this email, find and change the deactivated user's email first. |
| User does not see expected features | Check their role. Clerks have no admin access. Managers have limited access. See Roles & Permissions. |
| Cannot find a deactivated user | The users page only shows active users by default. Contact Brother POS support for assistance locating deactivated accounts. |
What's Next?
- Roles & Permissions -- Understand the granular permission system and customize per-role access.
- PIN Setup -- Learn about setting, resetting, and securing POS PINs.