Roles & Permissions
Brother POS uses a role-based access control system with granular, customizable permissions. Each user is assigned a role that determines what they can see and do across both the admin panel and the POS register. Admins can further customize permissions per role and per store.
Built-In Roles
Brother POS comes with four built-in roles. Each role has a default set of permissions that covers the most common use case for that role.
Admin
Full, unrestricted access to every feature in Brother POS.
- Complete admin panel access
- Full POS register access
- User management (create, edit, deactivate)
- System settings and configuration
- Integration management (WooCommerce, B2B)
- All reports and analytics
- Cash management oversight
- Compliance and regulatory features
Manager
Operational access for day-to-day store management.
- Admin panel access (most sections)
- Full POS register access
- Product and inventory management
- Cash drawer open/close, drops, payouts
- Returns processing
- Sales reports and analytics
- Customer management and loyalty
- Delivery management
Not included by default:
- User management (create/edit/deactivate)
- System settings
- Integration configuration
- License management
Clerk
POS-only access for processing sales.
- POS register access
- Product browsing and search
- Cart management and sales processing
- Customer lookup (read-only)
- Receipt printing
- Cash drawer session open/close
- Apply discounts
- Void sales
- Process returns
Not included by default (but configurable via the permissions page):
- Admin panel access
- Any management or reporting features
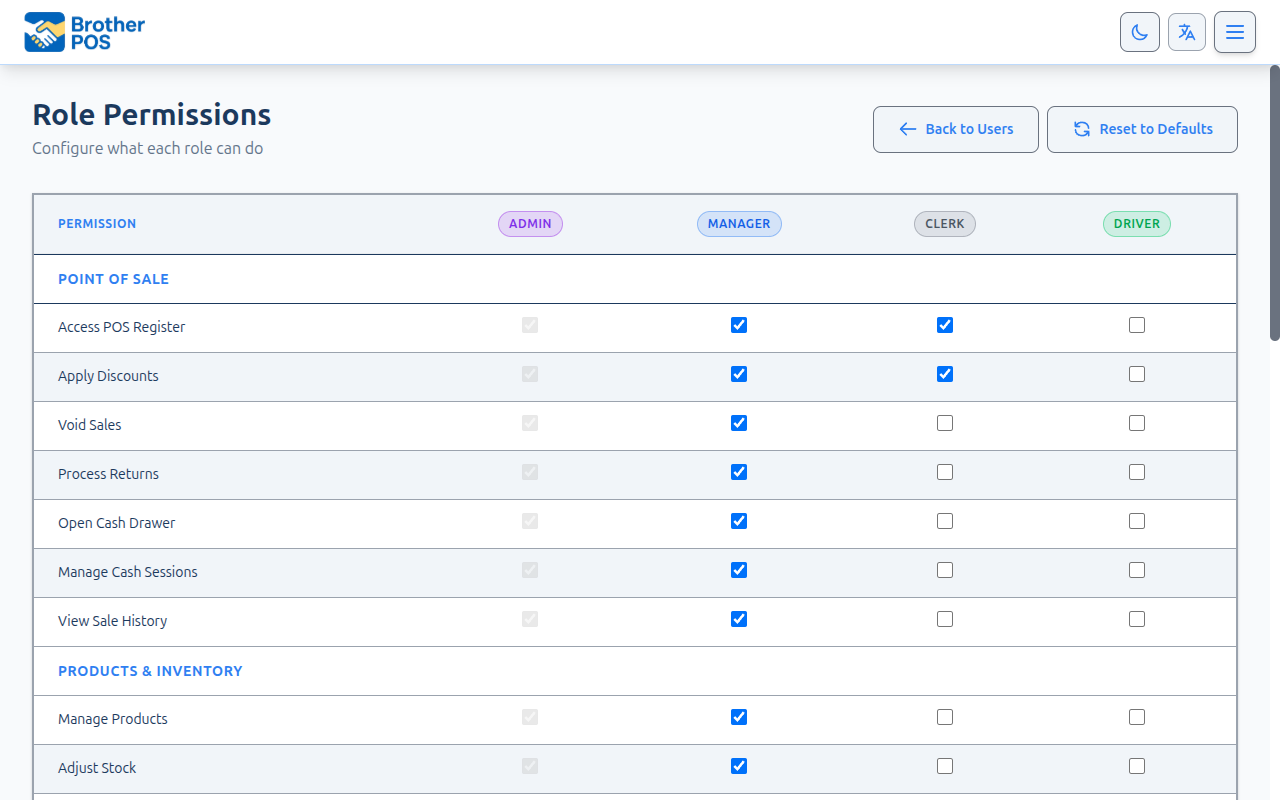
Newly provisioned stores grant clerks a broader default permission set out of the box — including apply discounts, void sales, process returns, and manage cash sessions — so clerks can run the counter without a manager-PIN dance. The audit trail records who voided or returned each item. Stores provisioned before this change keep the more conservative defaults (POS access plus cash session management) until an admin enables the additional permissions. You can adjust any of these on the Role Permissions page at any time.
Driver
Mobile delivery app access only.
- Driver PWA access
- View assigned deliveries
- Update delivery status
- Confirm drop-offs
Not included by default:
- POS register access
- Admin panel access
- Any management features
The Driver role is no longer selectable in the standard user create/edit dropdown. Drivers are onboarded through the Drivers section and the Driver PWA QR setup flow instead. See User Management for details.
Permission Categories
Permissions are organized into categories that map to the major features of Brother POS. These categories and individual permissions are what appear on the role permissions configuration page.
Point of Sale
| Permission | Description |
|---|---|
| access_pos | Access the POS register interface |
| apply_discounts | Apply manual discounts to orders |
| void_sales | Cancel completed transactions |
| process_returns | Issue refunds for returned items |
| open_cash_drawer | Open the cash drawer manually |
| manage_cash_sessions | Open and close cash drawer sessions |
| view_sale_history | Browse past sales |
Products & Inventory
| Permission | Description |
|---|---|
| manage_products | Create, edit, and delete products |
| adjust_stock | Manually adjust inventory levels |
| manage_categories | Create and edit categories |
| import_export | Import and export product data |
| manage_labels | Print and manage product labels |
| manage_suppliers | Manage supplier records |
| manage_stock_transfers | Transfer stock between stores |
Reports
| Permission | Description |
|---|---|
| view_reports | Access sales and operational reports |
| view_financial_data | See cost, margin, and profit data |
Orders & Fulfillment
| Permission | Description |
|---|---|
| manage_orders | View and manage orders |
| manage_deliveries | Manage delivery orders and drivers |
| manage_kitchen | Access the Kitchen Display System |
Promotions & Loyalty
| Permission | Description |
|---|---|
| manage_campaigns | Create and manage sale campaigns and freebies |
| manage_loyalty | Configure loyalty programs, tiers, and rewards |
Customizing Permissions
Admins can customize the default permissions for any role to match their store's specific needs.
Step-by-Step
- Go to the Users page.
- Click the Role Permissions button (this links to a separate permissions page).
- Select the role you want to customize.
- You will see all permission categories with toggles for each permission.
- Enable or disable individual permissions as needed.
- Click Save Changes.
Examples of Common Customizations
Allow clerks to process returns without a manager override:
- Select the Clerk role.
- Under Point of Sale, enable process_returns.
- Save.
Prevent managers from applying discounts:
- Select the Manager role.
- Under Point of Sale, disable apply_discounts.
- Save.
Allow clerks to view sale history:
- Select the Clerk role.
- Under Point of Sale, enable view_sale_history.
- Save.
After customizing permissions, test the changes by logging in as a user with that role. Verify they can access what they need and are blocked from what they should not access.
Manager Override (PIN Override)
Some actions that clerks cannot perform directly can be unlocked with a manager override. When a clerk attempts a restricted action (like applying a discount), the POS prompts for a manager or admin PIN. Once a valid PIN is entered, the action proceeds.
Actions that support manager override:
- Applying manual discounts
- Processing returns (if not granted directly)
- Voiding a sale
- Opening the cash drawer manually
There is an important distinction: a permission allows the user to perform the action independently. A manager override means the user can only perform the action when a manager physically enters their PIN. Use overrides when you want clerks to perform an action only under supervision.
How Permissions Are Stored
Permissions are stored per-role on the Store model, not per-user-per-store. This means all users with the same role within a store share the same permission set. To give different permission levels, assign users to different roles.
Permission Caching
Permissions are cached for fast lookup. When you update a role's permissions:
- The server-side cache is busted immediately when role permissions change, so the next request rebuilds the permission set from the saved values.
- Logged-in POS clerks refresh automatically. The POS runs a periodic full sync in the background; on the next sync it picks up the current user's updated permissions and role and applies them reactively — gates like the discount modal, void button, and returns flow start working without the clerk signing out and back in.
- Admin-panel users see the updated permissions on their next page load.
The cache has a 1-hour TTL (time to live). Even without manual changes, permissions refresh at least once per hour.
Because the server cache is busted on save and the POS auto-refreshes on its next sync tick, you no longer need to ask staff to log out and back in after a permission change — it takes effect within one sync cycle.
Audit Trail
All permission changes are logged in the audit trail:
- Who changed the permissions (which admin)
- When the change was made
- What role was affected
- What specific permissions were enabled or disabled
View the audit trail from Reports > Audit Trail and filter by "Role" or "Permission" to find relevant entries.
Best Practices
- Start with defaults. The built-in roles cover most use cases. Only customize when you have a specific need.
- Principle of least privilege. Give users only the permissions they need to do their job. Do not grant extra access "just in case."
- Use manager overrides for supervised actions. This is better than giving clerks full permission for sensitive operations.
- Review permissions quarterly. As your store evolves, revisit your role configurations to ensure they still make sense.
- Document your customizations. Keep a record of any changes you make to default permissions so new admins understand the reasoning.
- Test after changes. Log in as a user with the affected role to verify the changes work as expected.
Troubleshooting
| Problem | Solution |
|---|---|
| User sees features they should not | Check their role and verify permissions are correctly configured. Clear browser cache if stale permissions persist. |
| Permission change not taking effect | The server cache is busted on save and the POS auto-refreshes on its next background sync. Give it one sync cycle; if it still does not update, have the user log out and back in to force an immediate refresh. |
| Cannot find the Role Permissions button | Only Admin users can access the Users page where this button is located. Managers do not have access to permission configuration. |
What's Next?
- User Management -- Create and manage user accounts.
- PIN Setup -- Configure POS login PINs for your staff.