Managing Products
Use this page to find a product in your catalog and change it.
Quick steps
- Click Products in the top menu.
- Type part of the name, SKU or barcode in the search box — or narrow the list with the category buttons and the brand, status and stock filters.
- Click Edit on the product's card.
- Pick the tab you need — Details, Pricing, Specials, Inventory and so on — and change the fields.
- Click Update Product. One click saves your changes on every tab.
The pencil icons on a product card let you change its name, price, stock, image, categories, brand or unit type right from the list.
Common questions
How do I stop selling a product without deleting it? Click More on its card and choose Deactivate, or open the product and click Deactivate at the top of its page. It disappears from the register but stays in your catalog. Click Activate to bring it back.
Why can't I delete a product? Delete only shows on products with no sales, stock adjustments, reservations or variations. Deactivate the others instead.
How do I take one product off a sale? Open it, go to the Specials tab, find the campaign and click Take off.
Update Product jumped to another tab instead of saving. A field on that tab needs fixing. It's highlighted — correct it and click Update Product again.
More detail: the product list, search and filters
The Products page is your central hub for viewing and managing every item in your catalog. From here you can search, filter, and take quick actions on individual products or groups of products, then open any product to edit it.
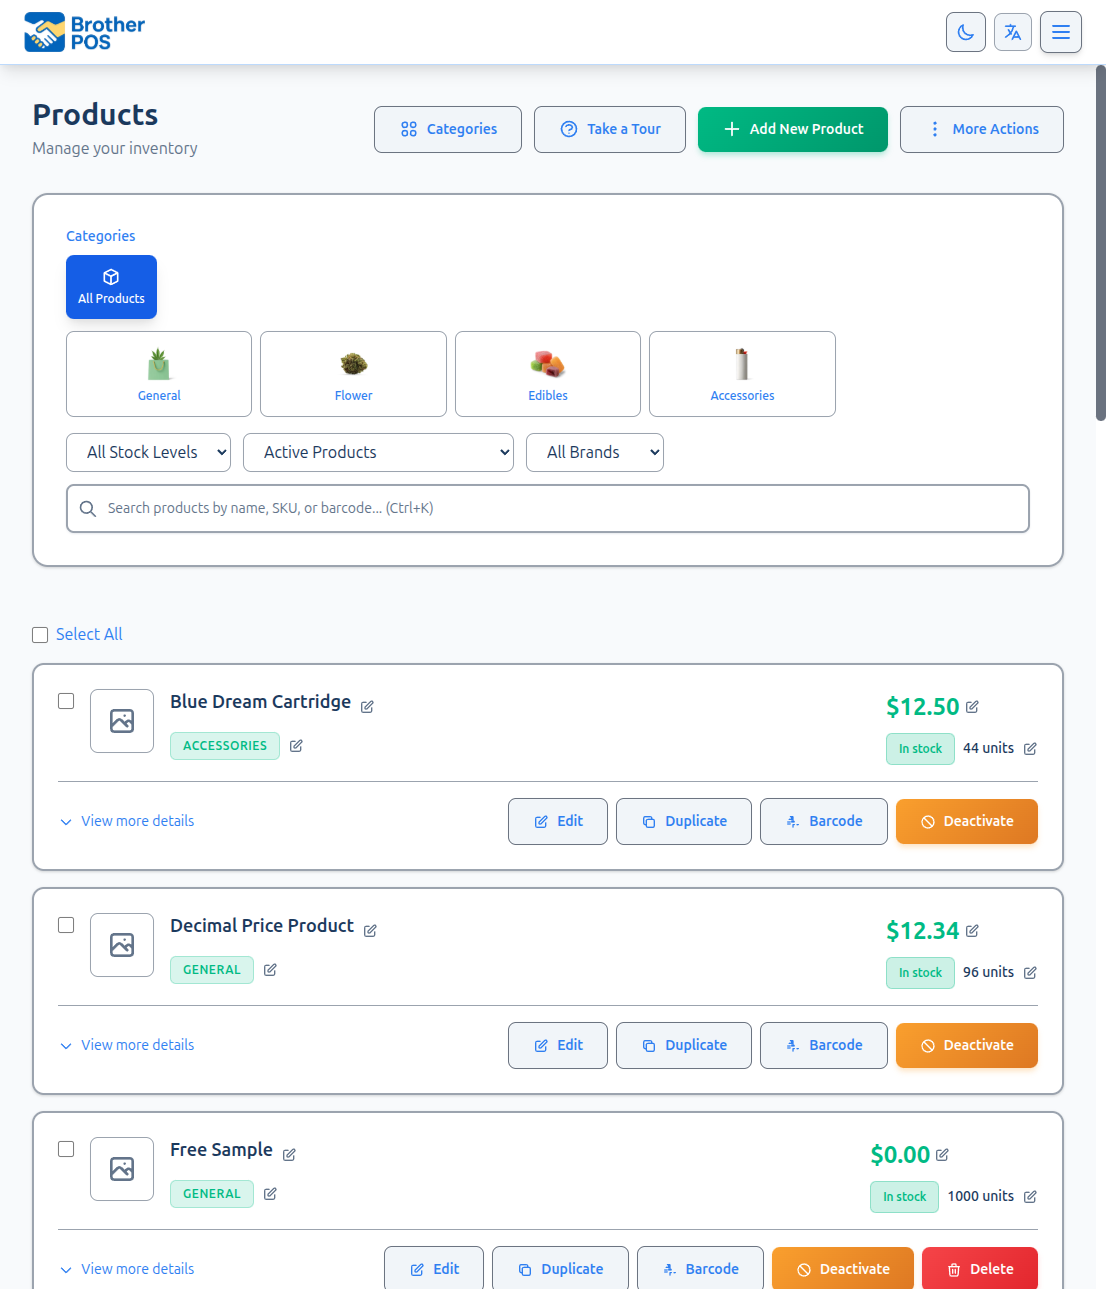
Accessing the Product List
- Log in to the Admin Panel.
- Click Products in the top navigation bar.
- The product list loads as a grid of product cards, 50 to a page. Active products come first, then inactive ones, until you filter by status.
Buttons at the top
| Button | What it does |
|---|---|
| Categories | Opens your category list. Shown to admins and to anyone whose role can manage categories. |
| Quick Add | A fast way to add a product. Shown when your store uses pricing templates. |
| Add New Product | Opens the new product wizard. See Creating Products. |
| Across stores | Shown when you run more than one store: every store's stock side by side. |
| More Actions | Everything else: Product Locations (admins, on stores that track stock by location), Take a Tour, the Strain Library (cannabis stores, admins and managers), exports and imports, Product Costs, Manage Brands, Sales Campaigns, Bulk Operations (admins), suppliers and purchase orders, label printing and, when your store uses them, modifier lists and menu boards. |
Understanding the Product List
Each card shows the product image, name, brand, categories, price and stock. Inactive products carry an Inactive — not sellable badge, and bundles, drinks and variable products are badged too.
Pencil icons on a card let you change the product's name, price, stock, image, categories, brand and unit type without opening the product.
Searching for Products
The search bar at the top of the product list finds products by:
- Name — type part of the product name (e.g., "Blue Dream").
- SKU — the full or partial SKU code.
- Barcode — scan or type a barcode value.
- Category — type a category name to find the products in it.
Press Ctrl+K to jump to the search box. Clear the search field to return to the full product list.
Filtering Products
Use the filter controls above the product grid to narrow your view.
By Category
Category buttons sit at the top of the filters, under Categories. Tap a category to show the products in it, including its subcategories. Subcategory buttons then appear so you can narrow further. Tap All Products to go back.
If your store has more than 12 main categories, the buttons start folded away to keep the page short. Click Categories (or Show all) to open them, and Hide to fold them again.
By Brand
Choose a brand from the brand dropdown. All Brands shows every brand.
By Status
| Option | Shows |
|---|---|
| Active Products | Products available for sale |
| Inactive Products | Products hidden from the POS but still in your catalog |
| All Products (Active + Inactive) | Both — this is the default |
| On Sale Only | Products whose sale Starts date has passed and whose Ends date, if any, hasn't |
On Sale Only only finds sales that were saved with a Starts date. A sale saved with Starts left blank is running, but it won't show up under this filter.
By Stock Level
| Option | Shows |
|---|---|
| In Stock | Stock above the product's low stock threshold |
| Low Stock | Stock above zero, but at or below the threshold |
| Out of Stock | Stock of zero or less |
A product that is running low shows under Low Stock, not under In Stock.
By Location
If your store keeps stock in more than one place (for example Sales Floor, Back Stock and Vault), a location dropdown appears next to All Brands. Pick a location to see only the products that have stock there. Each product then shows how much is at that location, for example 1779 grams at Vault. A product with variations is listed when any of its variations has stock there.
Combining Filters
Filters stack together. For example, you can view all Active Products in the Edibles category from Brand X that are Low Stock. While any filter is on, a bar above the grid lists your filters and how many products match. Click Clear All Filters to reset them all at once.
Product Ordering
Active products are listed first, alphabetically by name, followed by inactive products, also alphabetically. Inactive products are never hidden unless you filter them out. There are no sortable column headers — the product list uses a card layout, not a table.
More detail: quick actions on a product card
Quick Actions
Each product card has an Edit button and a More button. The other actions are in the More menu. On an inactive product, an Activate button also sits next to Edit so you can switch it back on in one tap.
| Action | Where | Description |
|---|---|---|
| Edit | On the card | Opens the product page. |
| Sales | More menu | Opens the product's sale history. |
| Duplicate | More menu | After you confirm, creates a copy named "[product name] (Copy)" and opens it. The copy has its own new SKU and barcode, starts inactive with no stock, and doesn't take the original's extra barcodes or weight-label barcodes. Enter its stock and switch it on when it's ready. |
| Barcode | More menu | Opens the label printing window. Only shown when label printing is turned on for your store. |
| Deactivate | More menu | Hides the product from the POS. A deactivated product can't be rung up by scanning its barcode either — the register says it is deactivated and can't be sold. |
| Activate | On the card (inactive products only) | Makes the product available again. |
| Delete | More menu | Deletes the product after you confirm. Only shown for products with no sales history, stock adjustments, stock reservations or variations — otherwise the menu says it can't be deleted and to deactivate it instead. Deactivate and Delete are also at the top of the product's own page. |
Deleting removes the product from the product list and the register. Delete is only offered for products that have never been sold, so no sales history is lost. The confirmation says the action cannot be undone — there is no Restore button in the admin. (Re-importing the product's SKU with CSV Import can bring a deleted product back.)
Products with sales history, stock adjustments, stock reservations or variations don't show a Delete button at all. Use Deactivate to take those off the register instead.
More detail: the product page and its tabs
The Product Page
Click a product to open its page. The page is titled with the product's name, and its buttons (such as Sale History) sit together at the top right. Fields are grouped into tabs across the top so you can find them quickly. All tabs belong to one form — change fields on any number of tabs, then click Update Product once to save them all.
| Tab | What's on it |
|---|---|
| Details | Name, Product Type (Simple, Variable, Variation or Bundle), categories, brand, description, SKU and barcode, named options and barcode aliases, images, and whether the product is available for sale |
| Pricing | Price, weight pricing and bulk / multi-buy pricing |
| Specials | The product's own sale discount, promotion exclusions, and every sale campaign in the store |
| Inventory | Stock, reorder settings, reservations, low stock alert, checking stock in and out with what it cost and, if your store tracks locations, stock by location |
| Options | Modifier lists, kitchen routing and bundle / combo setup |
| Variations | The product's variations |
| Cannabis | Strain, THC/CBD and other cannabis details, plus compliance and tax fields |
| History | Who changed what on this product, and when |
| Advanced | Settings such as resale analysis, auto-printing a label after sale, and WooCommerce stock sync |
Some tabs only appear when they have something in them:
- Options appears when your store uses modifiers, kitchen tickets, bundles or bar drinks.
- Cannabis appears when cannabis features are on. A store without cannabis features that uses split tax, compliance reporting or additional tax sees the same tab named Compliance.
- Advanced appears when one of its settings applies to your store.
- Variations isn't shown when the product is itself a variation. On a product with no variations, it explains that you set Product Type to Variable on the Details tab to add some. Once a Variable product is saved, the tab shows an Add the first variation button.
Buttons at the top of the page open the product's Sale History. Weight products also get Reweigh (called Shake / Reweigh in cannabis stores). When your store uses units of measure, products set up as bottles, mixed drinks or with unit-of-measure levels get a Units of Measure button (Bottle & Pours on a bottle).
Product Type
On the Details tab, Product Type decides what kind of product this is:
| Type | Meaning |
|---|---|
| Simple Product | A standalone product with no variations |
| Variable Product | A parent that has variations, such as flavours or sizes |
| Product Variation | A variation of another product — choose its parent and give it a variation name |
| Bundle | Sold as one item, built from other products. Stock comes out of each component. See Bundles, Combos & Buckets. |
On a product you've already saved, Product Type is a single line saying what the product is (for example Simple Product), with Change beside it. Click Change to see the choices. A product that already has variations shows them instead, and its type can't be changed while variations exist. If bundles are turned off for your store, Bundle is shown greyed out with a note saying so.
Categories
The category list on the Details tab scrolls. Above it, a Selected: line lists the categories the product is in right now (for example Selected: Buds, $112 oz), so you don't have to scroll to check. It updates as you tick and untick.
More detail: the Specials tab
Specials Tab
The Specials tab answers "is this product on a special, and which one?" without opening every campaign.
Sale Discount
A temporary markdown on this one product.
| Field | What it does |
|---|---|
| Discount Type | No Sale, Percentage Off, or Dollar Amount Off |
| Discount Value | e.g., 20 for 20% off |
| Apply When Qty ≥ | Leave blank for every unit; 2 or more for "Buy N" deals |
| Sale Reason | Optional label, e.g., "Clearance" |
| Starts (optional) | Leave blank to start as soon as it is saved |
| Ends (optional) | Leave blank and it runs until you turn it off |
Below the fields, the tab tells you where the sale stands:
- Scheduled — starts [date]. Not on sale yet.
- Active Sale: with the discount and reason.
- Ended [date] — back at its regular price.
To end a sale early, set Discount Type back to No Sale and save.
Promotion Exclusions
- Exclude from automatic promotions — no sale campaigns, BOGO, freebies or loyalty bonuses ever apply to this product, and storefront promo codes skip it as well.
- Also block manual discounts at the register — clerks can't apply a line-item discount to it on the POS.
Campaigns
At the top of the list, a banner shows what applies right now:
- ON SALE — 1 special applies right now (or the number of specials that apply). Only the single best automatic promotion is ever applied at the register, so specials don't add up on top of each other.
- No special is applying to this product right now.
- If the product is excluded from automatic promotions, the banner says so, and nothing on the list applies.
Every campaign in the store is listed with its type, discount and what it targets. Each one shows where this product stands:
| Shows | Button | What it means |
|---|---|---|
| On this special | Take off | The campaign reaches this product. Take off removes just this product from just this campaign — it stays on your other specials. |
| Taken off | Put back on | You took the product off this campaign earlier. |
| — | Add to this special | A campaign that lists specific products, which doesn't include this one yet. |
| Not targeted — change the campaign to include it | — | A category or brand campaign that doesn't cover this product. Edit the campaign itself to widen it. |
Taking a parent product off a campaign takes all of its variations off too. On a variation, that shows as Taken off with [parent] — change it there, linking to the parent.
Click All campaigns to go to the full campaign list. See Sale Campaigns.
More detail: the Inventory and History tabs, and pagination
Inventory Tab
The Inventory tab holds everything about how much of this product you have, and what it is worth.
- Current Stock, the Low Stock Alert level and the Reorder Point — see Low Stock Alerts. If you leave Current Stock as it was, saving the product doesn't touch stock, even if some sold while the page was open. If you change it, the difference you typed is applied on top of anything sold in the meantime.
- Check in / check out — record a delivery with the price you paid, or take stock out with a reason such as Damaged or Store use / sample. Across the top it shows On hand, the cost per unit (per gram on products sold by weight) and Value at cost; underneath, the recent check-ins and check-outs with the cost and value of each. A price you enter when checking stock in is averaged into the product's cost.
- Check in asks where the stock went (Into), on stores that track stock by location. It lists each location with what it holds now, and starts on where deliveries usually land: the back room, or the sales floor if there's no back room.
- Inventory by location — on stores that split stock between a Sales Floor and Back Stock: the split, a Counted box with Set for each location, Move to floor (a one-tap way to bring back stock forward), and a Move stock panel. In Move stock, pick From and To (each location shows what it holds), enter a Quantity and click Move. It starts on moving from the back room to the floor.
The check in and check out forms need the Adjust Stock permission, and aren't shown on bundles or on products with variations. Full details in Stock Adjustments.
History Tab
The History tab lists the 25 most recent changes to the product:
| Column | Shows |
|---|---|
| When | Date and time of the change |
| Who | The staff member who made it |
| What | The kind of change, such as Create or Update |
| Changed | Each field that changed, from its old value to its new one — e.g., Price |
Brands, categories and similar links show their names rather than codes. A new product shows Product created. Older changes recorded before this detail was kept show detail not recorded.
For what the product has sold, click Sale History.
Pagination
The product list shows 50 products per page. Use the page controls above or below the grid to move between pages.
More detail: common workflows
Common Workflows
Finding a product to update its price
- Search by name or SKU.
- Click the product to open its page.
- Go to the Pricing tab, update the price and click Update Product.
You can also click the pencil beside the price on the product card.
Taking one product off a weekend special
- Open the product and go to the Specials tab.
- Find the campaign and click Take off.
The product keeps any other specials it's on.
Reviewing low stock items
- Set the stock level filter to Low Stock.
- Review the filtered products displayed in the grid.
- For each item, decide whether to reorder (create a purchase order) or adjust thresholds.
Deactivating seasonal products
- Tap the relevant category (e.g., "Holiday Specials").
- Select products using the checkboxes on each product card.
- When products are selected, a bar appears at the bottom of the screen with Deactivate Selected, Activate Selected, Delete Selected and Make Variations. Click Deactivate Selected to hide the selected products from the POS.
See Bulk Operations for more on these actions.
More detail: troubleshooting
Troubleshooting
| Problem | Solution |
|---|---|
| Update Product jumps to another tab instead of saving | A field on that tab has a value the form won't accept. The page opens that tab and highlights the field — fix it and save again. |
| A tab I expected isn't there | Options, Cannabis and Advanced only appear when your store uses a feature that puts something on them. |
| A new product is on sale at a price I didn't set | A running special targets its category or brand. On the Specials tab, click Take off for that campaign, or tick Exclude from automatic promotions. |
| A product on sale doesn't show under On Sale Only | Its sale was saved without a Starts date. The sale still runs; the filter just doesn't find it. |
| I deleted a product by mistake | There is no Restore button. Re-importing its SKU with CSV Import can bring it back. |
What's Next?
- Creating Products — Add a new product to your catalog.
- Bundles, Combos & Buckets — Sell several products as one item.
- Bulk Operations — Make changes to multiple products at once.
- Categories & Brands — Organize your catalog with categories and brands.
- Stock Adjustments — Correct stock quantities manually.