Creating Products
Use this page to add a new product so it can be sold at the register.
Quick steps
- Click Products in the top menu, then click Add New Product.
- Category: tick at least one category (and pick a brand if you like), then click Next.
- Pricing Model: pick how it is sold, such as Unit-Based then Single product, and click Next.
- Details: type the Product Name and the price before tax (for example Unit Price). Enter how many you have in Current Stock.
- If you see SKU and Barcode, leave them blank to have them made for you, or click in Barcode and scan the barcode printed on the package.
- Click Create Product. You land back on the product list with a message that it was saved.
Enter prices before tax. The register adds tax at the sale.
Common questions
Why won't the Next button work? A choice on that step is still missing. On step 1 tick at least one category; on step 2 pick a card and one of the options under it.
The product has sizes or flavours. What do I pick? On step 2 choose Unit-Based, then Multiple variations. The wizard adds a fourth step where each size or flavour gets its own price and stock. See Variations.
A green box says the product will join a special. Is that a problem? Only if you don't want it on sale. Specials that target a category or brand pick up new products automatically. Tick Keep this product out of every automatic special to stop that.
I have a lot of products to add. Is there a faster way? Yes. Import them from a spreadsheet with CSV Import, or duplicate a similar product from the product list and change the details.
More detail: the four steps, and step 1 (category and brand)
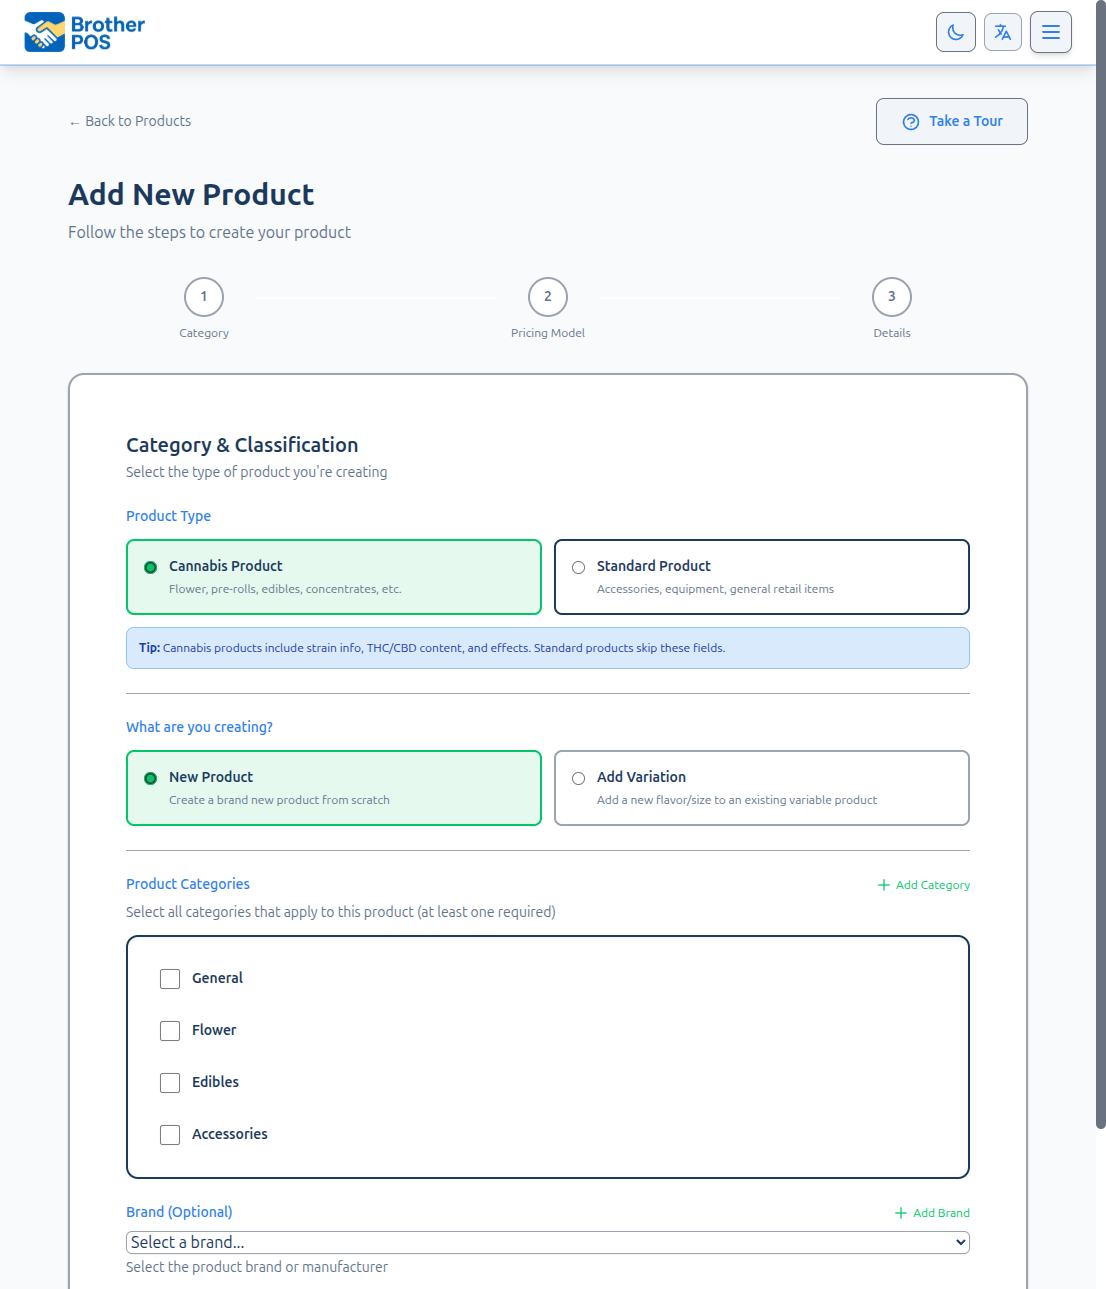
The Product Creation Wizard
The wizard has up to four steps, shown in a progress bar at the top:
- Category — What you are creating, its categories and brand.
- Pricing Model — How the product is sold (unit-based, weight-based, bundle, and so on).
- Details — Name, price, stock, sale discount and other details.
- Variations — Only used when you chose a product with multiple variations.
Use the Next and Previous buttons to move between steps. A step won't let you continue until its required choices are made. If the product doesn't need variations, step 3 shows Create Product instead of going on to step 4.
Step 1: Category
Cannabis or Standard Product
If your store has cannabis features enabled, first choose Cannabis Product (flower, pre-rolls, edibles, concentrates) or Standard Product (accessories, equipment, general retail). Cannabis products get strain, THC/CBD and effect fields on step 3.
What Are You Creating?
- New Product — a brand new product.
- Add Variation — a new flavour or size for an existing variable product. Choose the parent product, and the wizard skips straight to the variation step. Only products already set to Variable Product are listed.
Product Categories
Tick at least one category. Products can belong to several categories. Click Add Category to create a new one without leaving the wizard.
Ticking a subcategory also ticks its parent and locks it, so a product in "Sativa" is also in "Flower". Untick the subcategory to unlock the parent again.
See Categories & Brands for more on managing categories.
Pricing Template
If your store uses pricing templates (quality tiers), a Pricing Template (Optional) choice appears here once you tick a Flower or Concentrates category. Picking a template answers how the product is priced, so the wizard skips step 2. The weights and prices then come from the template and can't be changed on the product itself.
Brand
Choose a brand under Brand (Optional), or click Add Brand to create one.
More detail: step 2 (how the product is sold)
Step 2: Pricing Model
Choose how the product is sold. The cards you see depend on which features your store has turned on.
| Card | Use it for |
|---|---|
| Unit-Based | Items sold individually at a fixed price. You then choose Single product or Multiple variations (e.g., a vape cartridge in several flavours). |
| Weight-Based | Items sold by weight, such as flower or concentrates. You then choose Price Per Gram (one $/g rate, the customer picks any weight), or Pricing Template (set weights with set prices — only offered when your store uses pricing templates). |
| Bundle | One item made from other products — gift sets, starter kits, combos, platters, buckets. Shown when Product Bundles (or Bar Drinks) is turned on for your store. See Bundles, Combos & Buckets. |
| Fuel / Volume-Based | Price per litre or gallon — you then pick Litres (L) or Gallons (gal). Shown only when fuel pricing is on. |
Next won't work until you pick a card. For Unit-Based and Weight-Based, you also have to pick one of the options that appear under the card.
How the Product Is Measured
The wizard sets how the product is measured from the pricing model you picked on step 2. To change it later, open the product's Pricing tab and use Sold By:
- Individual Units (pre-packaged)
- Weight (sold by gram)
- Box, Case or Pack — you then enter how many units are in one
- Litre (L) and Gallon (gal), when fuel pricing is on
Distributor stores choose from Gram, Ounce, Pound and Kilogram instead of Weight.
More detail: step 3 (name, price, stock, cost and codes)
Step 3: Details
This step contains the core product fields. Some sections only appear when your store uses the feature they belong to.
Product Name
The display name shown on the POS register and in reports. Choose a clear, descriptive name that your cashiers will recognize.
- Required: Yes
- Example: "Blue Dream 3.5g"
Description
A text description of the product, up to 1,000 characters. It may be synced to your online store if you use the WooCommerce integration.
- Required: No
Price
The pre-tax selling price (Unit Price for a unit-based product). Tax is calculated automatically at the time of sale based on your store's tax configuration.
- Format: Decimal with two places (e.g.,
29.99)
For a Price Per Gram product you enter the Price Per Gram instead, plus an optional Minimum Weight and Maximum Weight. For a pricing-template product, the prices come from the template.
For a bundle, this is the Bundle Price — what the customer pays for the whole bundle. The bundle's components are added on this same step. See Bundles, Combos & Buckets.
Specials This Product Will Join
Sale campaigns usually target a category or a brand, so a new product can be on sale the moment it is saved. When that will happen, a green box on this step names each running special that will pick the product up, based on the categories and brand you chose on step 1.
If you don't want that, tick Keep this product out of every automatic special.
Modifiers (Optional)
If your store uses modifiers and has at least one modifier list, tick any lists the clerk should be asked for at the register — sauce, size, toppings. The lists themselves are managed under Products > More Actions > Modifier Lists.
Discounts & Bulk Pricing (Optional)
Sale Discount
A temporary markdown shown to customers as "on sale."
| Field | What to enter |
|---|---|
| Discount Type | No Sale, Percentage Off, or Dollar Amount Off |
| Discount Value | e.g., 20 for 20% off, or 5 for $5 off |
| Apply When Qty ≥ | Leave blank to discount every unit. Set 2 or more for "Buy N" deals. |
| Sale Reason | Optional label such as "Summer Sale" or "Clearance" |
| Starts (optional) | Leave blank to start as soon as the product is saved |
| Ends (optional) | Leave blank and the sale runs until you turn it off |
Setting Ends means you don't have to remember to switch the sale off. Once the end time passes, the product goes back to its regular price on its own.
Bulk / Multi-Buy Pricing
Tick Add bulk / multi-buy pricing to set a lower price when the customer buys a set quantity or more — for example, "Buy 3 for a total of $25." This isn't offered for weight-based products or bundles.
- Tick Add bulk / multi-buy pricing.
- Choose how the deal applies: every unit once the quantity is reached, or only complete packs.
- Click + Add tier, then enter the quantity and the total price for that quantity.
- Add more tiers for deeper discounts at higher counts if you want.
Bulk pricing is a permanent lower price at higher quantities. A sale discount is temporary. Don't use both at once. See Pricing Models.
Stock
Current Stock
The quantity currently on hand. When creating a new product, enter your starting stock count.
- Required: No (defaults to 0)
If your store tracks stock by location and has two or more locations, you enter the amount at each location instead, and the total is added up for you. The Sales Floor amount is what the register can sell.
Allow Negative Stock
Shown only when Show Negative Stock Option on Products is ticked under Settings, on the Products & Inventory tab, in the Stock Management section. Tick it to let this product keep selling when its stock reaches zero or below.
When that store setting is off, the box isn't shown and a new product can't be sold past zero — the register respects its stock count.
Low Stock Alert Threshold
The stock level at which the product counts as low on stock. When stock falls to or below this number, the product shows under Low Stock in the product list's stock filter.
- Required: No
- The wizard fills in 5, the same as a product added any other way (import, quick add). Change it to suit the product.
Cost
Your wholesale cost for this product, under Cost (optional). Used to calculate margins and inventory value in reports.
- Required: No (but recommended for margin reporting)
- Format: Decimal (e.g.,
18.50)
On a weight-based product, stock is counted in grams, so the field reads Cost per gram (optional) — what one gram costs you, not the whole bag. Type $850 for a pound and every gram is valued at $850.
To work it out, use the Paid for a batch? Work out the per-gram cost line under the field: enter what you paid and how many grams you got — for example $850 for 448 g — and the per-gram cost ($1.8973) is filled in for you. A pound is 448 g, a half pound 224 g, a quarter 112 g, an ounce 28 g.
If you have suppliers set up, you can also pick a Preferred supplier (optional).
Cost is entered and reported in the admin. It never appears on the POS register.
Product Codes
Shown when barcode scanning is turned on for your store.
- SKU (Optional) — a unique code for the product, used for scanning, inventory and CSV imports. Leave it blank and one is generated for you.
- Barcode (Optional) — leave it blank and one is generated for you.
A SKU must be unique among your store's current products. A deleted product's SKU and barcode can be reused on a new product.
If your store uses Units of Measure, a note here explains how to sell the same stock in more than one size — packs and cartons, singles and cases. Save the product first, then open it and choose Set up pallet / case / unit levels. See Unit of Measure Levels.
Every product and every variation must have a unique SKU. If you enter a duplicate SKU, the system will reject it. Plan your SKU scheme before bulk-adding products.
Product Image (Optional)
Upload an image file, enter an image URL, or scan the QR code to take a photo with your phone.
Batch Received Date
The date the current batch or bag was received. This is a freshness-tracking field, so you can see at a glance how long the current batch has been on hand.
- Required: No
- Where to find it: On the product page's Cannabis tab (called Compliance in stores without cannabis features), under Compliance & Tax. That section only appears when your store uses split tax, compliance reporting or additional tax.
- Format: Date picker. Update it each time you open a new batch of the same product.
More detail: step 4 (variations)
Step 4: Variations
Only shown when you chose Multiple variations on step 2, or Add Variation on step 1. Each variation gets its own SKU, price, and stock level. In a cannabis store each variation also has its own Size box. Leave it blank and the size is read from the variation's name (a variation named "3.5g" counts as 3.5 g).
- A variation left without a price sells at the base price you entered on step 3.
- If your store tracks stock by location and has two or more locations, Put the variations' stock on decides where their starting stock goes. It starts on the Sales Floor, which is what the register sells from; stock put anywhere else has to be moved to the floor before it can be sold.
See Variations.
More detail: cannabis details
Cannabis Attributes
These fields appear only if your store has cannabis features enabled and you chose Cannabis Product on step 1. They sit in a Cannabis Details box at the top of step 3, which starts closed. Click it to open it. Skip this section entirely if you run a non-cannabis retail store.
Size and Daily Limit
If your store enforces a daily purchase limit or has compliance reporting switched on, a Size and daily limit box sits above Cannabis Details. It decides how much one of this product counts toward a customer's daily limit.
| Field | What to enter |
|---|---|
| Size | The package size, such as 3.5g, 10 x 0.5g or 355 mL |
| Counts as | The kind of product: Flower, Pre-roll, Vape, Concentrate, Edible (solid), Drink, Oil, tincture or capsule, Topical, Accessory (not cannabis) and so on. It's filled in for you from the category you picked, when the category makes it clear. |
A line underneath shows the result as you type, for example Counts as 3.5 g toward the daily limit. For a product with variations, you add each size on the next step instead.
If you leave Size blank on a product sold by the unit, Brother POS tries to read it when you save, as long as it knows what kind of product it is (Counts as, or a category that makes it clear): from a size at the end of the product's name ("Blue Dream – 3.5g", "Gummies (10 x 1g)"), or from a variation named like a size ("3.5g", "Eighth", "1/8 oz"). A size you typed is never replaced. If it still can't tell, the product is saved with a message saying the daily limit will count each one at an estimate. Open the product and set its size or Equivalent Grams to count it exactly. See Compliance.
Strain Type (Optional)
Select the strain classification:
- Indica — Typically associated with relaxation.
- Sativa — Typically associated with energy and focus.
- Hybrid — A combination of Indica and Sativa genetics.
- CBD — High-CBD, low-THC varieties.
THC Content and CBD Content (Optional)
The THC and CBD potency, each with a unit beside it (% or mg).
- Format: Decimal (e.g.,
22.5or0.8) - THC and CBD are printed on receipts in cannabis stores.
Cannabis Profile
Tick any that apply. Each is a list of choices.
| Field | Examples |
|---|---|
| Terpenes | Myrcene, Limonene, Caryophyllene |
| Effects | Relaxed, Euphoric, Creative |
| Flavors | Berry, Citrus, Earthy |
| Medical Benefits | Pain, Stress, Insomnia |
The dominant terpene, effects (shown as Top Effects) and medical benefits (shown as Helps With) appear in the product's details on the POS register.
More detail: saving, common mistakes and adding many products
Saving the Product
- Review all fields for accuracy.
- Click Create Product.
After saving, you are taken back to the product list with a confirmation message. If the product has already been picked up by a running special, the message says so — naming the special when there are one or two, or giving a count when there are more — so you can check the product's Specials tab if that wasn't intended.
From the product list you can open the new product to:
- Edit details or add variations
- Take the product off a particular special on the Specials tab (see Managing Products)
- Upload images
- Print barcode labels (when label printing is turned on)
Common Mistakes to Avoid
| Mistake | Why It Matters |
|---|---|
| Duplicate SKU | The system rejects duplicate SKUs. Check existing products first, or leave SKU blank to have one generated. |
| Price entered with tax included | Prices must be pre-tax. Tax is added automatically at checkout. |
| Wrong category | Products in the wrong category are harder to find on the register, and category specials may pick them up. |
| Stock set to zero | If you have inventory on hand, enter it now to avoid a stock adjustment later. |
| Skipping cost | Without cost, margin reports will show incomplete data. |
| Ignoring the specials box | A new product can go straight onto a running special at a price you didn't intend. |
Creating Multiple Products Quickly
If you need to add many products at once, consider:
- CSV Import — Upload a spreadsheet of products. See CSV Import.
- Duplicate — From the product list, duplicate an existing similar product and modify the details. The copy starts inactive with no stock and its own new SKU and barcode, so enter its stock and switch it on when it's ready.
What's Next?
- Managing Products — The product page, its tabs, and the product list.
- Bundles, Combos & Buckets — Sell several products as one item.
- Variations — Add size, weight, or other variations to this product.
- Options & Barcode Aliases — Sell many flavours or scan many barcodes as one shared-stock product.
- Images — Upload product photos.
- CSV Import — Bulk-add products from a spreadsheet.