Time Tracking
Use this page to see when staff clocked in and out, fix mistakes on their time cards, and export timesheets for payroll.
Quick steps
- Turn it on once: Settings > Edit Settings > Operations, under Time Tracking Settings tick Enable Employee Time Tracking, click Update Settings.
- Staff clock in at the register: tap Time Clock, enter their PIN, tap Clock In (and Clock Out at the end).
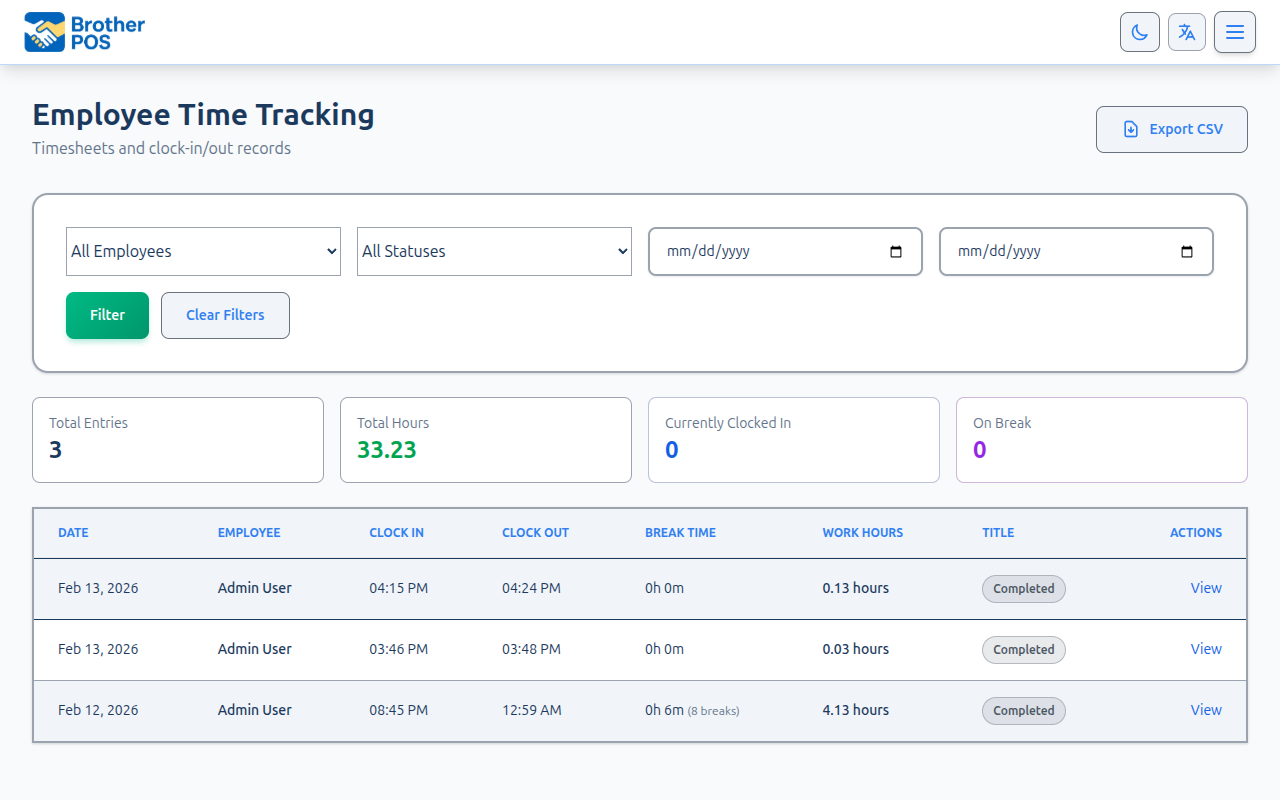
- In the admin, click Time Tracking in the top navigation to see every shift, newest first.
- To fix a time card, click View on the entry, then Edit. Change the Clock in or Clock out and click Save changes. For a forgotten clock-in, click Add Entry.
- For pay, click Payroll, or More Actions > Export CSV to download the timesheet.
Common questions
Someone forgot to clock out. Open the entry, click Edit, set the real clock-out time and save. Setting Auto clock-out after (hours) closes forgotten shifts automatically — but check those entries before payroll.
Can a manager fix their own time card? No. An admin has to change it.
Are breaks paid? Paid breaks count as work time. Unpaid breaks and lunch are taken off.
The time clock says Account locked. Try again later. Too many PIN tries came in at once. Wait a minute and try again.
Why is someone's gross pay $0.00 on payroll? They have no Hourly Rate. Set one under Settings > Manage Users.
More detail: time tracking settings — breaks, auto clock-out and overtime
Brother POS includes a built-in time tracking system for monitoring employee work hours. Employees clock in and out from the POS register, and managers can review and correct time records in the admin panel.
Time tracking is only available when it is switched on. Go to Settings > Edit Settings > Operations tab, find Time Tracking Settings, check Enable Employee Time Tracking, and click Update Settings.
Time Tracking Settings
The Time Tracking Settings section of the Operations tab has a few options that control how the clock behaves store-wide.
| Setting | What it does |
|---|---|
| Enable Shift Scheduling | Adds the weekly Shift Schedule for planning who works when, the Time Off page, and a Scheduling Reports card on the Reports page. It also puts See My Schedule and Request Time Off on the register time clock. |
| Break tracking | Which break buttons appear on the time clock. Choose Paid & unpaid breaks (the default), Unpaid breaks only, Paid breaks only, or No breaks (hides break buttons entirely). |
| Auto clock-out after (hours) | Automatically closes any shift left open past this many hours, so a forgotten clock-out records a sensible length instead of running indefinitely. 0 = off. A common value is 16. |
| Overtime after (hours per week) | Weekly hours above this number are paid at 1.5× on the Payroll Summary. Blank = off (straight time only). Overtime is worked out on the whole Monday-to-Sunday week, even when a pay period starts or ends mid-week, and the hours past the line are the week's last shifts. |
Configurable Break Tracking
Set Break tracking to match how your store handles breaks:
- Paid & unpaid breaks — the clock shows Unpaid Break, Paid Break and Lunch buttons.
- Unpaid breaks only — Unpaid Break and Lunch buttons.
- Paid breaks only — a Paid Break button.
- No breaks — no break buttons; staff clock in and out only.
This setting applies everywhere the clock appears, including the login-screen Time Clock on the POS.
Auto Clock-Out for Forgotten Punches
When Auto clock-out after (hours) is set above zero, an hourly check closes any shift that is still on the clock past that limit. The shift is recorded as exactly that many hours (clock-in time plus the limit), not the time until the check ran, so a forgotten punch does not bloat the timesheet.
Auto-closed entries:
- Have any open breaks ended automatically. A break that was only started after the limit falls outside the shift and is dropped.
- Get a clock-out note (e.g., "Auto clocked out after 16h (no manual clock-out)").
- Are logged to the Activity Logs as a warning so you can spot which shifts were closed by the system.
If you deactivate a staff member who is still clocked in — from Manage Users or from the owner portal — their shift is closed at the time you deactivate them (or at the auto clock-out limit, if that comes first), so the hours they worked are paid. The clock-out note reads "Clocked out when deactivated".
The auto clock-out keeps a forgotten shift from running forever, but the recorded length is a cap — not the employee's real hours. Review any auto-closed entry and amend the clock-out time to the employee's actual departure before running payroll.
More detail: how it works and reading the time records
How Time Tracking Works
- An employee clocks in at the start of their shift.
- The system records the clock-in time.
- The employee works their shift normally, starting and ending breaks on the clock as needed.
- At the end of the shift, the employee clocks out.
- The system records the clock-out time and calculates total hours.
Clock-in and clock-out events are tied to the employee's user account. Staff who work at your store but belong to another of the owner's stores appear on your timesheet and in your payroll for the hours they clocked here. The entry's detail page also shows the network (IP) address each punch came from, when one was recorded.
Accessing Time Records
- Log in to the Admin Panel.
- Click Time Tracking in the top navigation bar (or open Reports and click Employee Time Tracking).
- The time tracking page loads with the most recent shifts first, 50 per page.
Payroll and Add Entry are at the top of the page. More Actions holds Export CSV and, when shift scheduling is on, Shift Schedule.
Viewing Time Records
Time Record Table
| Column | Description |
|---|---|
| Date | The date of the shift. |
| Employee | Name of the employee. |
| Clock In | Time the employee clocked in. |
| Clock Out | Time the employee clocked out (a dash if still clocked in). |
| Break Time | Total break time, with the number of breaks when there was more than one. A dash (—) means no break. |
| Work Hours | Hours worked (decimal hours rounded to 2 decimal places). |
| Status | Clocked In or On Break. The column only appears while someone on the list is on the clock, and finished shifts leave it blank. |
| Actions | View opens the entry. |
Filtering Records
Use the filter controls in the row above the table, then click Filter. Once a filter is on, Clear Filters appears to reset it.
- Employee — Filter by a specific employee.
- Status — Active (Clocked In) or Completed.
- Start Date and End Date — Show shifts that started within a date range. Both dates are whole days in your store's time zone, so shifts on the end date are included.
Summary Cards
The top of the time tracking page shows four cards: Total Entries and Total Hours (finished shifts only) for the records matching your filters, and the number of employees Currently Clocked In and On Break right now. Individual employee names are not shown in the cards.
More detail: clocking in and out, scheduling and the PIN limit
Clocking In and Out
From the POS Register
- Tap Time Clock — on the POS login screen, or in the top bar once someone is signed in.
- Enter your PIN.
- Tap Clock In. When you are on the clock, the same screen offers Clock Out and your store's break buttons.
Managers and admins can also add, amend and delete time records from the admin panel (see below).
A clock-in can't be dated in the future, or more than 12 hours before it reaches Brother POS. A register that was offline sends its saved clock-ins with their real time when it reconnects; if that takes longer than 12 hours, the clock-in is recorded as 12 hours before it arrived, and a manager should correct it.
Scheduling and Time Off
Time tracking records what happened. If you also switch on Enable Shift Scheduling, you get the other half — the plan:
- Shift Scheduling — a week-at-a-glance grid of who works when, which prints as a PDF and emails each employee their own week. Reach it from More Actions → Shift Schedule on this Time Tracking page, or from More Actions on Settings > Manage Users.
- Time Off Requests — staff ask for days off at the register time clock with their PIN, and managers approve or decline on the Time Off page. Approved time off shows on the schedule and blocks shifts being booked over it.
The schedule never feeds payroll. What an employee is paid for comes from their clock-ins on this page and the Payroll Summary. Marking a shift No Show or Completed on the schedule changes nothing on their timesheet.
The Register Time Clock PIN Limit
The register time clock answers to a bare 4-digit PIN with no login, so the number of PIN attempts that can come from one internet connection is capped at 30 a minute. That is roomy for a real shift change and far too slow for anyone working through PIN combinations.
Staff who hit the limit see one of two messages, depending on what they were doing:
| What they were doing | Message |
|---|---|
| Entering a PIN on the time clock | Account locked. Try again later. |
| Clocking in or out, or starting or ending a break | Rate limit exceeded. Retry later. |
Both clear on their own within a minute — waiting is the fix, and no manager action is needed. The same Account locked. Try again later. message also appears when one person's account has been locked after too many failed sign-in attempts; that lock lifts by itself after 5 minutes. If it keeps happening to one employee rather than to a queue of them, check that they know their sign-in details. See PIN Setup.
The limit counts all PIN activity coming from your store's internet connection, not per person — registers on the same connection share it. If a whole shift punches in at once, the tail end of the queue can hit it. Staggering arrivals slightly avoids it.
More detail: editing, adding and deleting time cards
Amending Time Records
Managers and admins can correct time records directly from the admin time tracking page. This is essential for handling the everyday mistakes staff make while learning the clock — forgotten clock-ins, forgotten clock-outs, and wrong times.
Editing, adding, and deleting time records is restricted to managers and admins. Clerks cannot amend time records.
A manager can't add, edit or delete their own time card, because that would be changing their own pay. They see "Your own time card has to be changed by an admin." An admin (usually the owner) makes those corrections.
Edit a Time Card
- Click View on the time entry you want to correct.
- Click Edit.
- Adjust the Clock in, Clock out, Clock-in note and/or Clock-out note.
- Click Save changes. The total hours recalculate automatically from the new times.
Breaks are edited on the entry's page: the Breaks section lets you change a break's type, start time, end time and notes (Save), or Remove it. Use Add a break to log a break someone forgot. The work total recalculates. Every break change is recorded in the Activity Log, and, as with the time card itself, a manager can't change breaks on their own time card.
The corrected hours are the hours payroll uses. Fix a forgotten clock-out from 8 hours to 10, and the Payroll Summary and timesheet export pay 10. Log an unpaid break someone forgot, and it comes off their paid hours.
Leaving the clock-out time blank marks the entry as still on the clock (active).
Add a Time Card by Hand
If an employee forgot to clock in entirely, you can create the shift manually:
- Click Add Entry.
- Pick the Employee and enter the Clock in time (and Clock out time, if the shift is finished).
- Click Add entry. Leaving the clock-out blank leaves the employee on the clock.
Delete a Time Card
Open the entry with View, click Delete, and confirm.
Every manual add, edit, and delete is recorded in the Activity Logs with the manager's name, and changes to time entries also appear in the Audit Trail. A clock-out time that is not after the clock-in time is refused.
More detail: how hours are worked out, rates and exports
How Hours Are Calculated
| Item | How it counts |
|---|---|
| Total hours (paid time) | Gross shift duration minus non-paid breaks only. |
| Paid breaks | Counted as paid time — they are not deducted from total hours. |
| Unpaid / lunch breaks | Deducted from total hours. |
Paid breaks are compensated, so they are included in an employee's paid hours. Only unpaid and lunch breaks reduce the paid total. For example, an 8-hour shift with a 30-minute paid break and a 60-minute lunch yields 7.0 paid hours (8h minus the 1h lunch; the paid break is not deducted).
Setting Hourly Rates
Each employee has an hourly rate on their staff profile. The rate is what drives the Payroll Summary report (hours × rate = gross pay, with overtime at 1.5× if you have turned overtime on).
- Go to Settings and click Manage Users.
- Edit the employee.
- Enter their Hourly Rate and save.
Employees with no rate set show $0.00 gross pay on the Payroll Summary, and the report flags that rates are missing. Set a rate on every employee you pay hourly before relying on the payroll numbers.
Exporting Timesheets
Click More Actions → Export CSV on the time tracking page to download the records matching your current filters. The export includes date, employee, clock-in, clock-out, total hours, break time, work time, and status.
Active (still-clocked-in) entries are handled gracefully in the export — they show "Still clocked in" for the clock-out and use the time worked so far for the totals, so you can export a sheet even while employees are on the clock.
For a pay-period roll-up of hours and gross pay per employee, click Payroll to open the Payroll Summary report instead.
More detail: good habits
Best Practices
- Train employees on clock procedures — Ensure everyone knows how to clock in and out from the POS register.
- Review weekly — Check time records at least weekly to catch errors before payroll processing.
- Monitor the summary cards — Keep an eye on the Currently Clocked In and On Break counts to ensure shifts are tracked correctly.
What's Next?
- Shift Scheduling — Plan the week, print it, and email each employee their shifts.
- Time Off Requests — Approve, decline, add and cancel staff time off.
- Payroll Summary — Roll hours up into gross pay per employee for a pay period.
- Activity Logs — Track all user actions including clock events.
- Audit Trail — View change history on time records.
- Managing Products — Return to product management.