Tax Configuration
Use this page to set the tax your store charges — one combined rate (like HST), separate GST and PST, an extra tax such as a vapour products tax, or no tax at all.
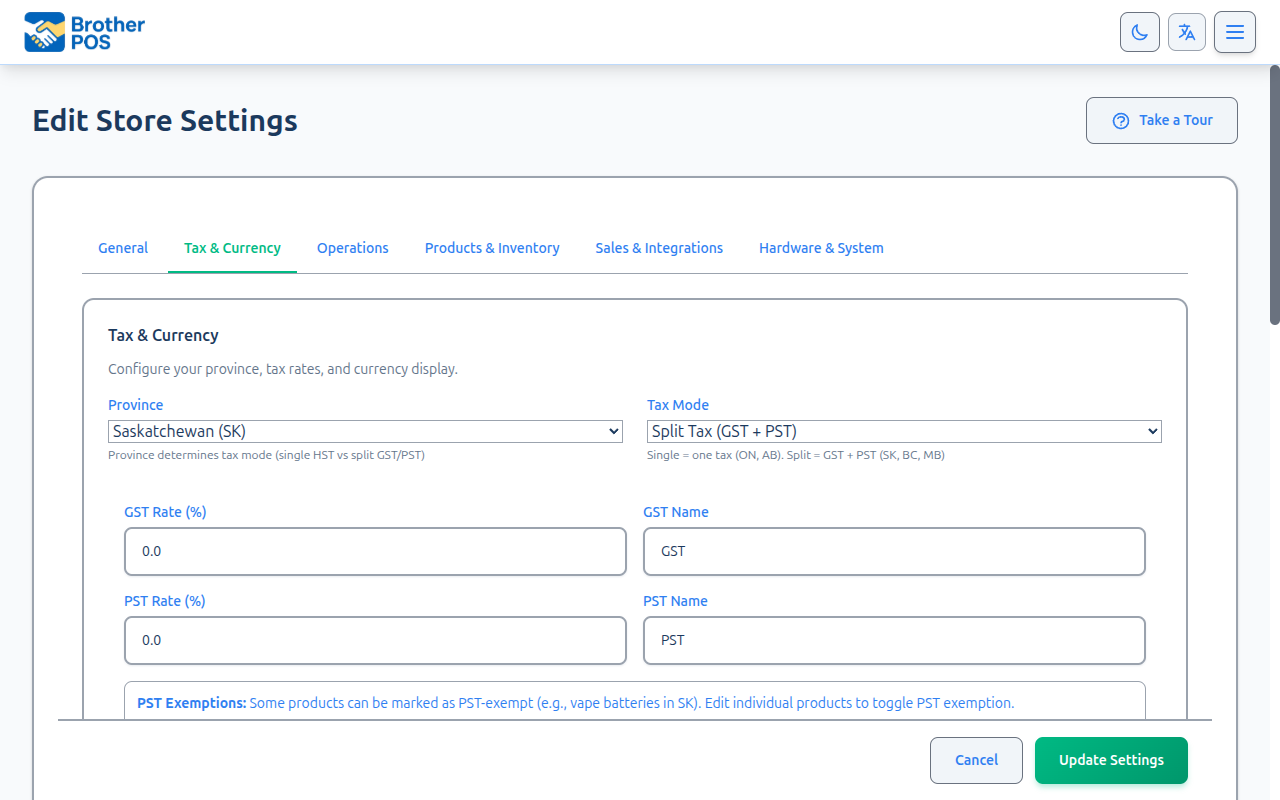
Quick steps
- Go to Settings, click Edit Settings, and open the Tax & Compliance tab.
- Check your Province / State is right.
- Pick the Tax Mode:
- Single Tax (HST) — enter the Tax Rate (%) (for example
13) and the Tax Name printed on receipts (for example "HST"). - Split Tax (GST + PST) — enter the GST Rate (%), GST Name, PST Rate (%) and PST Name (for example 5 and 6 in Saskatchewan).
- Single Tax (HST) — enter the Tax Rate (%) (for example
- Click Update Settings.
- Check it: ring up a $100 item at the register. With 13% HST you should see $13.00 tax.
Tax is added at the time of sale and shows as its own line on the receipt.
Common questions
We don't charge tax at all.
Enter 0 as the rate (both rates in split mode), tick This store charges no tax, and save. The tax line then disappears from the register and receipts.
How do I add the Saskatchewan vapour products tax? Tick Enable Additional Tax, enter an Additional Tax Name (for example "VPT"), save, then set the rate on the categories or products it applies to.
Can one product skip PST? Yes, in split tax mode. On the product's edit page, mark it PST Exempt in the Compliance & Tax section. It still gets GST.
If I change the rate, do old sales change? No. Past sales keep the tax they were rung with, and returns refund tax the same way the original sale charged it.
What about online orders? Your Brother POS storefront uses the same tax settings as the register. WooCommerce orders keep the tax the customer paid on your WooCommerce site.
More detail: getting there, and a single tax rate
Accessing Tax Settings
- Log in to the Admin Panel.
- Click Settings in the top navigation bar.
- Click Edit Settings.
- Click the Tax & Compliance tab.
Standard Tax Rate
Most Canadian provinces use a single combined tax rate. This is the simplest configuration.
Setting a Single Tax Rate
- Select Single Tax (HST) from the Tax Mode dropdown.
- Enter the Tax Rate (%) as a percentage (e.g.,
13for 13% HST in Ontario). - Enter the Tax Name (e.g., "HST") — this is the label printed on receipts.
- Click Update Settings.
Common single-rate provinces:
| Province | Rate | Label |
|---|---|---|
| Ontario | 13% | HST |
| New Brunswick | 15% | HST |
| Nova Scotia | 14% | HST |
| Newfoundland | 15% | HST |
| PEI | 15% | HST |
All product prices in Brother POS are entered pre-tax. Tax is calculated and added at the time of sale. Customers see the tax as a separate line item on their receipt.
More detail: charging no tax at all
Charging No Tax at All
Not every organisation charges sales tax — a volunteer-run club, a non-profit event, a business in a jurisdiction that does not apply one. Brother POS supports that properly.
- Go to Settings > Edit Settings > Tax & Compliance.
- Enter
0in the Tax Rate (%) field. (Clearing the box entirely means the same thing — it saves as no tax rather than failing with a "can't be blank" error.) - Tick This store charges no tax, which appears once the rate is 0 or empty.
- Click Update Settings.
In split tax mode, set both the GST Rate and the PST Rate to 0 — or clear both boxes — and tick the same box to charge nothing.
If a store that charges tax is saved at 0% without This store charges no tax ticked, nothing is saved and the page says the rate "is 0%. Tick "This store charges no tax" to confirm, or enter your tax rate." This stops a cleared box from quietly switching off tax for the whole store.
The tax line disappears too
A zero rate does not print "Tax (0.0%): $0.00" everywhere. Once your store's total tax rate is zero, the tax line is left off entirely:
- the register's cart totals
- emailed and PDF receipts
- the storefront cart and checkout
- storefront order lookup and a customer's order history
The subtotal and the total simply match, which is what a customer expects from an organisation that does not charge tax.
This is a store-level setting. A tax-exempt customer at a store that does charge tax still sees "Tax $0.00" on their receipt — there the zero is the information. And an order that genuinely was taxed keeps its tax line on the order history pages even if you switch the store to zero afterwards.
More detail: split tax (GST/PST)
Split Tax Mode (GST/PST)
Some provinces charge GST and PST as separate taxes rather than a single harmonized rate. Brother POS supports this with split tax mode.
Enabling Split Tax
- Select Split Tax (GST + PST) from the Tax Mode dropdown.
- Enter the GST Rate (%) (e.g.,
5for 5% GST). - Enter the GST Name (e.g., "GST").
- Enter the PST Rate (%) (e.g.,
6for 6% PST in Saskatchewan). - Enter the PST Name (e.g., "PST").
- Click Update Settings.
In split tax mode, an individual product can be marked PST Exempt on its edit page (in the Compliance & Tax section). Exempt items still have GST applied, but not PST — useful where certain product classes are PST-exempt but GST-taxable. The exemption is set per product, not per category.
Provinces that require split tax:
| Province | GST | PST | Total |
|---|---|---|---|
| British Columbia | 5% | 7% | 12% |
| Saskatchewan | 5% | 6% | 11% |
| Manitoba | 5% | 7% | 12% |
| Quebec | 5% (GST) | 9.975% (QST) | 14.975% |
How Split Tax Appears
When split tax mode is enabled:
- The POS register shows each tax component separately in the cart totals.
- Receipts print each tax on its own line (e.g., "GST (5%): $2.50" and "PST (6%): $3.00").
- Reports break down tax collected by component.
Quebec's QST is calculated on the pre-tax amount (not on the GST-inclusive amount, as was the case historically). Enter 9.975 as the PST rate if you are in Quebec. Brother POS applies both taxes to the pre-tax subtotal independently.
More detail: additional tax
Additional Tax
Some product categories are subject to an additional surcharge tax beyond the standard rate. Brother POS supports one additional tax layer for this purpose.
Common Use Case: Vapour Products Tax
Saskatchewan charges an additional Vapour Products Tax on vaping products. Similar surcharges exist in other jurisdictions.
Setting Up Additional Tax
- Check the Enable Additional Tax checkbox.
- Enter the Additional Tax Name (e.g., "VPT" for Vapour Products Tax) — this short name is printed on receipts.
- If you sell through WooCommerce, enter the WooCommerce Default Additional Tax Rate (%) (e.g.,
20for a 20% surcharge). This rate is only sent to WooCommerce, for products that have no additional tax rate of their own. - Click Update Settings.
- Set the rate on the categories or products it applies to, from their own edit pages.
At the register and on your storefront, a product is charged additional tax at its own rate, or at its category's rate if the product has none. A product with no rate of its own, in a category with no rate, is not charged additional tax. The WooCommerce Default Additional Tax Rate is not used for these sales. Set a product to 0 to exempt it from its category's rate.
How Additional Tax Appears
- The additional tax is shown as a separate line item in the POS cart.
- Receipts print it as its own line, under your Additional Tax Name (e.g., "VPT: $4.00").
- Reports include the additional tax in a separate column.
- The additional tax is calculated on the pre-tax product price, not on top of other taxes.
- It is charged the same way on register sales and on orders placed through your online storefront.
When a product that carried additional tax is returned, the refund includes that tax — but never more than the original sale actually collected, less anything already refunded on earlier returns. This holds even if you have since unticked Enable Additional Tax: a sale that collected Vapour Products Tax still refunds it, and the refund keeps the tax's name even if you have cleared the Additional Tax Name field.
More detail: debit / card surcharge
Debit / Card Surcharge
A surcharge is not a tax — it is a fee you add when a customer pays by card, to pass on your processing cost. Brother POS can add one automatically at the register.
Where to set it
- Go to Settings > Edit Settings.
- Open the Operations tab.
- Scroll to Payment Types. The surcharge controls sit underneath the payment-method checkboxes.
- Tick Add a surcharge to card / debit payments.
- Fill in any combination of:
| Field | What it does |
|---|---|
| Percentage (%) | A percentage of the order total, e.g. 2 |
| Flat fee ($) | A fixed amount per transaction, e.g. 0.25 |
| Receipt label | What the customer sees on their receipt. Defaults to "Card Surcharge" — change it to whatever wording you use |
- Click Update Settings.
Percentage and flat fee are combined: 2% + $0.25 on a $100 order is a $2.25 surcharge. If both are left at zero, no surcharge is applied even with the box ticked.
Which payments get surcharged
| Payment | Surcharged? |
|---|---|
| Debit | Yes |
| Card terminal payments | Yes |
| Cash | No |
| Store credit | No |
| Gift card | No |
| House / charge account | No |
| Split payments (more than one tender on a sale) | No |
The surcharge is worked out on the final total the customer owes — after discounts and including tax — and then added on top.
What the customer sees
- At the register, the card payment screen shows the surcharged amount as the total due, with the breakdown underneath:
$100.00 + Card Surcharge $2.25. That surcharged amount is what the terminal charges. - On the receipt, the surcharge prints on its own line using your Receipt label, between the subtotal and the total, so the arithmetic ties out. The same line appears on emailed and PDF receipts.
- In your figures, the surcharge is recorded separately from the sale itself, so it is not counted as product revenue.
Card surcharging is restricted by card-network rules and is prohibited on Interac debit in Canada. Confirm with your payment processor that it is permitted for your business and at your rate before switching this on. The settings page carries the same warning.
More detail: how tax is calculated, and checking your setup
Tax Calculation Details
Calculation Order
Brother POS calculates taxes in this order:
- Subtotal — Sum of all product prices (pre-tax, after discounts).
- Standard Tax — The single rate or GST/PST split applied to the subtotal.
- Additional Tax — Applied only to eligible products, calculated on their pre-tax price.
- Total — Subtotal + Standard Tax + Additional Tax.
Rounding
Standard tax (single rate or GST/PST) is calculated on the overall taxable subtotal and rounded to 2 decimal places. Additional tax is calculated per line item (because each product or category can have its own rate) and summed.
Discounts and Tax
Discounts reduce the taxable amount. If a $20 product has a $5 discount, tax is calculated on $15 (the discounted price), not on $20.
Verifying Your Tax Setup
After configuring taxes, verify the setup:
- Go to the POS Register.
- Add a product to the cart.
- Check that the tax line(s) show the correct amount(s).
- If using split tax, verify both GST and PST appear separately.
- If using additional tax, add a product from an eligible category and verify the surcharge appears.
For easy verification, add a product priced at $100. With 13% HST, you should see exactly $13.00 in tax for a total of $113.00.
More detail: changing tax rates
Changing Tax Rates
Tax rates change occasionally (e.g., when a province adjusts its PST rate).
- Update the rate in Settings > Edit Settings > Tax & Compliance tab.
- Click Update Settings.
- The new rate takes effect immediately for all future sales.
Changing the tax rate does not affect historical sales. Past transactions retain the tax rate that was in effect at the time of the sale. This is correct behavior — tax changes should only apply going forward.
Changes and refunds of older sales
Every sale remembers the tax set-up it was rung under — single or split tax, and the rates. A return refunds tax the same way the original sale charged it, whatever your settings say today.
This matters most if your Province / State was set wrong when the store was first set up and you correct it later (changing province can switch the store between single and split tax). For example, a $100 sale that collected $13 HST still refunds $13 HST after you switch the store to GST + PST — not $11 of GST and PST.
The same goes for additional tax: switching it off stops charging it on new sales, but returns of older sales still refund what those sales collected.
More detail: more questions
Common Questions
Do I need to set tax rates for online orders? Orders placed on your Brother POS online storefront use the same tax settings as the register, including additional tax. WooCommerce manages its own tax settings: when a WooCommerce order is brought into Brother POS, it keeps the tax the customer was actually charged on your WooCommerce site.
Can different products have different base tax rates? No. All products share the same base tax rate (or GST/PST rates). The additional tax feature handles surcharges on specific categories and products, and in split tax mode a product can be marked PST Exempt. If your jurisdiction requires product-level tax variation beyond this, contact support.
What if my province has no PST?
Use the single tax rate mode. Alberta, for example, would use 5 as the tax rate with "GST" as the label.
What's Next?
- General Settings — Configure your store name, address, and timezone.
- Operations — Cash drawer defaults, payment types and the card surcharge.
- Feature Flags — Enable or disable optional store features.