Tier Pricing
Tier pricing uses quality tiers to create weight-based pricing matrices for products. Instead of a single price, each product has a price for every weight option defined in its template. This is the standard pricing model for cannabis flower in Canadian dispensaries.
Prerequisites
Tier pricing requires two feature flags to be enabled:
- Cannabis Features — Must be on.
- Quality Tiers — Must be on.
To enable these:
- Go to Admin > Settings > Edit Settings > Products & Inventory tab.
- Toggle on Cannabis Features and Enable Quality Tiers.
- Click Save.
How Tier Pricing Works
The Pricing Matrix
Each quality tier has its own pricing matrix — a set of weight-to-price pairs. The tier pricing page shows a table of quality tiers, where each row is an individual template.
For example, a "Flower Premium" template might have this pricing matrix:
| Weight | Price |
|---|---|
| 1g | $10.00 |
| 3.5g | $32.00 |
| 7g | $58.00 |
| 14g | $105.00 |
| 28g | $190.00 |
And a "Flower Budget" template would have its own separate matrix with different prices.
At the POS Register
When a cashier selects a tier-priced product:
- The weight selection modal opens showing the available weight options from the template.
- The price displayed for each weight corresponds to the product's assigned template.
- The cashier taps the desired weight, and the item is added to the cart at the correct price.
For example, if "Blue Dream" uses the "Flower Premium" template and the customer wants 3.5g, the price is $32.00 from the matrix above.
Setting Up Tier Pricing
Accessing the Tier Pricing Page
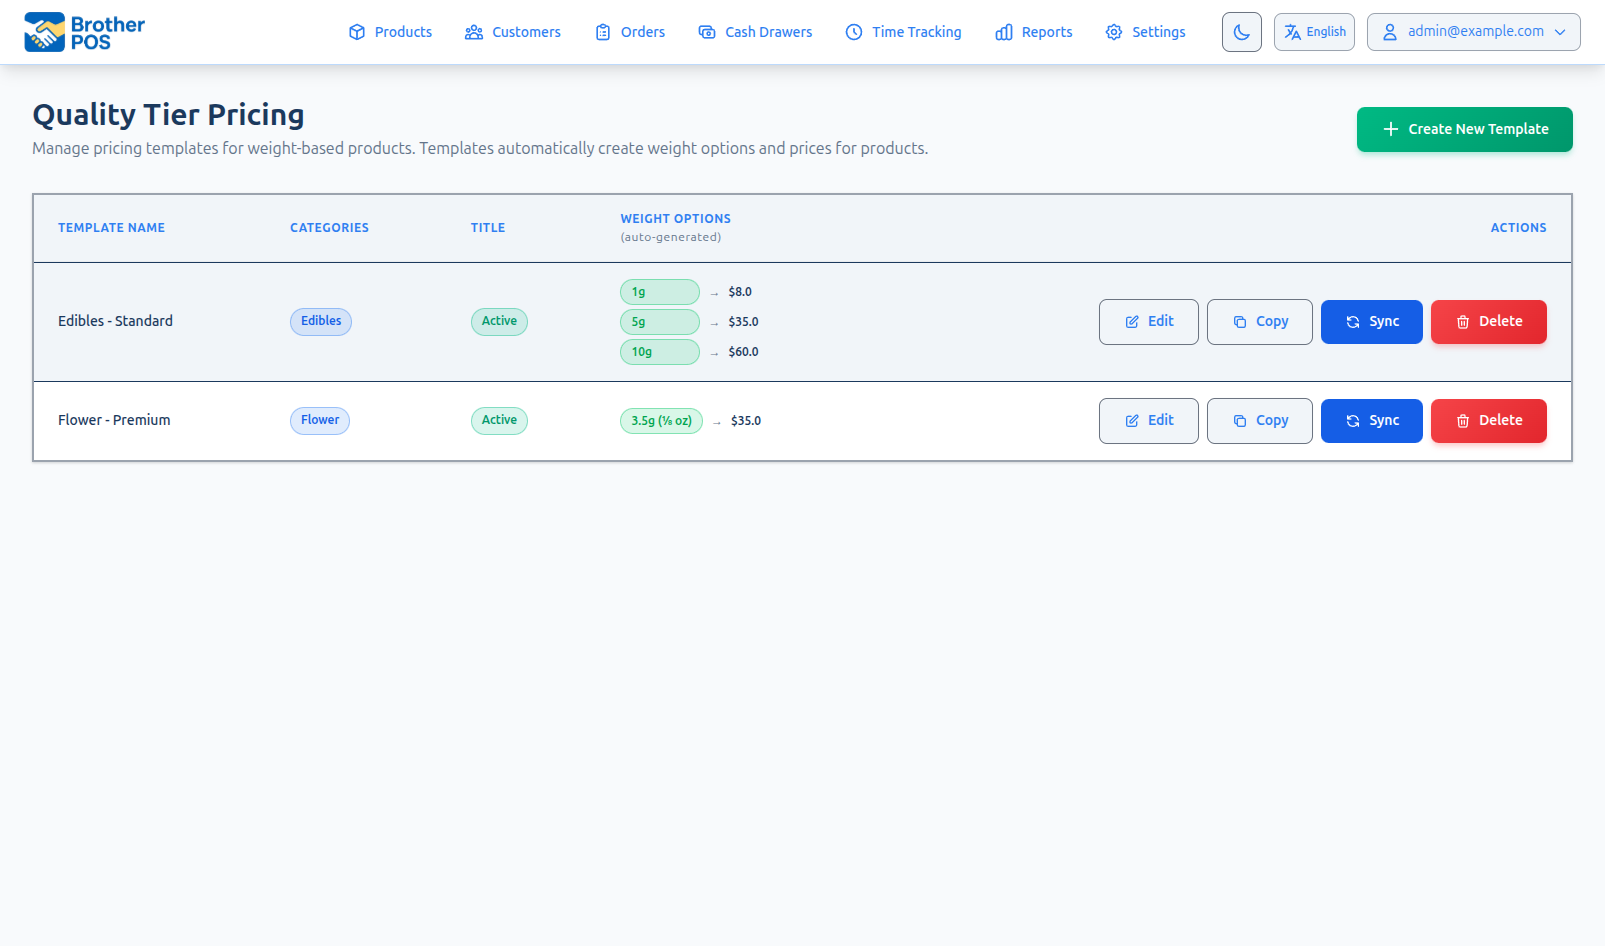
Navigate to the Products page dropdown and select Tier Pricing.
The index page displays a table of all quality tiers. Each template has the following actions available:
- Edit — Open the template's pricing matrix for editing.
- Copy — Create a new template by copying the pricing matrix from an existing one.
- Sync Products — Push the template's pricing matrix to all products assigned to it, ensuring consistency.
- Delete — Remove the template entirely.
Editing a Template's Pricing Matrix
- Click the Edit button on the template you want to modify.
- The edit page shows the pricing matrix — a list of weights with a price field for each.
- Enter the price for each weight you want to offer.
- Check the POS checkbox next to weights you want shown as quick-pick buttons in the register.
- Leave weight fields at $0 for weights you do not sell. The POS will not offer that weight option.
- Click Save.
All weights with prices are used for pricing calculations (including Mix & Match consolidation). The POS checkbox controls which weights appear as quick-pick buttons in the register. Unchecked weights still have valid prices — they just won't appear in the weight selection modal.
Assigning Templates to Products
From the Product Wizard
When creating a new weight-based product:
- In Step 1, select a category. If a matching quality tier exists, the Quality Tier dropdown appears.
- Select the template.
- In Step 2, select "Weight-Based" pricing.
- The template's weights and prices are shown in Step 3 (read-only).
From the Product Edit Page
- Go to Admin > Products and open the product.
- In the Weight Product Settings section, select the template from the Quality Tier dropdown.
- Save. The product now uses the template's pricing matrix.
Volume Discounts in Tier Pricing
Tier pricing inherently supports volume discounts because you set each weight's price independently. The per-gram price typically decreases as the weight increases:
| Weight | Price (Premium) | Per Gram |
|---|---|---|
| 1g | $10.00 | $10.00/g |
| 3.5g | $32.00 | $9.14/g |
| 7g | $58.00 | $8.29/g |
| 14g | $105.00 | $7.50/g |
| 28g | $190.00 | $6.79/g |
This incentivizes customers to purchase larger quantities.
Mix & Match Consolidation
Each template has a Mix & Match Pricing toggle. When enabled, multiple items from the same template combine their weights in the cart for bulk pricing discounts.
Example: A customer adds 7g ($60) and 3.5g ($35) of different products from the same template. Instead of $95 total, the combined 10.5g is priced at the 7g tier's per-gram rate ($8.57/g) = $90.00, saving $5.00.
When disabled, each item is priced individually at its exact preset price.
Managing the Pricing Matrix
Auto-Fill Empty
When editing a template's pricing matrix, use the Auto-Fill Empty button to interpolate prices between anchor prices you have already set. Set prices for a few key weights (e.g., 1g and 28g) and let auto-fill calculate reasonable prices for the weights in between.
POS Visibility Checkboxes
Each weight has a POS checkbox. This controls which weights appear as quick-pick buttons in the register. All weights with prices are still valid for pricing calculations — the checkbox only affects UI visibility.
Adding Weights
Click + Add another weight to open the weight modal. Select from existing presets or create a custom weight.
Tier Pricing and Discounts
Tier prices interact with other discount mechanisms:
Sale Campaigns
Sale campaigns can apply to tier-priced products. The discount is applied to the tier price:
- 20% off a $32.00 (3.5g) item = $25.60
- $5 off a $32.00 item = $27.00
Loyalty Tier Discounts
If your store uses loyalty tiers, customers with higher loyalty levels may receive automatic discounts on tier-priced products. The loyalty discount is applied after the tier price is determined.
Manual Discounts
Cashiers (with permission) or managers can apply manual discounts on top of tier pricing at the POS.
When multiple discounts apply, Brother POS processes them in this order:
- Tier price is determined from the matrix.
- Sale campaign discount is applied (if applicable).
- Loyalty tier discount is applied (if applicable).
- Manual discount is applied (if applicable).
Each discount applies to the result of the previous step, not to the original tier price.
Tier Pricing at Scale
Consistency Across Products
Pricing templates ensure consistency. When you update the "Flower Premium" template's pricing matrix, every product using it updates automatically. This is much more efficient than updating prices product by product.
Adding a New Product
When you create a new product and assign it a quality tier:
- The product automatically uses the template's pricing matrix.
- No additional pricing configuration is needed.
- The product immediately appears at the POS with the correct prices for each weight.
Changing a Product's Template
If you want to reprice a product:
- Open the product and change the Quality Tier to the new template.
- Click Save.
- The product now uses the new template's pricing matrix.
- Prices update at the POS immediately.
Reporting on Tier Pricing
Tier pricing data is reflected in several reports:
- Sales Reports — Sales can be broken down by template and weight.
- Margin Analysis — Margins are calculated per template, helping you see which templates and weights are most profitable.
- Category Performance — Category performance includes template-level detail.
- Top Products — See which template-weight combinations sell the most.
Best Practices
- Start with market rates. Research what competing stores charge per weight, and set your initial matrix accordingly.
- Maintain clear price differentiation. There should be a noticeable price difference between templates. If templates are priced too close together, customers will always choose the higher quality.
- Reward volume purchases. Make sure the per-gram price decreases meaningfully at higher weights. This encourages larger purchases.
- Review the matrix monthly. Market prices fluctuate. Review your matrix at least monthly to ensure you are competitive and maintaining healthy margins.
- Use categories effectively. Assign templates to categories so the right template is auto-suggested when creating new products.
Common Workflows
Setting up tier pricing for a new store
- Enable Cannabis Features and Quality Tiers in Feature Flags.
- Navigate to Tier Pricing and create your quality tiers.
- Set prices for each weight in each template.
- Create your products and assign quality tiers.
- Test at the POS to verify correct prices appear.
Changing a product's quality tier
- Open the product in Admin > Products.
- Change the Quality Tier to the new template.
- Save. The product now uses the new template's pricing matrix.
Troubleshooting
| Problem | Solution |
|---|---|
| Product not showing tier pricing at POS | Verify the product has a quality tier assigned. Check that the Quality Tiers feature flag is enabled. |
| Some weight options missing at POS | The corresponding weight in the template's pricing matrix may have no price or have the POS checkbox unchecked. Open the template and add a price or check the visibility box. |
| No quality tier available in product wizard | Ensure the product's category matches a template's assigned categories. Create a template for that category if needed. |
| Pricing templates not appearing as an option | Enable Quality Tiers in Admin > Settings > Edit Settings > Products & Inventory tab. |
What's Next?
- Pricing Models — Understand all available pricing models in Brother POS.
- Sale Campaigns — Run promotions on tier-priced products.
- Quality Tiers — Deep dive into quality tier configuration.
- Weight Presets — Customize the available weight options.