Pricing Templates
Pricing templates let you create centralized weight-based pricing matrices. Each template is a separate pricing configuration with its own set of weight-to-price pairs. Products assigned to a template automatically use its pricing matrix — change the template, and all products using it update instantly.
Pricing templates are only available when Enable Pricing Templates is enabled in your store settings. Navigate to Settings > Edit Settings > Products & Inventory tab and toggle it on.
How Pricing Templates Work
Each pricing template defines a set of weight-to-price pairs. Products are assigned to a template, and the POS uses that template's pricing matrix automatically.
Example: Flower Premium Template
| Weight | Price |
|---|---|
| 1g | $12 |
| 3.5g | $40 |
| 7g | $72 |
| 14g | $135 |
| 28g | $250 |
Example: Flower Budget Template
| Weight | Price |
|---|---|
| 1g | $10 |
| 3.5g | $32 |
| 7g | $58 |
| 14g | $105 |
| 28g | $190 |
When a budtender selects a product on the POS register, the system uses the product's assigned pricing template to determine available weights and prices. The budtender selects the weight, and the price fills in automatically.
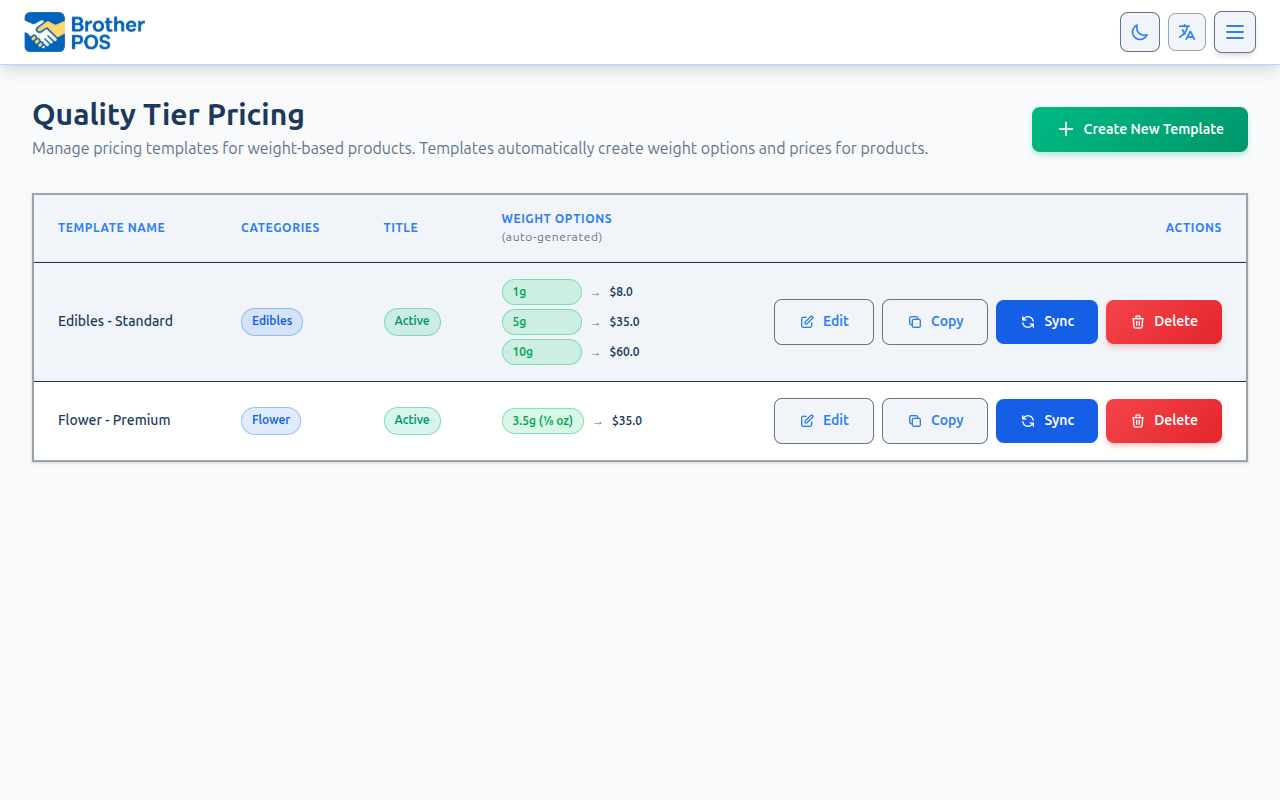
Accessing Pricing Templates
- Log in to the Admin Panel.
- Navigate to Products > Tier Pricing.
- The index page displays a table of pricing templates. Each row is an individual template with its own pricing matrix.
Naming Templates
Pricing templates can have any name. Common approaches include:
- Quality grades: "AAAA", "AAA", "AA", "Budget"
- Descriptive names: "Flower Premium", "Concentrates Standard", "Value Tier"
- Category-based: "Shatter Premium", "Live Resin Budget"
Choose names that are meaningful to your staff. Templates are visible in the product wizard and edit page.
Setting Up a Template's Pricing Matrix
Each pricing template has its own pricing matrix — a set of weight-to-price pairs.
Step-by-Step
- Navigate to Products > Tier Pricing.
- Click Create New Template or the Edit button on an existing template.
- Enter a Template Name.
- Select which Categories this template applies to.
- Set prices for each weight in the pricing matrix.
- Check the POS checkbox next to weights you want shown as quick-pick buttons in the register.
- Click Save or Create.
Rules
- All prices are pre-tax. Tax is calculated automatically at checkout.
- Prices must be greater than zero.
- You do not need to fill in every weight. Weights with no price will not appear on the POS register for products using this template.
- The matrix updates the POS register immediately after saving.
- Active tiers cannot share categories. A given category can only be linked to one active template at a time. To reuse a category in a new template, deactivate the old one first. (Inactive templates can share categories freely — the overlap rule only applies to
active: truetiers.)
If a weight has no price set, that weight option will not appear on the POS register for products assigned to this template. This is intentional — use it to restrict which weight options are available for sale.
Auto-Fill Empty
The template editor includes an Auto-Fill Empty button that interpolates prices between anchor prices you have already set. Set the price for a few key weights (e.g., 1g and 28g) and use auto-fill to calculate reasonable prices for the weights in between.
POS Visibility Checkboxes
Each weight in the pricing matrix has a POS checkbox. All weights with prices are used for pricing calculations (including consolidation). The POS checkbox controls which weights appear as quick-pick buttons in the register. Unchecked weights still have valid prices — they just won't appear in the weight selection modal.
Adding Custom Weights
Click + Add another weight to open the weight modal. You can:
- Select from existing Weight Presets (1g, 3.5g, 7g, etc.)
- Create a custom weight by entering the gram value — it's automatically saved as a preset for future use
Assigning Templates to Products
From the Product Wizard
When creating a new weight-based product:
- In Step 1, select a category (e.g., "Flower").
- The Pricing Template dropdown appears. Select the template to use.
- In Step 2, select "Weight-Based" pricing.
- In Step 3, the template's weights and prices are shown (read-only).
- Complete the wizard and save.
From the Product Edit Page
- Navigate to Products and open the product.
- In the Weight Product Settings section, find the Pricing Template dropdown.
- Select the template.
- Save the product.
The product will now use the pricing matrix from its assigned template.
Weight Consolidation (Bulk Pricing)
Each template has two independent consolidation toggles that give customers volume discounts when they buy more than one weight-based item.
Same-Product Weight Consolidation
Toggle: Same-Product Weight Consolidation
When enabled, multiple bags of the same product combine their weights for pricing purposes. Different products do NOT combine.
Example: Customer buys 7g + 7g of the same product. Weights combine to 14g → 14g tier price applies to the pair, instead of 2 × 7g prices.
Mix & Match Pricing
Toggle: Mix & Match Pricing
When enabled, different products within the same template combine weights for bulk pricing. Mix & Match supersedes Same-Product Consolidation — when on, all items in the tier consolidate together regardless of product.
Example: Template has 7g=$60, 3.5g=$35. Customer buys 7g of Product A + 3.5g of Product B = 10.5g total. The 7g tier's per-gram rate ($8.57/g) applies → $90.00 combined instead of $95.00.
When both toggles are off, each weight selection is priced individually at its matrix price, and buying the same product twice results in two separate line items with no discount.
Disable both toggles when you want each weight to price exactly at its preset tier price and no consolidation discounts are offered.
How Templates Appear on the POS
When a budtender taps a product that has a pricing template assigned:
- The POS displays a weight selector showing the POS-visible weights for that template.
- Each weight option shows the corresponding price from the template's matrix.
- The budtender taps the desired weight.
- The item is added to the cart at the matrix price.
If the product does not have a pricing template assigned, it will show a warning that no weight options are configured.
Per-Gram Fallback Pricing
When Mix & Match consolidation combines weights to an amount that doesn't exactly match a preset tier, the system uses per-gram fallback pricing:
- It finds the largest tier threshold that is less than or equal to the combined weight.
- It uses that threshold's per-gram rate.
- This preserves volume discount incentive — you only get a lower $/gram when you've reached that threshold.
Example: Tiers are 1g=$10, 3.5g=$30, 7g=$50. Selling 5g → uses the 3.5g tier rate ($8.57/g) = $42.86.
Copying Templates
When creating a new template, you can use the Copy Pricing From dropdown to start with an existing template's pricing matrix and modify it. This saves time when creating similar templates (e.g., creating a "Budget" template based on a "Premium" template with lower prices).
Syncing Templates
Sync All Button
The pricing templates index page includes a Sync All button that synchronizes all templates with their assigned products. Use this when:
- You have updated a template and want to ensure all products reflect the changes.
- You have imported products from another system (e.g., WooCommerce).
Adjusting Prices
To update prices for a template:
- Navigate to Products > Tier Pricing.
- Click the Edit button on the template.
- Edit the prices in the pricing matrix.
- Click Save.
Updated matrix prices take effect on the POS register immediately. Any items already in an open cart will use the price at the time they were added. New items will use the updated price.
Disabling or Deleting a Template
Deactivating
- Navigate to Products > Tier Pricing.
- Edit the template and uncheck the Active checkbox (or delete the template if deletion is allowed).
- Products assigned to that template will no longer display weight pricing on the POS. They will fall back to their flat price if one is set.
Before deactivating a template, check which products reference it. Navigate to Products, filter by quality tier, and reassign them to an active template or set a flat price.
Protected Template Names
A handful of seed template names are protected and cannot be deleted from the Pricing Templates index (the Delete button is hidden on these rows):
AAAA+AAA+GreenhouseConcentrates
These can still be deactivated by unchecking Active in the editor, but the record itself is kept so the system has a known starting point. If you don't use these tiers, simply deactivate them.
Reporting
Pricing template data is captured in sales records. You can view performance in reports:
- Sales Reports — Filter by quality tier to see revenue by template.
- Top Products — See which template sells the most units.
- Margin Analysis — Compare margins across templates when cost data is entered.
Best Practices
- Price competitively — Research your market. Lower-tier templates should be noticeably cheaper to justify the grading.
- Be consistent — Apply templates objectively based on quality, not brand preference.
- Review quarterly — Adjust the matrix as market prices shift.
- Train your staff — Ensure budtenders understand which template applies to which products.
- Use categories — Assign templates to categories so new products automatically get the right pricing.
What's Next?
- Weight Presets — Configure the standard weights used in the pricing matrix.
- Strain Library — Browse the strain catalog.
- Terpenes, Effects & Flavors — Add detailed product attributes.
- Sales Reports — Analyze revenue by pricing template.