Sale Campaigns
Sale campaigns let you run time-limited promotions that automatically apply discounts at the POS register. You define which products or categories are included, the discount type and amount, and the start and end dates. When a campaign is active, eligible products are discounted automatically -- no cashier action needed.
How Sale Campaigns Work
- An admin creates a campaign with a date range and discount rules.
- When the campaign's start date arrives, it activates automatically.
- At the POS register, products included in the campaign show their discounted price.
- Cashiers see a visual indicator that a campaign discount is applied.
- When the end date passes, the campaign deactivates and prices return to normal.
No manual activation or deactivation is required -- campaigns are fully date-driven.
Accessing Sale Campaigns
- Log in to the Admin Panel.
- Navigate to the Products page.
- Open the dropdown menu on the Products page and select Sales Campaigns.
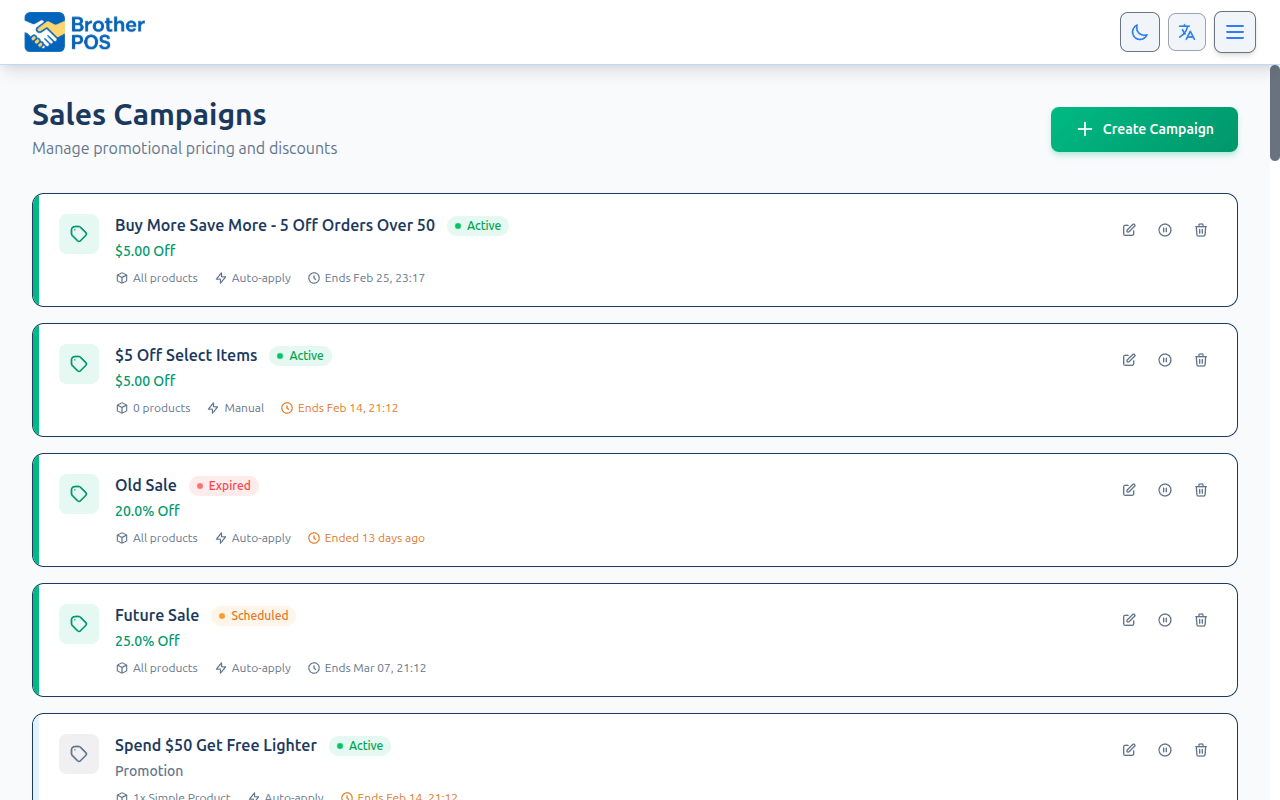
The campaigns list shows all campaigns organized by status: Active, Scheduled (upcoming), and Expired (past).
Campaign Types
Brother POS supports nine campaign types:
| Type | Description |
|---|---|
| Discount | Percentage or dollar amount off eligible products. |
| Freebie Threshold | Customer gets a free item when cart meets a spend threshold. |
| BOGO | Buy one, get one free (or discounted). |
| Buy X Get Y | Buy a specified quantity of one product, get another product free or discounted. |
| Bundle | Discounted price when specific products are purchased together. |
| Mix & Match | Discount when purchasing from a group of eligible products. |
| Tiered Quantity | Discount increases with quantity purchased. |
| Choice Reward | Customer chooses a reward from a selection of options. |
| Loyalty Bonus | Bonus loyalty points multiplier — customers earn more points on qualifying products during the campaign (e.g., 2x points on Edibles week). Not a cash discount. |
Understanding the Campaigns List
Campaigns are displayed as cards with the following information:
- Colored type stripe along the edge indicating the campaign type.
- Type icon for quick visual identification.
- Campaign name.
- Status badge (Active, Scheduled, or Expired).
- Deal summary showing the discount type and amount.
- Description (if provided).
- Meta information: number of targeted products, Auto-apply or Manual mode, and date range.
- Action buttons for editing or deleting the campaign.
Campaign Statuses
| Status | Meaning | Color |
|---|---|---|
| Active | The campaign is currently running. Discounts are being applied at the POS. | Green |
| Scheduled | The campaign is set up but has not started yet. It will activate on the start date. | Amber/yellow |
| Expired | The campaign has ended. Discounts are no longer applied. | Grey |
Creating a Sale Campaign
Step-by-Step
- Click New Campaign at the top of the campaigns list.
- Fill in the campaign details:
Basic Information
| Field | Required | Description |
|---|---|---|
| Campaign Name | Yes | A descriptive name for internal reference (e.g., "Summer Sale 2026", "420 Week Special"). |
| Description | No | Optional notes about the campaign purpose or rules. |
| Application Type | Yes | Controls how the discount is applied. Automatic applies the discount as soon as an eligible product is added to the cart. Manual requires the cashier to select and apply the campaign at the POS. |
Discount Configuration
- Choose the Discount Type:
| Type | Description | Example |
|---|---|---|
| Percentage Off | A percentage discount on the product price. | 20% off |
| Dollar Amount Off | A fixed dollar amount subtracted from the product price. | $5.00 off |
- Enter the Discount Value:
- For percentage: Enter the percentage (e.g.,
20for 20% off). - For dollar amount: Enter the dollar value (e.g.,
5.00for $5 off).
- For percentage: Enter the percentage (e.g.,
All discounts are applied to the product's pre-tax price. Tax is then calculated on the discounted amount.
Targeting
- Choose what the campaign applies to:
All Products -- Every product in your catalog is discounted.
Specific Categories -- Only products in selected categories are discounted.
- Click Select Categories.
- Check the categories you want to include.
- All products within those categories are eligible.
Specific Products -- Only hand-picked products are discounted.
- Click Select Products.
- Search for and select individual products.
- Only these exact products are eligible.
If you frequently add new products, targeting by category means new products automatically join the campaign when they are added to the included category. With specific product targeting, you would need to manually add each new product.
Category and brand campaigns are evaluated dynamically. Any product you create after the campaign was set up is automatically included as soon as it belongs to a targeted category or brand -- you do not need to edit the campaign or re-save it. The product list is not frozen at campaign creation time. (Only Specific Products targeting requires you to add each product by hand.)
Storefront Visibility
After the targeting section, the form includes a Show on storefront checkbox.
| Field | Default | Description |
|---|---|---|
| Show on storefront | On (checked) | Controls whether the deal is published to your public storefront. When on, the campaign appears on the storefront /deals page and the homepage deals section. When off, the deal still applies in-store and at the POS register, but is hidden from customers browsing your storefront. |
Uncheck Show on storefront for deals you do not want advertised publicly -- for example, an employee discount or a quiet clearance price. The discount still applies at checkout; it just stays off the customer-facing storefront.
Schedule
- Set the Start Date and Start Time for when the campaign should begin.
- Set the End Date and End Time for when the campaign should end.
- Click Create Campaign.
What Cashiers See at the POS
When a sale campaign is active, the POS register shows:
- Discounted price on the product card (with the original price crossed out).
- Campaign badge indicating the product is on sale.
- Line item discount in the cart showing the campaign name and discount amount.
- Automatic application -- cashiers do not need to select or apply the campaign manually. It applies as soon as the eligible product is added to the cart.
If a product is eligible for multiple active campaigns, Brother POS applies the campaign that gives the customer the best price. Campaigns do not stack.
Editing a Campaign
You can edit campaigns at any time, including active ones.
- Click the Edit button on the campaign card.
- Update any fields (name, discount, targeting, dates).
- Click Save Changes.
Changes to active campaigns take effect immediately at the POS. Cashiers will see updated prices on their next product search or page refresh.
Changing the discount amount or targeting on an active campaign affects all future sales immediately. Transactions already completed with the old discount are not modified.
Extending a Campaign
To extend a campaign that is about to expire or has already expired:
- Click the Edit button on the campaign card.
- Update the End Date to a later date.
- Click Save Changes.
If the campaign was expired, it reactivates automatically (as long as the current date falls within the new date range).
BOGO Campaigns
BOGO (Buy One, Get One) campaigns automatically add free items to the cart when a customer purchases qualifying products.
How BOGO Works
- A customer adds a qualifying product to the cart (the "buy" item).
- When the buy quantity is met, the system automatically adds the free item(s) to the cart as $0.00 line items.
- Free items appear in the cart with a FREE badge, just like freebie threshold items.
- If the buy item is removed, the free items are automatically removed too.
Configuring a BOGO Campaign
- Click New Campaign and select BOGO as the campaign type.
- Configure the BOGO rules:
| Field | Description | Example |
|---|---|---|
| Buy Quantity | How many items the customer must purchase to trigger the free item | 1 |
| Get Quantity | How many free items are added when triggered | 1 |
| Same Product | The free item is the same as the purchased item | Buy 1 Blue Dream, get 1 Blue Dream free |
| Different Product | The free item is a specific different product | Buy 1 concentrate, get 1 rolling paper free |
- Set Product Targeting to define which products qualify as the "buy" item.
- If using a different free product, select the specific product to give away.
- Set the campaign date range and click Create Campaign.
BOGO vs. Freebie Threshold
| Feature | BOGO | Freebie Threshold |
|---|---|---|
| Trigger | Purchasing a specific product | Reaching a spend amount |
| Free item | Same or different product | Always a specific product |
| Cart display | $0.00 line item with FREE badge | $0.00 line item with FREE badge |
| Stock deduction | Yes, free items deduct from stock | Yes, free items deduct from stock |
BOGO free items are saved as actual sale line items with a $0.00 price. This means they deduct from inventory, appear on receipts, and are tracked in sales reports. This ensures accurate stock management.
Product-Level "Buy N for Price X" Deals
Separate from campaigns, an individual product can carry its own sale discount that only fires once the cart reaches a minimum quantity -- a "Buy N for price X" deal (e.g., singles at full price, but $25 each when buying 2 or more).
This is configured on the product itself (Product edit page, or Step 3 of the new-product wizard), not on the Sale Campaigns page.
Configuring a quantity-gated product sale
- Edit the product (or open Step 3 of the product wizard).
- In the Sale Discount (Optional) section, set:
| Field | Description |
|---|---|
| Discount Type | Percentage or dollar amount off. |
| Discount Value | The percentage or dollar amount. |
| Apply When Qty ≥ | The minimum cart quantity that triggers the sale. Leave blank to apply to every unit (the standard behaviour). Set to 2 or more for a "Buy N" deal. The minimum allowed value is 2. |
| Sale Reason | Optional label shown to the cashier when the deal applies. |
- Save the product.
When a minimum quantity is set, the storefront and product-listing price still shows the regular (single-unit) price, so a shopper buying one sees the honest price. The discounted price is only computed in the cart once the quantity threshold is met. The offline POS calculator applies the same threshold so online and offline registers agree.
Campaign and WooCommerce Sync
If your store has a WooCommerce integration, sale campaigns can sync to your online store:
- Campaign discounts are pushed to WooCommerce as sale prices.
- Start and end dates are synced so online and in-store promotions run simultaneously.
- When the campaign ends, WooCommerce prices revert to regular pricing.
See WooCommerce Product Sync for details on configuring this sync.
Best Practices
- Name campaigns clearly. Use descriptive names like "Back to School 15% Off Accessories" rather than "Sale 1." Future you will thank present you.
- Schedule in advance. Create campaigns ahead of time with future start dates. This avoids rushing on the promotion start day.
- Test before launch. For important promotions, create the campaign with a start date of "now" and verify prices at the POS before the sale goes public.
- Avoid overlapping campaigns on the same products. While Brother POS handles this gracefully (best price wins), it can confuse staff and make performance analysis difficult.
Common Workflows
Creating a weekend flash sale
- Click New Campaign.
- Name it "Weekend Flash Sale - 25% Off Edibles."
- Set Discount Type to Percentage Off, Value to 25.
- Under Targeting, select Specific Categories and check "Edibles."
- Set Start Date to Friday 6:00 PM and End Date to Sunday 11:59 PM.
- Click Create Campaign.
Running a store-wide holiday sale
- Click New Campaign.
- Name it "Holiday Sale - 15% Off Everything."
- Set Discount Type to Percentage Off, Value to 15.
- Under Targeting, select All Products.
- Set start and end dates for the holiday period.
- Click Create Campaign.
Troubleshooting
| Problem | Solution |
|---|---|
| Campaign is active but products are not discounted at POS | Verify the targeting includes the product. Check that the product is in the targeted category. |
| Wrong discount amount showing | Open the campaign and verify the discount value. Remember that percentage discounts are on the pre-tax price. |
| Campaign did not start on time | Check the start date and time. Ensure the timezone is correct in your store settings. |
| Products show sale price after campaign ended | Refresh the POS page. If the issue persists, check the campaign end date -- it may have been accidentally extended. |
| Two campaigns applying to the same product | Brother POS applies the best price. If this is unintentional, adjust the targeting on one of the campaigns to exclude the overlapping products. |
What's Next?
- Freebie Campaigns -- Set up spend-threshold campaigns that auto-add free items.
- Tier Pricing -- Configure quality tier pricing matrices.
- Pricing Models -- Understand the different pricing models in Brother POS.