Loyalty Tiers
Loyalty tiers let you reward your best customers with escalating benefits as they spend more at your store. Customers automatically progress through tiers based on their lifetime spend or visit count, unlocking better points multipliers, discounts, and other perks. This page covers how to configure tiers in the admin panel.
How Tiers Work
Each loyalty tier defines:
- A level (numeric rank, starting at 0 for the base tier)
- A name (e.g., Bronze, Silver, Gold, Platinum -- fully customizable)
- Qualification criteria (minimum lifetime spend and/or minimum visits)
- Benefits (points multiplier, discount percentage, free delivery, early access)
Customers are assigned to tiers automatically. When a customer's lifetime spend or visit count crosses a tier threshold, they are upgraded immediately -- no manual action required.
Brother POS never automatically downgrades a customer's tier. Once a customer reaches Gold, they stay Gold permanently (unless an admin manually changes their tier). This keeps customers happy and avoids the frustration of losing earned status.
Viewing Existing Tiers
- Navigate from the Customers page, click the Loyalty button (when loyalty is enabled), which takes you to the Loyalty dashboard.
- Tiers are listed on the Loyalty dashboard.
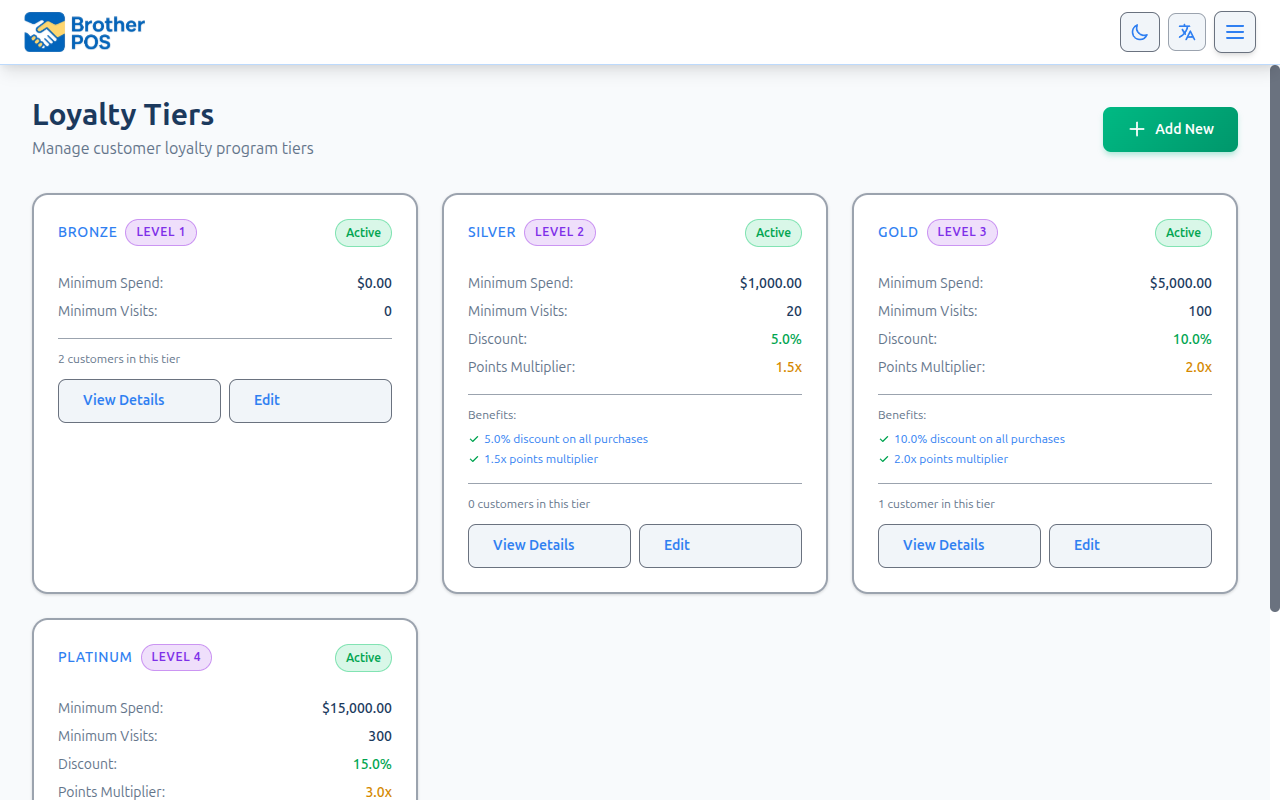
Tiers are displayed as a card-based list, not a table. Each tier card shows:
- Color badge with level number
- Name (with an "Inactive" badge if the tier is not active)
- Requirements text (e.g., "$500 spend or 20 visits")
- Discount percentage
- Points multiplier
- View Details and Edit buttons
Creating a New Tier
Step-by-Step
-
Navigate to Loyalty Tiers in the admin panel.
-
Click Add Tier.
-
Fill in the tier details:
Field Required Description Name Yes Display name for the tier. Must be unique within your store. Examples: "Bronze", "Silver", "Gold", "Platinum", "VIP", "Diamond". Level Yes Numeric rank. Must be unique. Use 0 for the base tier, then 1, 2, 3, etc. Higher levels represent better tiers. Minimum Lifetime Spend Yes Dollar amount a customer must spend (lifetime total) to qualify. Set to $0 for the base tier. Minimum Visits Yes Number of completed sales required to qualify. Set to 0 to use only the spend threshold. Discount Percentage No Automatic percentage discount applied to every sale for customers in this tier. Set to 0 for no discount. Maximum 100%. Points Multiplier Yes Multiplier for points earned. Set to 1.0 for the standard rate. Values above 1.0 accelerate earning (e.g., 1.5 = 50% faster). Minimum 1.0. Color No Color name for the tier badge display (e.g., "bronze", "silver", "gold"). Used in the POS and admin UI. Free Delivery No Whether customers in this tier get free delivery (if delivery is enabled). Early Access to Sales No Whether customers in this tier get early access to sale campaigns. Benefits Description No Free-text description of tier benefits for display purposes. Active Yes Whether this tier is currently active. Inactive tiers are not considered for upgrades. -
Click Save.
A customer qualifies for a tier if they meet either the minimum spend or the minimum visits threshold -- they do not need to meet both. If you set minimum visits to 0, only the spend threshold is checked. This gives you flexibility in designing your tier structure.
Editing a Tier
- Click on the tier you want to edit.
- Modify any of the fields described above.
- Click Save.
Important Considerations When Editing
- Lowering a threshold may cause some customers to qualify for a higher tier than they currently hold. Brother POS checks tier eligibility when customers make their next purchase, so upgrades from threshold changes take effect over time.
- Raising a threshold does not downgrade existing customers. Customers already in a tier stay there even if the threshold increases beyond their lifetime spend.
- Changing the discount percentage affects all future sales for customers in that tier immediately. Past sales are not recalculated.
- Changing the points multiplier affects points earned on future sales only. Past points are not recalculated.
- Renaming a tier is cosmetic and takes effect immediately across all interfaces.
The level number determines the order of tiers and is used for comparison (higher level = better tier). Changing level numbers on existing tiers can cause unexpected tier assignment behavior. If you need to restructure your tiers, it is safer to deactivate old tiers and create new ones.
Recommended Tier Structure
Here is a typical four-tier structure suitable for most retail stores:
Base Setup
| Tier | Level | Min. Spend | Min. Visits | Multiplier | Discount | Color |
|---|---|---|---|---|---|---|
| Bronze | 0 | $0 | 0 | 1.0x | 0% | bronze |
| Silver | 1 | $500 | 20 | 1.25x | 2% | silver |
| Gold | 2 | $1,500 | 50 | 1.5x | 5% | gold |
| Platinum | 3 | $5,000 | 100 | 2.0x | 10% | platinum |
Why This Works
- Bronze is the default tier for all new customers. No spend required. Standard points rate, no discount. This is the starting point.
- Silver is achievable for regular customers within a few months. A small discount and slightly faster point earning provide a tangible reward.
- Gold represents committed customers. The 5% discount is meaningful and the 1.5x multiplier significantly accelerates rewards.
- Platinum is for your top customers -- the ones who spend significantly. A 10% discount and 2x multiplier make them feel valued.
Alternative: Three-Tier Structure
For simpler programs, a three-tier structure works well:
| Tier | Level | Min. Spend | Multiplier | Discount |
|---|---|---|---|---|
| Member | 0 | $0 | 1.0x | 0% |
| Premium | 1 | $1,000 | 1.5x | 5% |
| VIP | 2 | $3,000 | 2.0x | 10% |
Tier Assignment Logic
How Tiers Are Determined
When a customer's lifetime spend or visit count changes (i.e., after each completed sale), Brother POS evaluates all active tiers:
- It checks every active tier, starting from the highest level.
- For each tier, it checks if the customer meets either the minimum spend or the minimum visits threshold.
- The highest qualifying tier is selected.
- If the selected tier is higher than the customer's current tier, the customer is upgraded.
- If the selected tier is lower or equal, no change occurs (no downgrades).
Manual Tier Changes
There is no tier selection field on the customer edit form. Tier assignment is handled automatically by the system based on lifetime spend and visit thresholds. If you need to manually change a customer's tier, contact Brother POS support for assistance.
The admin interface does not provide manual tier override controls. Customers progress through tiers automatically as they meet the qualification criteria.
Tier Benefits in Detail
Discount Percentage
When a customer with a tier discount is attached to a sale at the POS:
- The discount is applied automatically to the sale subtotal.
- It appears as a line item labeled "Loyalty Tier Discount" in the cart.
- The discount is calculated before tax.
- The discount stacks with other discounts (sale campaigns, manual discounts, etc.) unless your discount rules specify otherwise.
Points Multiplier
The points multiplier increases the rate at which customers earn points:
- 1.0x = Standard rate (no bonus)
- 1.25x = 25% more points
- 1.5x = 50% more points
- 2.0x = Double points
The multiplier is applied during the points calculation:
Points Earned = Sum(line_item_total x Points Per Dollar x campaign_multiplier) x Tier Multiplier
Free Delivery
If enabled for a tier, customers in that tier automatically qualify for free delivery on delivery orders. This only applies if your store has the delivery feature enabled.
Early Access to Sales
If enabled for a tier, customers in that tier can see and purchase from sale campaigns before the general public. This is an informational benefit -- the actual implementation depends on your store's marketing workflow.
Deactivating a Tier
There are two ways to deactivate a tier:
- From the edit form: Edit the tier, uncheck the Active checkbox, and save.
- Toggle active button: An Active/Inactive toggle button on the tier card allows you to quickly activate or deactivate a tier without opening the edit form.
Deactivated tiers:
- Are not considered for future tier upgrades.
- Do not display their badge in the POS.
- Preserve their assignment for customers who already have that tier.
- Can be reactivated at any time.
Common Questions
What happens to customers if I add a new tier between existing tiers?
Adding a new tier between existing levels (e.g., adding a "Sapphire" tier at level 1.5 between Silver at level 1 and Gold at level 2) works as expected. On their next purchase, customers will be re-evaluated against all active tiers and assigned to the highest one they qualify for.
However, you cannot use decimal level numbers -- levels must be integers. If you need to insert a tier, you may need to renumber existing tiers.
Can I have different tier structures for different product categories?
No. Tiers apply store-wide and are based on total lifetime spend across all categories. However, you can configure individual categories as not loyalty-eligible, which would exclude them from the spend calculation that drives tier upgrades.
How quickly do tier upgrades take effect?
Tier upgrades are processed when points are earned (i.e., when a sale is completed). The upgrade takes effect immediately -- the customer's new tier benefits apply starting from their next transaction.
Can customers see their tier progress?
At the POS, customers can ask the cashier to check their loyalty info. The customer panel shows their current tier, lifetime spend, and available rewards. Your cashier can tell them how close they are to the next tier by comparing their lifetime spend to the next tier's threshold.
What's Next?
- Rewards -- Create rewards that customers can redeem with their points.
- Loyalty Setup -- Enable the loyalty program and configure the points rate.
- Customer Management -- View and manage customer accounts.
- Loyalty Points & Tiers (POS) -- How tiers appear and work at the POS register.