Completing Payment
Once the cart is ready and any discounts or promotions have been applied, the final step is collecting payment. Brother POS supports multiple payment methods, each with its own flow. This guide covers single-method payments. For splitting across multiple methods, see Split Payments.
Payment Buttons
Payment buttons appear at the bottom of the cart pane whenever items are in the cart. Only enabled payment methods are shown -- your admin configures which methods are available in Store Settings.
The primary payment buttons are:
| Button | Payment Method |
|---|---|
| CASH | Cash with change calculation |
| DEBIT | Debit card (payment terminal) |
| E-TRANSFER | Interac e-Transfer |
| GIFT CARD | Redeem a gift card balance (when gift cards are enabled) |
| STORE CREDIT | Apply a customer's store credit balance |
Below the payment buttons, you will also see action buttons for Discount, Hold, and Manual Item.
The SPLIT button appears on a second row when more than one payment method is enabled. See Split Payments for details.
Cash Payment
The cash payment flow includes a numpad for entering the amount tendered and automatic change calculation.
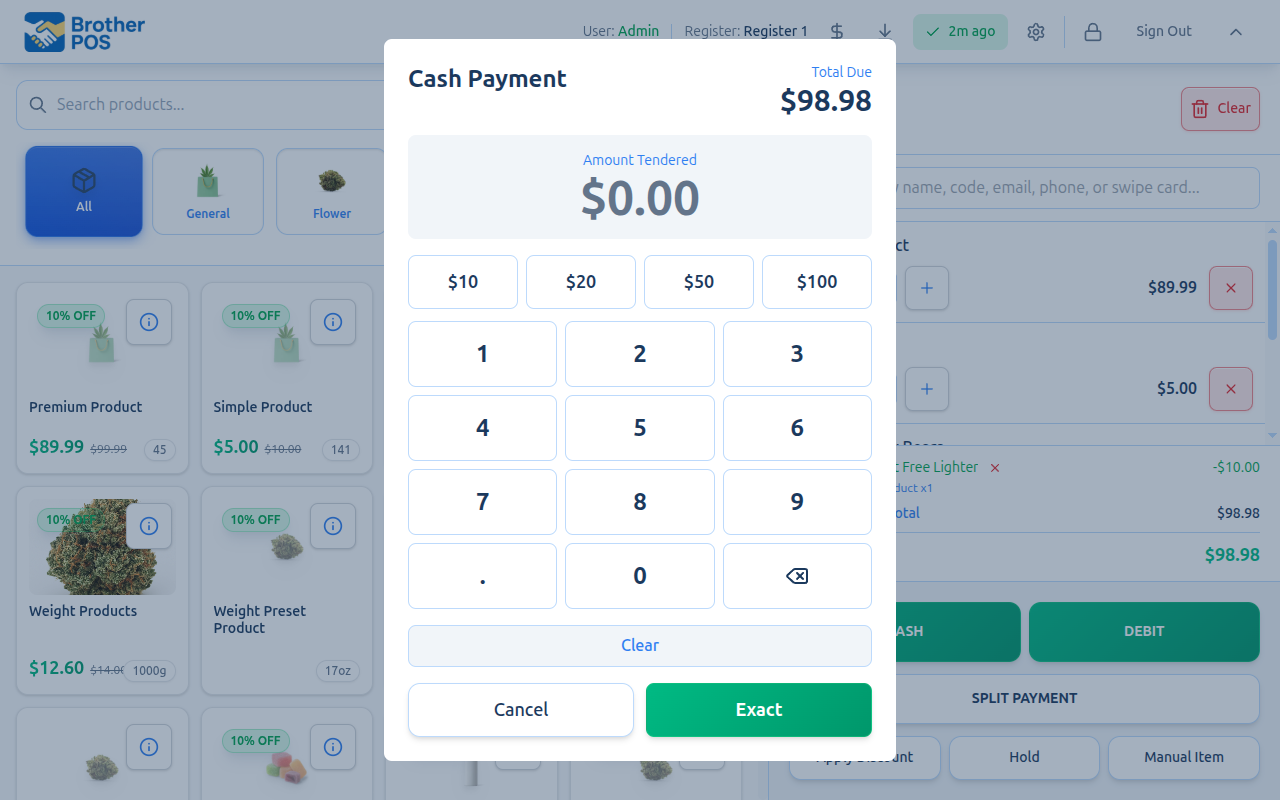
Cash Payment Steps
- Tap the CASH button.
- The Cash Payment modal opens showing:
- Total Due in large text (e.g., "$44.06")
- An amount tendered display (starts at $0.00)
- Quick amount buttons: $10, $20, $50, $100
- A full numpad for entering custom amounts
- Change amount (updates in real time)
-
Enter the amount the customer is paying using one of these methods:
- Tap a quick amount button (e.g., $50) to fill in that amount.
- Use the numpad to type a specific amount (e.g., $45.00).
- Leave the amount blank to indicate exact change (the customer is paying exactly the total).
-
The change amount calculates automatically:
Change = Amount Tendered - Total Due
-
Tap Complete Sale (or Exact Amount if no amount was entered).
Cash Modal Controls
| Control | Function |
|---|---|
| 0-9 keys | Enter digits |
| . (decimal) | Add decimal point (only one allowed) |
| Backspace (arrow icon) | Delete last digit |
| Clear | Reset the tendered amount to $0.00 |
| $10, $20, $50, $100 | Quick-fill common bill amounts |
Change Display
When the tendered amount exceeds the total, the change amount appears in green:
Change: $5.94
This is also displayed prominently on the success screen after the sale completes, so you can confirm the change to give the customer.
If the entered amount is less than the total due, tapping Complete Sale shows a warning: "Insufficient payment amount". You must enter an amount equal to or greater than the total.
Exact Change
If the customer pays the exact total, simply tap Exact Amount without entering any value. The system records the tendered amount as equal to the total with $0.00 change.
Debit Card Payment
The debit payment flow depends on whether your store uses a payment terminal integration.
Without a Payment Terminal
If no payment terminal is configured:
- Tap the DEBIT button.
- The Debit Payment modal opens showing the total due.
- Process the card payment on your external terminal.
- Tap Complete Sale to record the payment in Brother POS.
This is a "record-only" flow -- Brother POS does not communicate with the card terminal. The cashier is responsible for verifying the payment was approved on the external terminal before tapping Complete Sale.
With a Payment Terminal
If a payment terminal integration is enabled:
- Tap the DEBIT button.
- Brother POS sends the payment amount to the terminal.
- The modal shows "Present card on terminal..." while the terminal processes.
- The customer taps, inserts, or swipes their card on the terminal.
- The terminal sends the result back:
- Approved: The sale completes automatically and the success screen appears.
- Declined: A message appears (e.g., "Insufficient funds", "Card expired"). You can retry or cancel.
- Cancelled: The customer pressed cancel on the terminal. You can retry or choose a different payment method.
Terminal Status Messages
During terminal-based payments, you may see these statuses:
| Status | Meaning |
|---|---|
| Processing | Sending to terminal |
| Present card on terminal | Terminal is ready, waiting for customer |
| Approved | Payment successful |
| Declined | Payment was declined (with reason) |
| Cancelled | Customer cancelled on the terminal |
| Terminal busy | Terminal is processing another transaction |
| Error | Communication issue with the terminal |
| Timeout | Terminal did not respond in time |
If a terminal payment is declined, you can immediately retry without leaving the payment screen. The customer can try a different card or payment method.
Skip Terminal
A Skip Terminal button is available during terminal-based payments. Tapping it bypasses the terminal entirely and records the sale directly as a debit payment. This is useful when the terminal is unresponsive or the payment was processed on an external device.
E-Transfer Payment
E-transfer is a simple payment recording flow for Interac e-Transfer payments.
E-Transfer Payment Steps
- Tap the E-TRANSFER button.
- The E-Transfer Payment modal opens showing the total due.
- Optionally enter an E-Transfer Reference (transaction ID or confirmation code from the e-transfer).
- Verify that the e-transfer has been received or is pending in your bank.
- Tap Complete Sale.
The reference field is optional but recommended. It helps with reconciliation when reviewing sales reports, especially if you receive multiple e-transfers in a day.
Store Credit Payment
Store credit allows customers to pay using a pre-loaded balance on their account. Credits are typically issued from returns, loyalty reward redemptions, or manual adjustments by a manager.
The STORE CREDIT button only appears when store credit payments are enabled in your store settings. An admin must turn this on at Settings > Edit Settings > Operations tab, under Payment Types > Enable Store Credit Payments.
Store Credit Payment Steps
- Tap the STORE CREDIT button.
- The Store Credit Payment modal opens.
- Select a credit using one of two methods:
- Customer attached to cart: The modal automatically loads the customer's available credits as clickable buttons. Each button shows the credit code, current balance, and the reason the credit was issued. Tap a credit to select it.
- No customer attached (or manual lookup): Enter a credit code in the manual entry field and tap Look Up.
- After selecting or looking up a credit, the modal displays the credit details:
- Credit code
- Customer name
- Available balance
- Reason for the credit
- The modal shows "Credit Applied: -$X.XX" and indicates whether the credit covers the full sale amount.
- Tap Complete Sale.
When Credit Covers the Full Amount
If the credit balance is equal to or greater than the sale total:
- The full sale amount is deducted from the credit.
- Any remaining balance stays on the customer's account.
- No additional payment method is needed.
When Credit Does Not Cover the Full Amount
If the credit balance is less than the sale total:
- The modal shows a warning that the credit does not cover the full amount.
- Use a split payment to combine store credit with another payment method (cash, debit, etc.).
- See Split Payments for how to split across methods.
For full details on store credit management, see Store Credits.
Gift Card Payment
Gift cards allow customers to pay using a stored-value card purchased previously. Gift cards are accepted as a payment method when the Enable Gift Cards feature flag is turned on.
Gift Card Payment Steps
- Tap the GIFT CARD button.
- The Gift Card Payment modal opens.
- Enter or scan the gift card number.
- The system looks up the card and displays its status and available balance.
- If the balance covers the full sale, the amount is deducted from the card. Tap Complete Sale.
- If the balance is less than the total, the available balance is applied and you must use a split payment for the remainder.
For full details, see Gift Cards.
What Happens After Payment
Regardless of the payment method, completing a sale triggers the following:
1. Sale Recorded
The sale is saved to the database with all details: line items, quantities, prices, discounts, tax, payment method, amount tendered, change given, and the clerk who processed it.
2. Inventory Updated
Stock levels are decremented for each item sold. Weight-based products decrement by the weight sold.
3. Loyalty Points Awarded
If a customer is attached, loyalty points are added to their account based on the sale total.
4. Receipt Printed
If auto-print is enabled on the register, a receipt prints automatically. See Receipts for details.
5. Cash Drawer Opens
If the register is configured to open the cash drawer on sale completion, the drawer kicks open (for cash payments and split payments that include cash).
6. Success Screen
The Payment Successful screen appears showing:
- A green checkmark
- "Payment Successful!" message
- The sale total
- For cash payments: the Change Due in a prominent yellow box, with the tendered amount shown in smaller text outside the box
- A Start New Sale button
Tap Start New Sale to clear the screen and begin the next transaction.
Offline Payments
If the POS is offline when a sale is completed:
- The sale is saved to the local offline queue.
- The success screen still appears normally.
- A sync indicator shows the pending sale count.
- When connectivity returns, pending sales automatically sync to the server.
During offline mode, inventory is tracked locally and may not reflect changes made on other registers. Loyalty points are recorded locally and verified when the sale syncs.
Payment Error Handling
| Scenario | What Happens |
|---|---|
| Network error during sale submission | Sale is saved to offline queue and syncs later |
| Terminal communication failure | Error message shown, option to retry or cancel |
| Duplicate sale prevention | The POS prevents the same sale from being submitted twice |
What's Next?
- Gift Cards -- activating and redeeming gift cards
- Split Payments -- dividing payment across multiple methods
- Receipts -- printing and reprinting receipts
- Sales History -- viewing and managing completed sales
- Voiding Sales -- cancelling a completed sale