Cart Management
Use this page to build the customer's order in the cart: add items, change amounts, take things out, and park an order for later.
Quick steps
- Add items — tap a product card, or scan its barcode. Tap or scan again to add another.
- Change the amount — tap + or - on the line, or tap the quantity number and type the exact amount.
- Take an item out — tap the X on its line. (The - button stops at 1; it won't remove the item.)
- Add something not in your catalogue — tap Manual Item, type the Item Name, Price and quantity, and tap Add to Cart.
- Attach the customer — search for them at the top of the cart so they earn loyalty points.
- Park the order — tap Hold, type an Order Name, and tap Hold Order. When they're back, tap Recall (shown when the cart is empty), pick the order and tap Recall Order.
The Clear Cart button (trash can at the top of the cart) empties the cart, the customer and any discounts at once, with no undo.
Common questions
It says Out of stock or Only 3 available. The cart can't hold more than you have. If you scanned it, you get a Stock Override Required window where a manager can approve adding it anyway.
It says Not on the sales floor. The stock is in the back. Bring it out front and tap Move [amount] to floor (for example Move 14g to floor). The item then goes in the cart.
A product rings up at $0.00. It has no price set. Cancel and ask a manager to set a price, or use Manual Item to charge the right amount now.
How do I change toppings or options on an item already in the cart? Tap Edit on its line.
More detail: what's in the cart pane
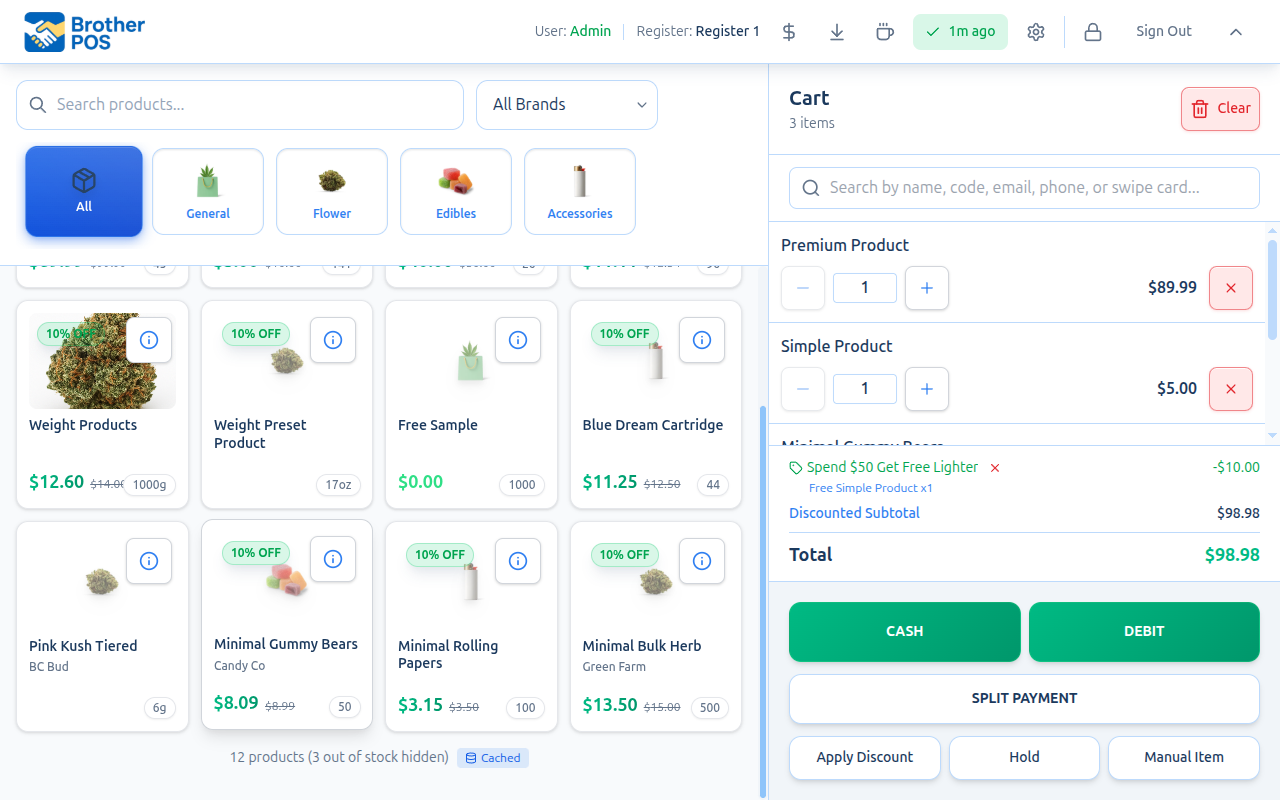
The cart pane on the right side of the POS screen is where you build the customer's order. This guide covers everything you can do with cart items before completing payment.
Cart Overview
The cart pane displays:
- Customer search at the top (to find or attach a customer)
- Line items in the middle (scrollable if there are many items)
- Totals area showing subtotal, discounts, tax, and total
- Action buttons at the bottom (payment methods, Apply Discount, Hold, Manual Item)
On a phone, tap the cart button in the bottom bar to open the cart full screen.
More detail: adding every kind of item
Adding Items to the Cart
Standard Products
Tap a product card in the product grid. The item appears in the cart with a quantity of 1. Tapping the same product again increments the quantity.
If you have given a line its own discount, adding the same product again starts a new line at the regular price instead of joining the discounted one.
If a product has no price set anywhere, tapping it opens a No price set window first, warning that it will ring up at $0.00. Tap Add at $0.00 to add it anyway, or cancel and ask a manager to set its price in Products. To charge an amount for it right now, use Manual Item instead.
Products with Bulk / Multi-Buy Pricing
Some products are set up with a bulk deal — a lower per-unit price when the customer buys a set quantity or more (for example, "Buy 5+ for $5 each"). When you open the product's info window, it shows a Bulk pricing section listing each deal as a badge, such as:
Buy 5+ · $5.00 ea · save $2.00
You don't have to do anything special to apply it. Just add the product and adjust the quantity in the cart — once the count reaches a bulk break point, the lower price kicks in automatically. See Bulk / Multi-Buy Pricing for how these deals are set up.
Barcode Scanning
Scan a product barcode to add it instantly. If the product is already in the cart, its quantity increases by 1. See Product Search and Scanning for scanner details.
Weight-Based Products
Tapping a weight-based product opens the weight selection modal. After choosing a weight, the item is added to the cart with the selected weight as its quantity (e.g., "3.5g" of Blue Dream). See Weight-Based Products.
Products with Variations
Products with variations (size, color, etc.) open a variation picker modal. You can select one or more variations and set quantities for each before adding them all to the cart at once. See Modifiers and Variations.
Products with Modifiers
Products with modifier groups (add-ons, toppings, customizations) open a modifier selection modal. You must satisfy any required modifier groups before adding. To change the choices once the item is in the cart, tap Edit on its cart line. See Modifiers and Variations.
Bundles, Combos, Platters and Buckets
Some items are made from other products (they usually carry a Bundle badge on the card):
- Fixed bundles go straight into the cart. If any part has its own options — such as toppings on the fries in a combo — you're asked for them first, labelled with the part (e.g., Fries: Toppings).
- Combos with a choice open a window where you pick each choice, such as Choose 1 pop. The item won't go in the cart until every choice is filled.
- Build-your-own platters open a builder. Tap items to add them; use + and − to take two of the same thing. The button reads Pick 2 more until enough items are chosen, then Add to cart.
- Buckets show Pick one — 5 of the same. Tap one kind and the whole bucket is that kind. Tapping a different kind swaps it.
Items that can't cover the pick show Only 2 left or Out of stock, counting what's already in the cart.
On the cart line, the picks are listed under the item. A bucket shows the count — • 5 × Budweiser.
Platters, buckets and combos with picks can't be saved to a tab. Check them out directly. They can be held and recalled normally.
For how these are set up, see Bundles, Combos & Buckets.
More detail: stock limits and back stock
Stock Limits
The register won't let the cart hold more of a product than is available:
- Tapping the product in the grid again, or tapping + on its cart line, is refused once the cart already holds all the available stock.
- A message tells you Out of stock or Only 3 available.
- Products set to Allow Negative Stock in the admin are never refused — they can be sold past zero.
- Scanning a barcode for an item that doesn't have enough stock opens a Stock Override Required window instead. It shows the available stock and the amount asked for. Type a Reason for Override, have a manager enter their PIN in Manager PIN, and tap Add to Cart to add it anyway, or Cancel. The PIN must belong to someone whose role has the Adjust Stock permission (managers have it by default). If your own role has it, you aren't asked for a PIN. See Manager Override.
Items Kept in Back Stock
If your store keeps stock in more than one place, such as a Sales Floor and Back Stock (a vault or stock room), the register sells only what is on the Sales Floor.
When you add an item (by tapping it, scanning it, or tapping + on its cart line) and the Sales Floor doesn't have enough but Back Stock does, the item is not added. Instead a Not on the sales floor window opens. For example:
Pink Runtz: 0g on the sales floor, 420g in back stock. Bring 14g out to the floor to sell it?
- Bring the item out from the back.
- Tap Move 14g to floor. Only the missing amount is moved, not everything in the back.
- The item is then added to the cart (or the quantity change goes through).
Good to know:
- This applies even to products set to Allow Negative Stock, and a manager's stock override doesn't skip it. The stock is in the store; it just has to be moved out front first.
- If Back Stock is empty too, the usual stock limits above apply instead.
- Moving stock needs the Adjust Stock at the Register permission. Clerks have it by default.
- A sale rung up while the register was offline is always kept, even if the Sales Floor didn't have enough. The stock history for that product notes that the sales floor was short and what came out of back stock.
See Stock Adjustments for how Sales Floor and Back Stock work.
More detail: changing quantities
Adjusting Quantities
Using +/- Buttons
Each line item has + and - buttons to adjust the quantity:
- Tap + to increase by 1 (or by the appropriate increment for weight products).
- Tap - to decrease by 1. The minus button disables at the minimum quantity (1 for unit products), so the quantity never reaches zero through this button. Use the remove button to take items out entirely.
Editing Quantity Directly
Tap the quantity number on a line item to enter edit mode. Type the exact quantity you want and press Enter or tap away to confirm.
Lines sold by weight preset show a count instead (for example 2 for 2× 3.5g). Use + and - to change those.
Bulk Pricing on the Line Item
When a product has a bulk / multi-buy deal and you raise the quantity to a break point, the line item updates automatically:
- The per-unit price drops to the bulk rate, and the line total follows.
- A small Qty pricing: $X ea note appears under the item, with the regular price crossed out beside it.
Lower the quantity back below the break point and the regular price returns.
Weight Product Quantities
For weight-based products:
- Weight preset and tiered products (cannabis): The +/- buttons add or remove whole units of that weight. For example, if a customer has 1x 3.5g, pressing + gives them 2x 3.5g (7g total).
- Per-gram products: The +/- buttons adjust by 0.5g increments. A product shown by the ounce or pound steps by one ounce or pound instead.
Adding the same tiered product again at another weight creates a separate line rather than joining the existing one.
More detail: removing items, manual items and clearing the cart
Removing Items
To remove an item from the cart:
- On a phone or narrow screen: Tap the red X column beside the item.
- On a wider screen: Tap the X button on the item row.
The minus button cannot remove items — it disables at a minimum quantity of 1. Use the remove button instead.
Removing all items returns the cart to an empty state.
Manual Items
The Manual Item button lets you add a custom line item that does not exist in your product catalog.
Adding a Manual Item
- Tap Manual Item in the action buttons area.
- Enter an Item Name (e.g., "Custom Engraving").
- Enter the Price (must be more than zero).
- Set the Quantity.
- Choose whether the item is Taxable (ticked by default; only shown when your store charges tax).
- If your store charges an additional tax, such as a vapour products tax, a Charge Vapour Products Tax (20%) box appears (with your store's tax name and rate). It starts unticked. Tick it when the item should carry that tax, for example a vape that isn't in your catalogue. Only a taxable item can carry it.
- Tap Add to Cart.
If your role isn't allowed to sell manual items, the POS first asks for a manager's 4-digit PIN. Once a manager approves, a Reason is also required (for example, "barcode damaged").
Manual items are useful for one-off charges, services, or miscellaneous items that do not need to be tracked in inventory. They do not affect stock levels.
Clearing the Cart
To remove all items and start fresh:
- Tap the Clear button (trash icon) at the top of the cart pane. The cart is cleared immediately.
Clearing the cart also removes the attached customer, applied discounts, chosen rewards and applied store credit. There is no confirmation prompt and it cannot be undone.
If you are building a phone order (the order badge shows at the top of the cart), clearing removes only the items. The customer and the order's details are kept. Tap the × on the order badge to drop them and go back to a normal sale.
More detail: holding orders and attaching a customer
Holding and Recalling Orders
Holding an Order
If a customer needs to step away or you need to serve someone else:
- Tap the Hold button in the action buttons area.
- Enter an Order Name (required, e.g., "Customer went to ATM").
- Tap Hold Order to save it.
The cart clears, including the attached customer, and is ready for a new sale. The customer is saved with the held order.
Recalling an Order
When the customer returns:
- Tap the Recall button (appears when the cart is empty).
- A list of held orders appears, showing each order's name, who held it and when.
- Tap the held order, then tap Recall Order to load it back into the cart. The customer who was attached comes back with it.
- Continue the sale as normal.
For more details, see Hold and Recall.
Attaching a Customer
Use the customer search at the top of the cart pane to find an existing customer or create a new one.
Benefits of Attaching a Customer
- Loyalty points are earned on the sale.
- Tier discounts are applied automatically if the customer qualifies.
- Purchase history is recorded against their profile.
- Loyalty rewards become available in the discount window.
- Cannabis compliance: daily purchase limits are tracked per customer.
Removing a Customer
Tap the X next to the customer name to detach them from the current sale.
More detail: the totals, tax and purchase limits
Cart Totals Breakdown
The totals section at the bottom of the cart shows only the lines that apply to the current order:
| Line | Description |
|---|---|
| Subtotal | Sum of all line items before order-level discounts and tax |
| Quality Tier Savings | Saved when several quality-tier items combine for a better price (if any) |
| Order Discount | Whole-order discount, with the percentage if it is one (if any) |
| Promotion name | A promotion or spend-based discount that applied, shown by its name (if any) |
| Loyalty tier, e.g. "Gold (10% off)" | Automatic loyalty tier discount (if the customer qualifies) |
| Promo code | A promo code entered for this sale, with the amount it takes off. If the code can't be used, the line says why it wasn't applied (if any) |
| Loyalty Reward Discount / pts redeemed | Loyalty reward or points the customer redeemed (if any) |
| Discounted Subtotal | The subtotal after the discounts above |
| Tax | Tax with its rate, for example Tax (13%), calculated on the discounted subtotal |
| Additional tax, e.g. "Vapour Products Tax (20%)" | Your store's additional tax with its rate, on the items that carry it (if any) |
| Delivery Fee / Shipping | Added when the order is set up for delivery or shipping (if any) |
| Store Credit | Store credit applied to the sale (if any) |
| Total | Final amount the customer pays |
Discounts on a single item are shown on that item's line, not as a separate total. Most of the discount lines have a small X you can tap to take that discount off. A deal that only gives a free item has no line here; its X is on the free item's row instead (see Declining a Promotion).
If your store has Charge tax on delivery and shipping fees switched on (in the admin under Settings, on the Sales & Integrations tab, in the Delivery & Shipping Fees section), the delivery fee or shipping cost is taxed too, and that tax is included in the tax line. It's off by default. The additional tax (such as vapour tax) is never charged on fees.
If the totals take a while, the cart shows Updating totals…, and Still calculating — the server is slow to answer if it takes longer. Wait for the totals to settle before taking payment.
Split Tax Display
If your store uses split tax mode (e.g., GST + PST in Saskatchewan or British Columbia), the tax line splits into separate GST and PST amounts with their rates, for example GST (5%) and PST (6%). An additional tax, such as a vapour products tax, shows on its own line with its rate.
Cannabis Compliance
For cannabis stores that enforce purchase limits, the totals area also shows:
- The Cannabis Equivalent grams for the current order against the limit (for example 12.5g / 30g), with a progress bar
- When the attached customer has already bought today: Purchased today, This cart, Daily Total and Remaining
What counts toward the limit is what actually leaves the store:
- A case or pack counts every unit in it (a case of 12 pre-rolls counts 12 pre-rolls).
- Loose product sold by the gram counts by the weight sold, not by a package size.
- Drinks, oils and tinctures sized in mL count as liquids: 70 mL counts as 1g of dried cannabis. A 355 mL drink counts about 5g, and a 30 mL oil about 0.43g. Vape cartridges and other concentrates of 30 mL or less count at the concentrate rate instead.
- Flower poured heavy (for example, 10g in the bag for a 7g charge) goes into the customer's daily total as what was poured, not what was charged.
- Online orders count too. A pending phone or online order is checked again against the limit when it's completed at the register.
If the order goes over the limit, the cart shows Exceeds purchase limit - Manager override required (or Daily limit exceeded - Manager override required). When you take payment, a manager must approve the override before the sale can go through.
More detail: freebies, tapping a line, and printing labels
Freebie Progress Bar
When your store has active freebie campaigns, a progress bar appears below the cart items showing how close the customer is to qualifying for a free item. For example:
Spend $12.50 more to get: 1x Rolling Papers FREE
Once the spend threshold is met, the free item appears in the cart marked FREE. See Sale Campaigns and Freebies for details.
Tapping a Line Item
Tapping a line item (anywhere other than its buttons) opens the discount window with that item already selected, so you can discount just that line. Free items, payout lines and room charges brought in from a reservation can't be discounted this way. See Applying Discounts.
To change an item's options, typed requests or special instructions, tap the Edit button on its line instead. It shows on items that have modifiers, but not on manual items, free items or room charges brought in from a reservation. See Modifiers and Variations.
Printing a Label From the Cart
On a wider screen, items that take a product label show a printer button (Print label, or Reprint label once printed) on their cart line. Free items from a promotion can have one too. The button only shows when your store has label printing on and this register's label printer is switched on. See Label Printing.
What's Next?
- Weight-Based Products — weight presets, custom weights, and scale integration
- Applying Discounts — percentage, dollar, and final price discounts
- Completing Payment — processing the sale
- Hold and Recall — saving and retrieving orders