Fulfillment
Brother POS supports two fulfillment methods for orders that are not picked up in store: local delivery and shipping. Both are initiated from the POS register and follow a guided step-by-step wizard that collects customer info, delivery address, payment method, and creates the order.
Before You Begin
- Local delivery must be enabled via the local delivery setting in your store settings.
- Shipping must be enabled via the shipping setting.
- Delivery zones and shipping zones must be configured in the admin panel before orders can be placed.
- The Pending tab in Sales History only appears when delivery or shipping is enabled.
Fulfillment orders are feature-flagged. If your store does not offer delivery or shipping, these options will not appear in the POS interface. Contact your admin to enable them.
Creating a Fulfillment Order
Step-by-Step
The fulfillment wizard walks you through five steps:
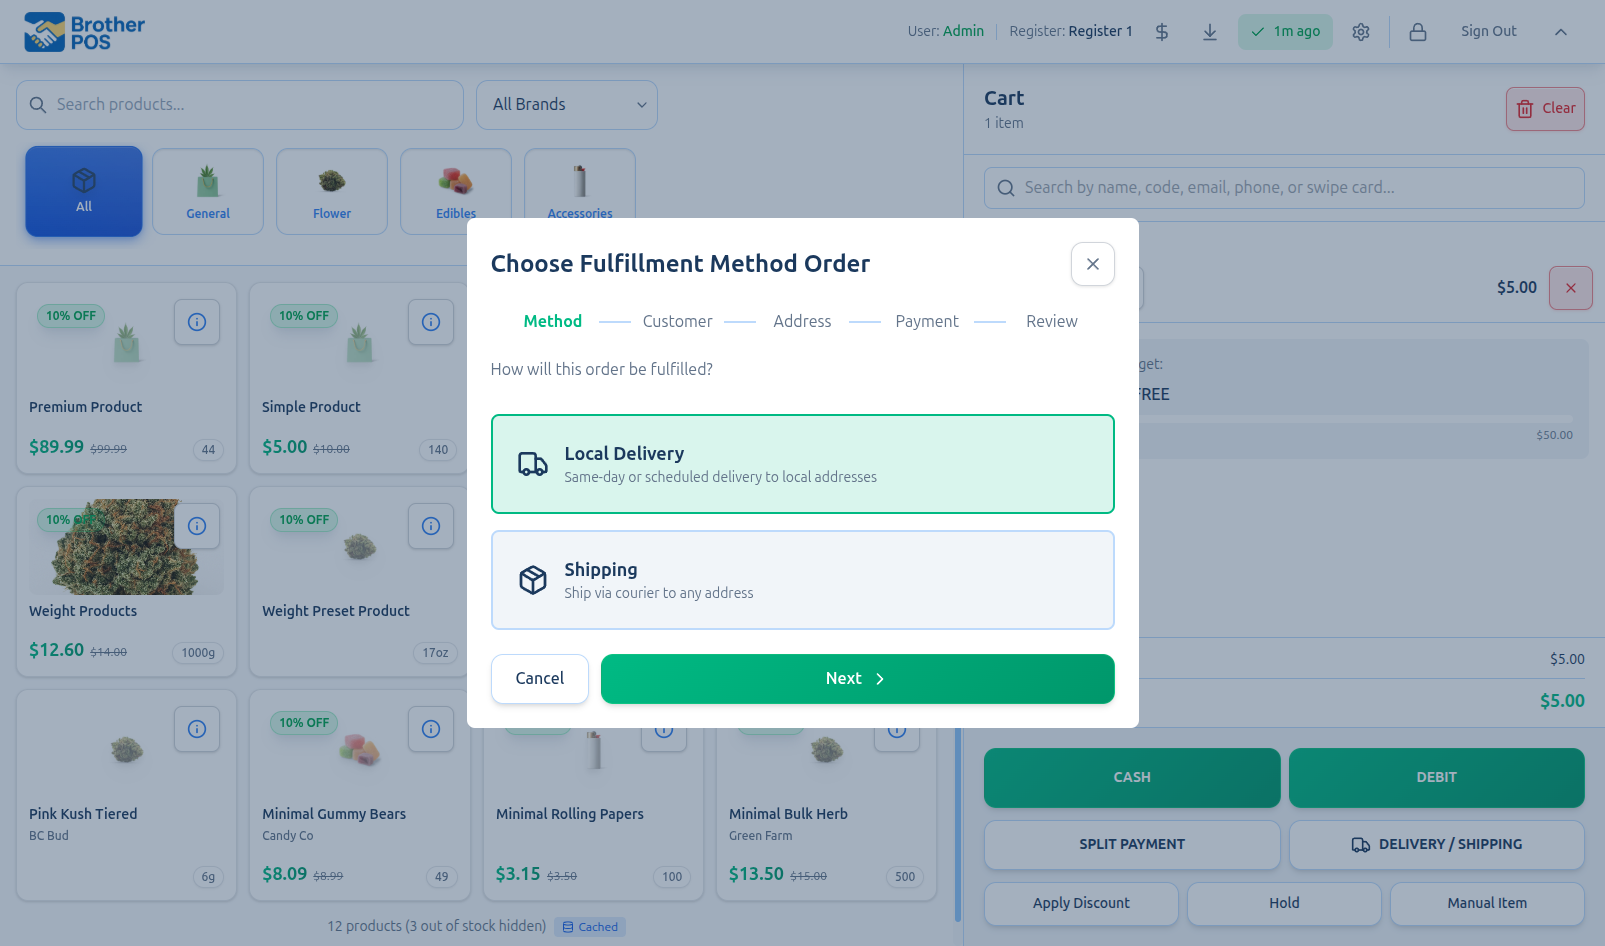
Step 1: Choose Fulfillment Method
-
The Create Order button (phone icon) appears in the tender buttons area when the cart is empty. Tap it to open the Create Order modal, which includes the fulfillment options for delivery and shipping.
-
Choose between:
Method Description Local Delivery Same-day or scheduled delivery to addresses within your delivery zones Shipping Courier shipping to any address, typically for out-of-area customers -
Tap Next to continue.
Step 2: Customer Information
-
Select an existing customer using the customer search, or enter new customer details:
- Name (required)
- Phone (required)
- Email (optional)
-
If you select an existing customer, their saved address and phone number auto-fill in the next step.
-
Tap Next to continue.
Step 3: Delivery Address
-
Fill in the delivery address:
Field Local Delivery Shipping Recipient Name Required Required Address Line 1 Optional Required Address Line 2 Optional Optional City Optional Required Province Optional Optional Postal Code Optional Required Phone Required Required Delivery Notes Optional Optional -
Postal code lookup -- When you enter a postal code, the system automatically checks whether it falls within a configured delivery or shipping zone and calculates the fee:
- If the postal code is in range, the zone name and fee are displayed.
- If it is out of range, an error message appears.
-
Manual zone selection (local delivery only) -- If you know the delivery zone but do not have a postal code, you can select a zone from the dropdown. The fee is calculated based on the selected zone.
-
Free delivery threshold -- If the zone has a free delivery threshold and the order subtotal meets or exceeds it, the delivery fee is automatically waived.
-
Scheduled delivery (optional) -- Set a delivery date and time slot:
- Morning (9 AM - 12 PM)
- Afternoon (12 PM - 5 PM)
- Evening (5 PM - 9 PM)
-
Delivery notes -- Add instructions like "Ring doorbell twice" or "Leave at back door."
-
Tap Next to continue.
Step 4: Payment Method
-
Choose how the customer will pay:
Option Description Cash on Delivery Customer pays the driver in cash Debit on Delivery Customer pays with card at delivery E-Transfer Customer sends an e-transfer before or after delivery Only payment methods enabled in your store settings appear as options.
-
Tap Next to continue.
Step 5: Review and Confirm
-
Review the complete order summary:
- Customer name and phone
- Delivery/shipping address
- Order items and quantities
- Subtotal, delivery/shipping fee, tax, and total
- Payment method
-
Tap Create Order to finalize.
The order is created with a pending status. It appears in the Pending tab of Sales History and is ready for dispatch.
Viewing Pending Orders
Pending fulfillment orders appear in the Pending tab of Sales History:
- View Recent Activity in the cart panel (visible when the cart is empty), or tap a completed sale to see its details.
- Switch to the Pending tab.
- Each order shows:
- Order number and customer name
- Fulfillment type (delivery or shipping)
- Status (pending, in transit, delivered)
- Total amount and payment method
Pending orders refresh automatically every 10 seconds while online. New orders from phone calls or the admin panel appear without manual reload.
Completing a Pending Order
When a pending order has been delivered or picked up:
- Select the order in the Pending tab.
- Tap Complete Order.
- The order status changes to completed, and it moves to the Sales tab.
Delivery Fee Calculation
Delivery fees are determined by the delivery zone configuration:
| Factor | How It Works |
|---|---|
| Zone-based fee | Each delivery zone has a flat fee set by your admin |
| Free delivery threshold | If the order subtotal exceeds the zone's threshold, the fee is waived |
| Postal code matching | The system matches the customer's postal code to a zone's patterns |
| Manual override | You can manually select a delivery zone if postal code lookup fails |
For shipping orders, the fee is calculated based on the shipping zone configuration, which may use distance-based or flat-rate pricing.
Common Scenarios
Phone Order for Delivery
A customer calls to place a delivery order:
- Add items to the cart based on the customer's request.
- Open the Fulfillment wizard.
- Select Local Delivery.
- Search for the customer or enter their details.
- Fill in the delivery address and notes.
- Choose Cash on Delivery (or their preferred method).
- Review and create the order.
- The order appears in the Pending tab for your driver.
Customer Pickup Order (Created Over Phone)
- Follow the same process but without a delivery fee.
- When the customer arrives, find the order in the Pending tab.
- Collect payment and complete the order.
Delivery Zone Not Found
If the customer's postal code does not match any configured delivery zone:
- Manually select a delivery zone from the dropdown if you know which one applies.
- If the address is genuinely out of range, inform the customer that delivery is not available for their area and offer shipping instead (if enabled).
Editing a Pending Order
To modify a pending order before fulfillment:
- Select the order in the Pending tab.
- Use the edit function to adjust line items, quantities, or customer info.
- Save the changes. The updated order replaces the original.
Driver Mobile App
If your store uses the Driver Mobile PWA, pending delivery orders are automatically pushed to drivers' devices. Drivers can:
- View their assigned deliveries
- Navigate to delivery addresses
- Confirm delivery with customer signature or photo
- Update order status in real time
The POS Pending tab reflects driver status updates as they happen.
Troubleshooting
| Problem | Solution |
|---|---|
| Fulfillment button not visible | Local delivery or shipping is not enabled for your store. Ask your admin to enable the feature flag. |
| "Not in delivery area" error | The postal code does not match any configured delivery zone. Try manual zone selection or check with your admin. |
| No delivery zones in dropdown | Your admin needs to create delivery zones in Admin > Delivery > Zones. |
| Pending tab not showing | This tab only appears when local delivery or shipping is enabled. |
| Delivery fee showing $0 unexpectedly | The order subtotal may have met the free delivery threshold for the selected zone. |
| Driver not receiving orders | Check the driver's app connectivity and ensure they are logged in and assigned to your store. |
Best Practices
- Verify the address before creating the order. Incorrect addresses cause delivery failures and wasted driver time.
- Use delivery notes generously. Instructions like apartment numbers, gate codes, and special directions save time.
- Set realistic time slots. Do not promise morning delivery if orders are placed in the afternoon.
- Complete orders promptly. Once a delivery is confirmed, mark it as completed so inventory and reports stay accurate.
- Review pending orders at end of day. Any uncompleted orders should be investigated.
What's Next?
- WooCommerce Orders -- Handle online orders that may need delivery
- Sales History -- View all completed and pending orders
- Making a Sale -- Standard in-store sales workflow