POS Quick Start
This guide walks you through your first sale on the Brother POS POS Register. In about 5 minutes, you will learn how to log in, find products, add them to the cart, and complete a transaction.
Make sure your administrator has:
- Created your user account with a PIN
- Opened a cash drawer session on the register you will be using
- Loaded products into the system
If any of these are missing, ask your manager for help.
Step 1: Open the POS
Open your browser and navigate to:
https://storename.brotherpos.ca/pos
Replace storename with your store's actual subdomain.
If the POS has been installed as a PWA (Progressive Web App) on your register device, simply tap the Brother POS icon on your home screen or desktop.
You should see the PIN login screen — a numeric keypad waiting for your input.
Step 2: Log In with Your PIN
- Enter your 4-digit PIN using the on-screen keypad or a physical keyboard.
- The system will verify your PIN and load the POS interface.
If your PIN is not accepted:
- Double-check that you are entering the correct digits.
- Ask your manager to verify your PIN or reset it.
- Make sure you are on the correct store's subdomain.
If no cash drawer session is currently open, you may see a message indicating that a drawer needs to be opened before you can make sales. Opening a drawer requires the Manage cash sessions permission, which is typically granted to managers and admins. If you do not have it, ask your manager to open the drawer for you.
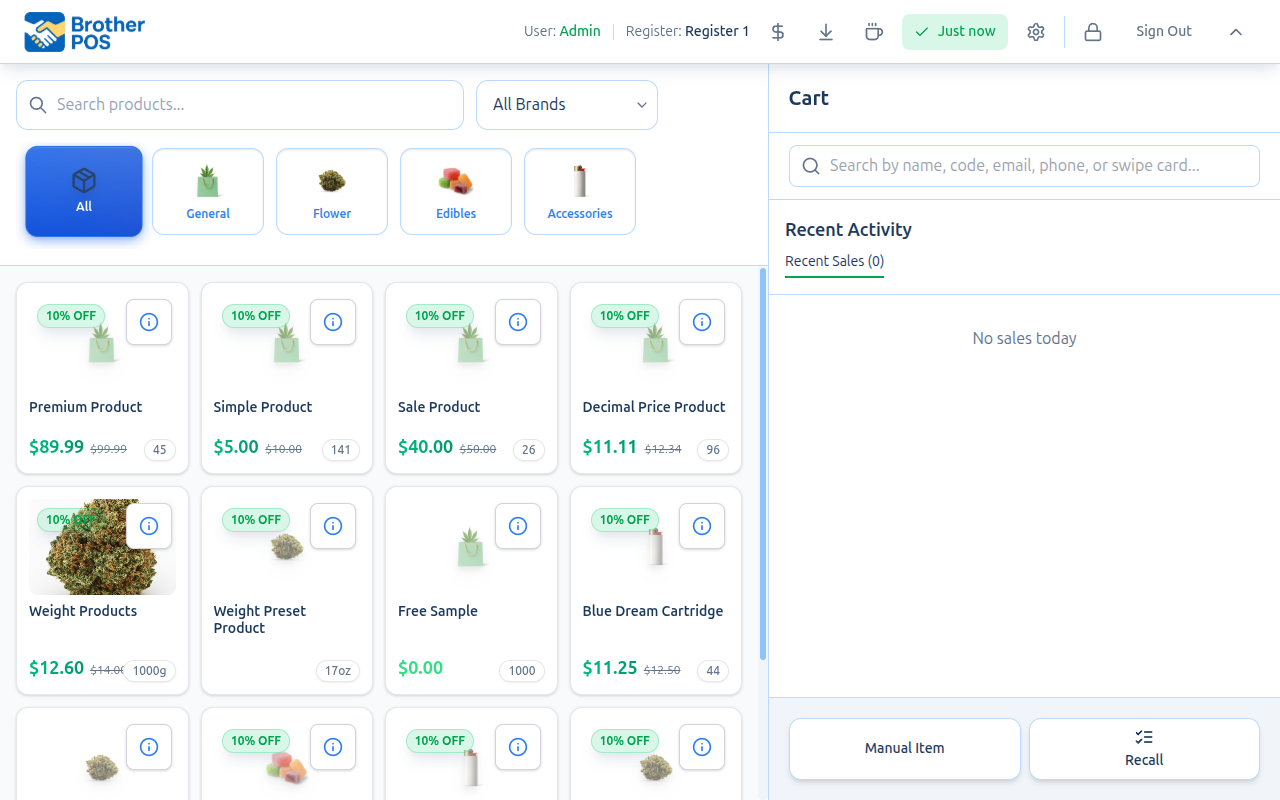
Step 3: Find a Product
Once logged in, you will see the main POS screen with a product grid showing available items. There are several ways to find the product you need:
Browse by Category
- At the top of the product grid, you will see a category bar with buttons for each product category (e.g., Flower, Edibles, Concentrates, Accessories).
- Tap a category to filter the product grid to only show items in that category.
- Tap "All" to show all products again.
Search by Name
- Tap the search bar at the top of the screen.
- Start typing the product name. Results will filter in real time as you type.
- Tap the matching product to add it to the cart.
Scan a Barcode
- If your register has a barcode scanner, simply scan the product's barcode.
- The scanner acts as a keyboard — it types the barcode number and the POS automatically finds and adds the matching product.
For high-volume stores, barcode scanning is the fastest way to add products. Just point and scan — the product is added to the cart instantly.
Step 4: Add Items to the Cart
When you find a product, tap on it in the product grid. The product is added to the cart on the right side of the screen.
Adjusting Quantity
- To add multiple units of the same product, you can:
- Tap the product in the grid again (each tap adds one more unit)
- Tap the quantity in the cart and use the + and - buttons
- Type a specific quantity using the number input
Weight-Based Products
Some products (especially cannabis flower) are sold by weight. When you add a weight-based product:
- A weight selection panel appears.
- Choose from preset weights (e.g., 1g, 3.5g, 7g, 14g, 28g) or enter a custom weight.
- If a scale is connected, you can tap "Read Scale" to pull the weight directly from the scale.
- The price is calculated automatically based on the weight and the product's price per gram.
Reviewing the Cart
The cart panel on the right shows:
- Each product with its name, quantity, and line total
- The subtotal before tax
- The tax amount
- The total due
To remove an item from the cart, tap the delete/trash button next to the item.
Step 5: Complete the Sale
When the cart is ready, it is time to process payment.
-
The payment method buttons (CASH, DEBIT, E-TRANSFER (if enabled), STORE CREDIT (if enabled), SPLIT PAYMENT) are directly visible in the cart panel below the cart totals.
-
Tap the appropriate payment method button to proceed.
-
Select a payment method:
- Cash — Enter the amount tendered. The system will calculate the change due.
- Debit — The customer pays by debit card at your terminal.
- Store Credit — The customer pays using a pre-loaded store credit balance (if enabled).
- Split Payment — The customer pays using multiple payment methods.
-
Confirm the payment by tapping the confirm or complete button.
-
The sale is recorded, the receipt prints (if a printer is connected), and the POS returns to the product grid ready for the next customer.
Cash Payments
When processing a cash payment:
- Tap "Cash" as the payment method.
- Enter the amount the customer gave you. For example, if the total is $23.45 and the customer gives you $25.00, enter
25.00. - The system shows the change due — in this case, $1.55.
- Give the customer their change and tap "Complete".
The payment screen displays quick cash buttons ($10, $20, $50, $100) so you can tap the amount instead of typing it. When no amount has been entered, the main completion button shows "Exact" — tap it to record the sale for the exact total with no change due. Use these to speed up cash transactions.
Card Payments
For debit payments:
- Tap "Debit" as the payment method.
- The customer processes their card on the payment terminal.
- Once the terminal confirms the payment, tap "Complete" on the POS.
Step 6: Receipt
After the sale is complete:
- If a receipt printer is connected, the receipt prints automatically.
- You can print the receipt or skip it.
- To reprint a receipt, you can find the transaction in the sales history and print it again.
Quick Reference: Your First Sale
Here is the entire flow in summary:
| Step | Action |
|---|---|
| 1 | Open storename.brotherpos.ca/pos |
| 2 | Enter your PIN |
| 3 | Find the product (browse, search, or scan) |
| 4 | Tap the product to add it to the cart |
| 5 | Adjust quantity if needed |
| 6 | Select payment method (Cash, Debit, Store Credit, or Split Payment) |
| 7 | For cash: enter amount tendered and give change |
| 8 | For debit: process card on terminal |
| 9 | Tap "Complete" |
| 10 | Hand the customer their receipt |
Common Scenarios
Customer Wants to Add More Items
No problem — just keep adding products to the cart before selecting a payment method. There is no limit to the number of items in a single transaction.
Customer Changed Their Mind About an Item
Tap the item in the cart to select it, then remove it. The totals will update automatically.
Customer Wants a Discount
If you have permission to apply discounts:
- Select the item in the cart (or apply a discount to the whole order).
- Tap the "Discount" button.
- Enter the discount as a percentage or a dollar amount.
- The cart totals update to reflect the discount.
Not all cashiers can apply discounts. This depends on your store's permission settings. If you cannot see the discount button, ask your manager to apply the discount for you or to grant you discount permissions.
Customer Has a Loyalty Account
- Before starting the sale (or during), use the customer search bar at the top of the cart panel.
- Search for the customer by name, phone number, or loyalty ID.
- Select the customer from the results.
- Their loyalty tier and any applicable discounts will be applied automatically.
- Complete the sale as normal — loyalty points are earned automatically.
Voiding a Sale
If you need to cancel the entire transaction before completing it, tap "Clear Cart" or the void/cancel button. This removes all items and resets the cart.
Once a payment has been processed and the sale is completed, you cannot void it from the POS. You will need to process a return instead. See your manager for help with returns.
Tips for New Cashiers
-
Practice first. Ask your manager if there is a training mode or if you can do a few practice transactions before going live.
-
Learn the categories. Knowing which category a product belongs to helps you find it faster when searching.
-
Use the barcode scanner. It is faster and eliminates the risk of adding the wrong product.
-
Count cash carefully. Always count the cash before entering the amount tendered. The POS will calculate the change, but you need to enter the correct amount.
-
Ask for help. If something does not look right or you are unsure about a step, ask your manager. It is better to ask than to process an incorrect transaction.
-
Stay logged in as yourself. Always use your own PIN. Never process a sale under someone else's PIN.
What's Next?
- Navigating the POS — Learn about every part of the POS interface in detail.
- Making a Sale — The complete guide to the sales workflow.
- Language & Theme — Customize the POS language and appearance.
- User Roles & Permissions — Understand what you can and cannot do with your role.