Scale
Use this page to connect a scale to the register and weigh products into the cart.
Quick steps
To connect the scale (first time):
- Tap the gear button (Settings) in the register's top bar and find the Scale section.
- USB scale on a computer (Chrome or Edge) or the Android app: plug it in, tap Auto-Detect. On a computer, pick your scale from the list and click Connect.
- Wi-Fi scale (iPad, or a computer with the Printer Bridge running): tap Scan for scale (on a computer, first tap Scale on Wi-Fi instead), then Test and Save. This needs the Configure Scale permission.
- You'll see the live weight and Stable when it's working. After this, the register reconnects on its own.
To weigh an item:
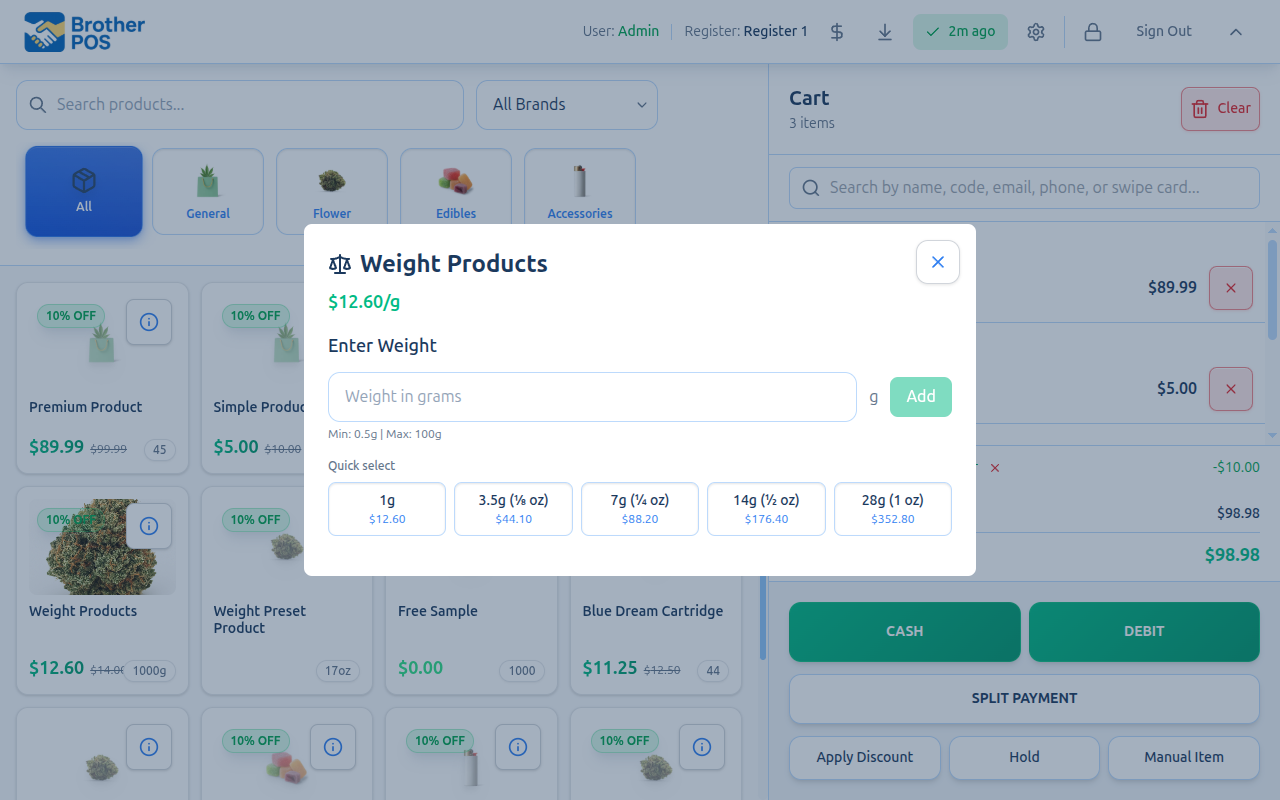
- Tap or scan the weighed product. The weight window opens.
- Using a bag or tray? Put it on the scale empty and tap Tare.
- Pour the product and wait for Stable.
- Tap Use Scale Weight (or Use _N_g for a per-gram product). The item goes into the cart at that weight.
No scale, or it stopped working? You can always type the weight on the number pad in the weight window.
Common questions
The reading says "In motion" and I can't tap the button. Wait for the item to settle. The button works once the reading shows Stable.
The scale is connected but shows no weight. Tap Auto-Detect again. It tries each setting until the scale's readings come through.
Scan for scale finds nothing. Read the message under the button — it says what went wrong. You can also type the scale's address by hand. See If Scan Finds Nothing.
Why does the reading turn amber? The pour is heavier than the size you're charging for, beyond the free give-away your store allows. Pour a little back.
More detail: connection types and before you begin
Brother POS lets you weigh products directly at the register and capture the weight into the cart. There are three ways the register can talk to a scale:
| Connection | Where it's used | How it works |
|---|---|---|
| USB | A computer in Chrome or Edge, or the Android app | The scale plugs into the register with a USB cable or USB-to-serial adapter |
| Wi-Fi (iPad app) | iPad POS app | The iPad reaches the scale's USR-W610 Wi-Fi adapter over your store's network |
| Wi-Fi (computer browser) | A computer's browser | The browser reaches the same adapter through the Printer Bridge running on that computer |
All three give you a live weight reading, a stable/in-motion indicator, and a manual weight entry fallback. The deli-style weigh-heavy workflow (capture the actual dispensed weight, allow a free give-away over the tier) works with any connected scale.
This page covers using the scale from the register. For store-wide scale settings, see Scales in the admin guide, and Printer Bridge for using a Wi-Fi scale in a browser.
Before You Begin
- The Enable Scale Integration store setting must be turned on.
- For a USB scale on a computer: use Google Chrome or Microsoft Edge. The scale connects through a USB-to-serial adapter, and the device list only shows adapters with Prolific (PL2303), FTDI (FT232R), Silicon Labs (CP210x) or QinHeng (CH340/CH341) chips. The browser asks for permission the first time you connect.
- For a Wi-Fi scale: a USR-W610 adapter connects the scale to your store's network. The iPad app reaches it directly; a computer's browser reaches it through the Printer Bridge (see Wi-Fi Scale in the Browser).
On a computer, a USB scale only connects in Chrome or Edge. The iPad can't use a USB scale. The Android app connects a USB scale on its own, but it doesn't read a Wi-Fi scale. A Wi-Fi scale works in the iPad app and in a computer's browser. If none of these fit, use manual weight entry.
More detail: connecting a USB scale
Connecting a USB Scale
First-Time Setup
-
Plug the scale into a USB port on your register.
-
Open the POS register.
-
Open the scale settings by tapping the gear button (Settings) in the top bar. The Scale section is in that window.
-
Choose how to connect:
Method Description Auto-Detect Brother POS tries each common speed and data format until the scale's readings come through Connect Scale Connects at the speed picked in Baud Rate (9600 is the most common) -
On a computer, the browser shows a list of serial devices. Select your scale and click Connect.
-
Once connected, the live weight reading shows in the Scale section, along with Stable or In motion.
Auto-Detect
Scales don't all send at the same speed or in the same data format. If the register listens with the wrong one, it hears nothing, which looks exactly like a dead cable. Auto-Detect finds the right combination for you:
- Tap Auto-Detect in the scale settings.
- The browser shows the device list. Select your scale.
- The button shows what it's trying, for example Trying 4800 7E1.... It tries every speed (9600, 4800, 2400, 1200) in the standard format first (8N1). Then it tries the formats that lab and pharmacy balances are often set to (7E1, 7O1 and 8E1).
- When readings come through, you'll see something like Detected and connected at 9600 baud, 7E1. The speed (shown as the Baud Rate) and the data format are saved on this device.
Connect Scale, Read Raw Data and the automatic reconnect all use the speed and format Auto-Detect found. A scale set to 7E1, for example, only needs Auto-Detect once on each device.
Some balances only send a weight when you press their Print or Output key, so Auto-Detect hears nothing at any speed. It says so when it gives up. To check, tap Read Raw Data (it listens for 3 seconds) and press the scale's Print or Output key while it's listening. If anything shows up, the scale is talking.
In the Android app, Auto-Detect tries the speeds in the standard format only.
Auto-Reconnect
After you connect a scale with Connect Scale or Auto-Detect, Brother POS remembers it, including its speed and data format, and reconnects on its own, without showing the device list:
| Situation | What happens |
|---|---|
| You reload or reopen the POS | On launch, the register quietly re-opens the USB scale it was last connected to, as long as Auto-connect on startup is ticked in the scale settings. It's ticked unless someone unticks it. Unticking it doesn't affect a saved Wi-Fi scale. |
| The scale powers back on (computer) | USB scales get switched off far more than printers do. When the scale powers up again, the register notices and re-opens it. |
| A Wi-Fi scale is saved for the register | The iPad app, and a computer's browser with the Printer Bridge running, connect to it on startup. |
- The device list only appears the first time you connect.
- If you tap Disconnect Scale, the scale stays off until you connect it again by hand.
- If the scale is unplugged or unreachable, the reconnect quietly fails and manual entry is still available.
More detail: connecting a Wi-Fi scale
Connecting a Wi-Fi Scale
A Wi-Fi scale plugs into a small USR-W610 Wi-Fi adapter (the "bridge") that puts the scale on your store's network. This is the recommended setup for iPad registers, since an iPad can't use a USB scale.
Setting Up a Wi-Fi Scale
If your role has the Configure Scale permission, you can find, test, and save the scale's bridge right from the register, with no admin login. This works in the iPad app or on a computer.
Open the Wi-Fi scale panel:
| Device | How to get there |
|---|---|
| iPad app | Open the Scale settings. The Wi-Fi scale panel is the only one shown. |
| Computer (Chrome or Edge) | Open the Scale settings and tap Scale on Wi-Fi instead (USR-W610 or similar), below the USB controls. |
| iPad or computer, once a Wi-Fi scale is saved | Open the Scale settings. The Wi-Fi scale panel opens straight away. |
The Android app doesn't show the Wi-Fi scale panel or the Scale on Wi-Fi instead button, because it can't read a Wi-Fi scale.
Find and save the scale:
-
Tap "Scan for scale." The button reads Scanning… while it looks, which can take up to about 15 seconds. The register first calls out to scale bridges on the network. If none reply, it checks every address on the network it's connected to.
- On a computer, the search is done by the Printer Bridge running on that same computer, so the bridge must be running.
- On an iPad, the first scan may ask for permission to find devices on your local network. Tap Allow.
-
If one scale bridge is found, its address is filled in for you. If several are found, you'll see Found bridges — tap to use:, and you tap the right one. A bridge found by checking addresses is listed as Scale bridge next to its address.
-
If nothing is found, the message under the button says why (see If Scan Finds Nothing). You can always enter the bridge details manually:
Field Description Bridge IP The bridge's address on your network, e.g. 192.168.1.50Port The bridge's port (default 8899)Name A label for the scale, e.g. "Counter Scale" Protocol generic,auto,nci, orand. Readings are recognised automatically, sogenericis fine for most scales. -
Tap "Test." The register connects and shows the live weight below if it can reach the bridge.
-
Tap "Save." The scale is saved as this register's scale.
To go back to a USB scale, tap Remove scale (use USB instead).
If Scan Finds Nothing
Each message means something different, so read the one you get:
| Message starts with | What it means | What to do |
|---|---|---|
| iOS is blocking local network access | The iPad app isn't allowed to look for devices on your network. | Open the iPad's Settings app, find the POS app, turn on Local Network, then scan again. |
| This build cannot search the network | The app version on this device can't search for scales. | Update the app. In the meantime, enter the bridge IP manually and tell support your app version. |
| No printer bridge running on this machine to search with | Computer only. A browser can't search the network by itself, so it asks the Printer Bridge on this computer. None answered. | Start the Printer Bridge and scan again. If it's already running, download the latest Printer Bridge, because older versions can't search for scales. |
| The printer bridge searched this network and nothing answered | Computer only. The Printer Bridge on this computer ran the search and found no scale bridge. | Check the scale's Wi-Fi bridge is powered on and on the same network as this computer, or enter the IP manually. |
| Searched 192.168.0.x and nothing answered (with your network's numbers) | iPad. The search ran on the network shown and found no scale bridge. | Check the bridge is powered on and joined to your Wi-Fi. If the scale's address starts with different numbers (for example 192.168.1. instead of 192.168.0.), the scale and this device are on different networks, so put them on the same one. Otherwise enter the IP manually. |
| This device would not say what network it is on | The device couldn't tell which network to search. | Enter the bridge IP manually. On an iPad, once an address is entered or saved, scanning searches that address's network. |
On your router, set a DHCP reservation for the bridge so its IP never changes. Otherwise the saved address can stop working after a reboot.
If your role doesn't have Configure Scale, the panel shows the saved bridge address and a Reconnect button, but you can't change it. If no scale is saved, it says No scale configured for this register. Ask an admin to assign one.
Wi-Fi Scale in the Browser
A browser on a computer can't reach the scale's bridge by itself, so it goes through the Printer Bridge running on the same computer. The Printer Bridge passes the live weight through to the register, and it also runs Scan for scale for the browser. With a Wi-Fi scale saved and the Printer Bridge running, the browser register connects to the scale on startup, the same way the iPad app does.
More detail: reading the weight and weighing during a sale
Reading Weight
Live Weight Display
When connected, the scale sends continuous weight readings. The live reading appears in the Scale settings, the weight selection window, and the Scale Mode window:
| Indicator | Meaning |
|---|---|
| Weight value | The current reading (e.g., "3.5 g") |
| Unit | The measurement unit (g, kg, oz, lb) |
| Stable / In motion | Whether the reading has settled |
| OVERLOAD | Appears when the item exceeds the scale's capacity |
Stability
- Stable: the weight has settled and can be used.
- In motion: wait for the item to settle. The capture button stays disabled until the reading is stable.
Using the Scale During a Sale (Inline)
The default workflow is inline: pick the product, weigh it, and the weight is captured right in the weight selection window.
Weighing a Product
- Add the weight-based product to the cart (tap, search, or scan). The weight selection window opens.
- Place the product on the scale. For products with weight tiers, the live reading is pinned at the top of the window so it stays visible even on the iPad's smaller screen. For per-gram products it sits above the number pad.
- Wait for Stable. Once the pour reaches a tier, the reading turns green while it's on the tier or within the weigh-heavy give-away, and amber when it's over.
- Tap the capture button. Its label changes to match what it will do:
- Use Scale Weight (tier name): the pour reached a tier, so the product is added at that tier's price.
- Use _N_g: a per-gram product. The reading (rounded down if your store uses Per-Gram Round-Down) is added straight to the cart. The tap is the confirmation, so there's no second step. The number pad is still there if you need to type a custom amount by hand.
- The product is added to the cart at the captured weight with the price calculated.
For a product priced by tiers, a pour below the smallest tier is placed in the custom weight field so you can review it before adding. For a product sold only by preset weights, a pour below the smallest preset shows Below the smallest weight option instead.
Weigh-Heavy / Actual-Weight Capture
For deli-style flower you charge a tier but record what was actually poured. When the reading is over the charged tier:
- Within the weigh-heavy threshold (set in store settings): the extra grams are a free give-away. The reading shows +_N_g free in green, and the customer is still charged the tier price.
- Over the threshold: the reading shows +_N_g over in amber as a heads-up to pour some back.
The actual poured weight is recorded on the line, so inventory deducts what was really dispensed (the give-away comes out of real stock) and the give-away is reported. See the Give-Away (Weigh-Heavy) report in the admin for totals.
Per-Gram Round-Down
For per-gram products, your store can round a scale capture down to a clean step so the customer is never charged for the fractional grams above it. The step is set in store settings (Per-gram rounding: off, down to 0.5g, or down to 1g):
- At the 0.5g step:
11.3gis charged as11.0g,11.5gstays11.5g,11.7gis charged as11.5g. Common amounts like0.5gand3.5gstay exact. - At the 1g step:
11.3gis charged as11.0g, and bumps to12.0gonly at12.0g. - Off: the exact reading is charged.
Rounding only ever rounds down, so the customer never pays for the fraction. The actual un-rounded weight is still recorded on the line, so inventory deducts the real grams poured and the difference is tracked as a give-away. Round-down applies to scale captures only ("Use _N_g", auto-capture, and Scale Mode). A manually typed weight is used as-is.
Cart Give-Away Warning
If a weighed line ends up poured heavier than it's charged for (e.g. a 7g Quarter dispensed at 11.4g), the cart line shows a small +_N_g badge so the budtender can catch a mis-weigh at checkout:
- Muted when the give-away is under a gram (normal weigh-heavy slack).
- Amber warning once it's a gram or more over, a heads-up that someone may have poured too much.
Tare / Weigh-in-Bag
To weigh product in a bag, tray, or container:
- Put the empty bag/tray on the scale.
- Tap "Tare" next to the live reading. The reading zeroes out, so it now shows only the product weight you add.
- Pour the product and capture as usual.
- Tap "Untare" to clear the offset. It also clears when you disconnect the scale.
Tare is applied in Brother POS, so it works even if your scale hardware has no tare button. To re-zero on something new, tap Untare and then Tare again.
Manual Weight Entry
If the scale is not connected or not functioning:
- Add the weight-based product to the cart.
- In the weight selection window, type the weight using the number pad (or tap a preset). You can type up to three decimal places, for example
1.75or1.755grams. - Confirm the weight to add the product to the cart.
Manual weight entry is always available as a fallback, even when a scale is connected.
More detail: Scale Mode, auto-print labels and how the weight was entered
Scale Mode (Batch Weighing)
Scale Mode is an alternative weigh-station workflow, useful when one person weighs many pours and another rings them in, or when you want to weigh several items up front. It's turned on by setting the Scale capture mode to Scale Mode (weigh many, attach after) in store settings.
When it's on, a Scale Mode button appears in the cart action bar (whether or not the cart has items). The button only shows when a scale is actually connected on this register, so on a multi-register setup where only some lanes have a scale, the others don't see a dead button. Tap it to open the Scale Mode window:
- Weigh a pour and tap Capture. The weight is added to the list (e.g.
3.5 g). You can capture as many as you like before attaching any. - Drop a bad capture with the ✕ next to a weight, or tap Clear to empty the list.
- Tap a captured weight. The window closes and that weight is ready for the next product tap.
- Tap a weight-based product in the grid. The weight is attached to it, with no weight selection window. If more captured weights remain, the Scale Mode window re-opens so you can pick the next one.
- Tare/Untare is available right in the window, the same as the inline flow.
Attaching a weight in Scale Mode prices it the same way the inline weigh-out does. A tiered or preset product snaps to the tier the pour reaches (charge the tier price, record the actual grams as dispensed, with any overage tracked as a give-away). A per-gram product rounds down to the rounding step (see Per-Gram Round-Down). The raw weight is recorded as actual dispensed so inventory deducts what was really poured.
Auto-Capture When Steady
You can turn on Auto-capture when steady in store settings. When on, a fresh pour that holds steady is captured with no tap needed. The hold time is set by Auto-capture hold (seconds) in store settings (default 5 seconds); a new pour must stay settled for the full duration before it fires.
- Inline mode: a tier reading adds the item at the tier price; a per-gram reading adds it straight to the cart at the rounded-down weight.
- Scale Mode: a fresh pour held steady drops into the capture list, so you can weigh item after item hands-free, then attach them to products. Auto-captures when held steady shows in the window.
- Fresh-pour safety: auto-capture only fires after the scale has returned near-empty, so it won't grab a weight already sitting on the pan when the window opens, or fire on a small drift. It never fires at or near zero, and fires once per pour (clearing the pan re-arms it).
- Over-threshold safety (inline): for tiered/preset products, inline auto-capture won't add a pour that's past the weigh-heavy threshold. A fresh 13g pour settling onto a 7g tier is more likely a mis-pick than a 6g freebie. Instead it shows Too heavy to auto-add — tap to confirm so the budtender consciously commits. Per-gram products have no tier, so they're never blocked. (Scale Mode just queues the weight, with no charge until you attach it.)
- It's off by default. Many budtenders prefer to confirm each pour by hand.
Auto-Print Exit Label
If your register has Auto-print labels after sales turned on (in the POS Settings, label printer section), Brother POS prints the exit/bagging label whenever a weighed item is added: a preset tap, a per-gram entry, a scale capture, an add to an open tab, or a Scale Mode attach. The budtender never has to walk back to print a label.
How the Weight Was Entered
Every weighed line records how its weight was set, so managers can see who's actually using the scale versus tapping presets or typing weights by hand:
| Method | When it's recorded |
|---|---|
| Scale | A live scale reading: the capture button, auto-capture, or re-weighing a cart line. |
| Preset | A preset-button tap with no scale reading behind it. |
| Manual | A weight typed in by hand on the number pad. |
You don't do anything to set this; it's captured automatically when you commit the weight. It shows on the admin order page (each weighed line shows ⚖ Weighed on scale, Preset weight or Manual weight) and in the admin Give-Away (Weigh-Heavy) report's Scale usage by budtender summary. See Weigh-Heavy Give-Away.
Supported Units
| Unit | Full Name | Common Use |
|---|---|---|
| g | Grams | Cannabis and small quantities |
| kg | Kilograms | Bulk items |
| oz | Ounces | Cannabis (1 oz = 28g) |
| lb | Pounds | Larger bulk items |
The scale decides which unit to report. You can change the unit on the scale itself (typically with a button on the scale). Brother POS reads whatever unit the scale sends.
More detail: troubleshooting and best practices
Troubleshooting
| Problem | Solution |
|---|---|
| Scale settings missing | The Enable Scale Integration setting is off. Ask your admin to turn it on. |
| Web Serial API is not supported in this browser | You are using a browser that can't reach USB scales. Switch to Chrome or Edge on a computer, or use a Wi-Fi scale. |
| Device list shows no devices (USB) | The adapter isn't recognised, or it uses a chip that isn't listed (see Before You Begin). Try a different USB port or adapter. |
| Connected but no readings | Wrong speed or data format (USB). Run Auto-Detect, which tries both. If your scale only sends when you press its Print or Output key, see Auto-Detect. |
| Auto-Detect says nothing was received | Check the cable and that the scale is on. Then tap Read Raw Data and press the scale's Print or Output key while it listens. |
| Readings are garbled | Wrong speed or data format (USB). Run Auto-Detect, or use Read Raw Data to see what the scale is sending. |
| "Scan for scale" finds nothing | Read the message under the button. Each one says what went wrong. See If Scan Finds Nothing. You can always enter the bridge IP manually. |
| No "Scan for scale" button | Your role lacks Configure Scale. On a computer with no Wi-Fi scale saved yet, tap Scale on Wi-Fi instead (USR-W610 or similar) first. The Android app has no Wi-Fi scale option. |
| "Test" can't reach the bridge | Wrong IP or port, or the bridge is offline. Verify the address; reserve the bridge IP on your router so it doesn't change. On a computer, check the Printer Bridge is running. |
| Can't change the Wi-Fi scale | Your role lacks the Configure Scale permission. Ask an admin. |
| Wi-Fi scale won't connect in the browser | The Printer Bridge isn't running on this computer. See Printer Bridge. |
| Wi-Fi scale won't connect in the Android app | The Android app reads USB scales only. Use a USB scale on Android. |
| OVERLOAD | The item exceeds the scale's weight capacity. Use a higher-capacity scale. |
| Weight reading fluctuates | The item has not settled. Wait for Stable before capturing. Make sure the scale is on a level, vibration-free surface. |
| Scale disconnects randomly | Check the USB cable connection, or the bridge's network and power for a Wi-Fi scale. A loose adapter can cause intermittent disconnections. |
Best Practices
- Tare before weighing in a bag or tray. Use the in-app Tare button to zero out the container, even if your scale has no hardware tare.
- Wait for stability. Capture the weight when Stable is showing.
- Keep the scale clean. Product residue on the weighing platform affects accuracy.
- Use Auto-Detect on first setup (USB). It saves guessing the speed and format.
- Reserve the bridge IP (Wi-Fi). A DHCP reservation keeps a Wi-Fi scale reachable after reboots.
- Have manual entry as a backup plan. Train staff on manual weight entry so they are not blocked if the scale has issues.
- Place the scale on a stable surface. Vibrations from foot traffic or other equipment can cause inaccurate readings.
What's Next?
- Scales (Admin) — Store-wide scale settings and the deli workflow
- Printer Bridge — Needed for a Wi-Fi scale in a computer's browser
- Barcode Scanner — Set up barcode scanning for fast product lookup
- Receipt Printing — Configure receipt printers
- Making a Sale — The complete sales workflow including weight-based products